Configure open invoice tables in HTML invoice templates
This article demonstrates how to configure open invoice tables in HTML invoice templates through the Zuora UI. All open invoices are associated with one account. An open invoice indicates that the balance of the invoice is not 0.
To configure an open invoice table, perform the following steps:
-
In the HTML invoice template editor, choose a blank row in the Blocks tab, and then drag the row into the HTML template.
-
Click Add Content in the Rows block.
The Content tab is displayed in the right panel. -
In the Content tab, drag the Data Table component into the HTML template.
-
Click the Data Table block in the HTML template.
The Content panel is displayed on the right of the template editor. - In the Data Table section, configure the following table information by adding different columns:
-
From the Table Object list, select Account: Account, and then select Invoices: list of Invoice from the displayed drop-down list.
-
In the Columns subsection, click Add in the Header column to add a column to the data table.
-
In the displayed Add Column dialog, configure the following column information:
- From the Field list, select a field that belongs to the Invoices object, for example, InvoiceDate.
- In the Function field, enter the
Localisefunction to format the date. To learn about the details of theLocalisefunction, see Functions used in merge fields. - In the Header field, enter a name for the selected field to display in the data table, for example, Invoice Date.
- Click Add to save the column information.
A column with the Invoice Date header is added to the data table.
-
In the Columns subsection, click Add in the Header column, and configure the following information in the displayed Add Column dialog:
- From the Field list, select a field that belongs to the Invoices object, for example, InvoiceNumber.
- In the Header field, enter a header name for the selected field to display in the data table, for example, Invoice Number.
- Click Add to save the column information.
A column with the Invoice Number header is added to the data table.
-
In the Columns subsection, click Add in the Header column, and configure the following information in the displayed Add Column dialog:
- From the Field list, select a field that belongs to the Invoices object, for example, DueDate.
- In the Function field, enter the
Localisefunction to format the date. To learn about the details of theLocalisefunction, see Functions used in merge fields. - In the Header field, enter a header name for the selected field to display in the data table, for example, Due Date.
- Click Add to save the column information.
A column with the Due Date header is added to the data table.
-
In the Columns subsection, click Add in the Header column, and configure the following information in the displayed Add Column dialog:
- From the Field list, select a field that belongs to the Invoices object, for example, Amount.
- In the Function field, enter the
Round(2)|Localisefunction to format the currency-related field. - In the Header field, enter a header name for the selected field to display in the data table, for example, Amount.
- Click Add to save the column information.
A column with the Amount header is added to the data table.
If you want to add the currency symbol before the amount, perform different steps to add an Amount column as follows:
- Enable Advanced Options next to the Field field.
- In the Field field, enter the
{{Invoice.Account.Currency|Symbol}}{{Amount|Round(2)|Localise}}fields. - In the Header field, enter a name for the header to display in the data table, for example, Amount.
- Click Add to save the column information.
A column with the Amount header is added to the data table.
-
In the Columns subsection, click Add in the Header column, and configure the following information in the displayed Add Column dialog:
- From the Field list, select a field that belongs to the Invoices object, for example, Balance.
- In the Function field, enter the
Round(2)|Localisefunction to format the currency-related field. - In the Header field, enter a header name for the selected field to display in the data table, for example, Balance.
- Click Add to save the column information.
A column with the Balance header is added to the data table.
-
In the SortBy subsection, click Add in the Field column, and configure the following sorting information in the Add Sort By dialog that is displayed:
- From the Field list, select the InvoiceDate field.
- From the Order list, select ASC.
Selecting ASC can sort invoices in the data table by invoice date in ascending order. - Click Add to save the sorting configuration.
-
In the Filters subsection, click Add in the Field column, and configure the following filtering information in the Add Filter By dialog that is displayed:
- From the Field list, select the Balance field.
- From the Operator list, select >=.
- In the Value field, enter 0.
- Click Add to save the filtering configuration.
The configuration can filter invoices whose balance is greater than 0.
-
-
To not display the open invoice table if no open invoice is available, perform the following steps to add conditional logic. To learn about how to use merge fields to conduct basic logic control, see Logic control and looping.
- In the HTML invoice template, drag the Columns component into the position above the open invoice table.
- Click the Rows block, and then click Add Content in the block.
The Content tab is displayed in the right panel. - In the Content tab, drag the Text component into the HTML template.
- In the Text block, replace the default text with the following input:
{{^Invoice.Account.Invoices|FilterByValue(Balance,GE,0)|IsEmpty}}: the conditional logic in the first line- Open Invoices: the text with its font configured as bold and 16px in the second line
- Drag another Columns component into the position below the open invoice table.
- Click the Rows block, and then click Add Content in the block.
The Content tab is displayed in the right panel. - In the Content tab, drag the Text component into the HTML template.
- In the Text block, replace the default text with the following input:
{{/Invoice.Account.Invoices|FilterByValue(Balance,GE,0)|IsEmpty}}: the closure of the conditional logic
-
In the HTML template editor, click Save to save the HTML invoice template with the open invoice table.
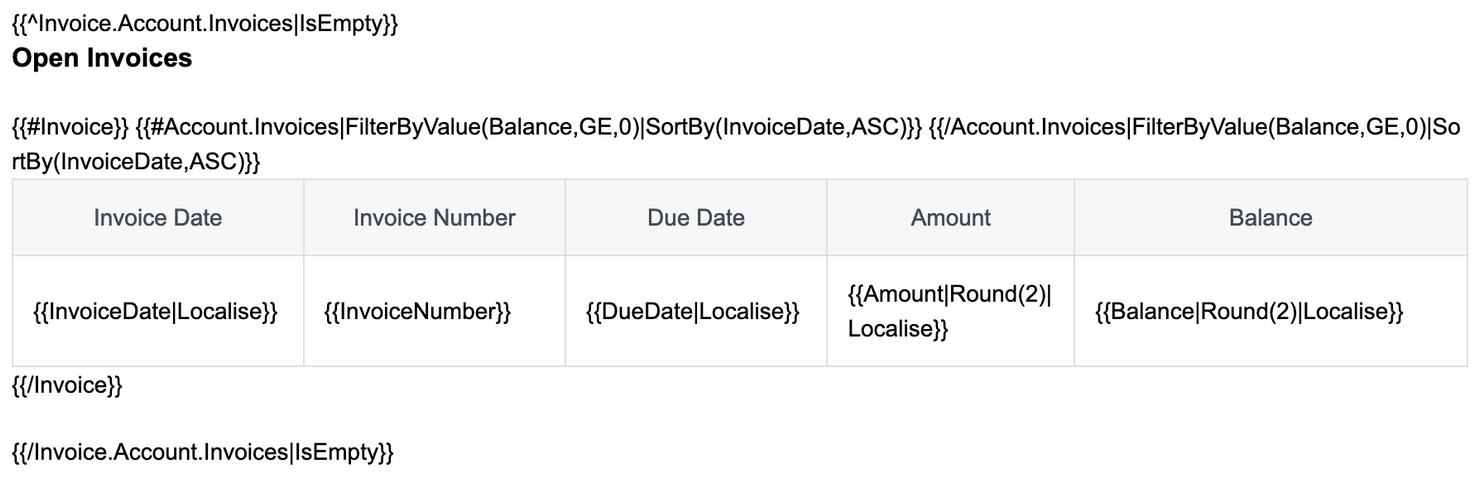
The following image shows the open invoice table that is displayed in the HTML invoice template.