List Filter Configuration Settings
List Filters
Salesforce administrators can set up List Filters that get applied to List Components during the quoting flow. The List Filters improve the efficiency of the quoting process by surfacing only the relevant items in the lists. For example:
- If you add a filter condition to the Rate Plan List, "Product Rate Plan.Service Region = Quote.Service Region", during the quote creation process, your users will only see the rate plans that are available in the service region that the user specified on the quote. In this example, the Service Region field would have been added as a custom field on the Product Rate Plan object and the Quote object .
- If you have a filter condition, "Billing Account.Status = Active", where Active is a static value, only the accounts with the Active status will be listed when user selects a billing account during the quote creation process.
You can add List Filters to the lists that were implemented via the List component, the QuickList component, or the Lookup component.
See Configure a List Filter on a Custom List Component for adding a List Filter to your custom List Component instances.
This setting is effective exclusively in legacy CPQ and does not apply to CPQ X.
Configure List Filters
Salesforce administrators can view and edit List Filters as described in this section.
To configure a List Filter:
- On the Zuora Config tab, click List Filter Configuration Settings. A list of List Filters appears.
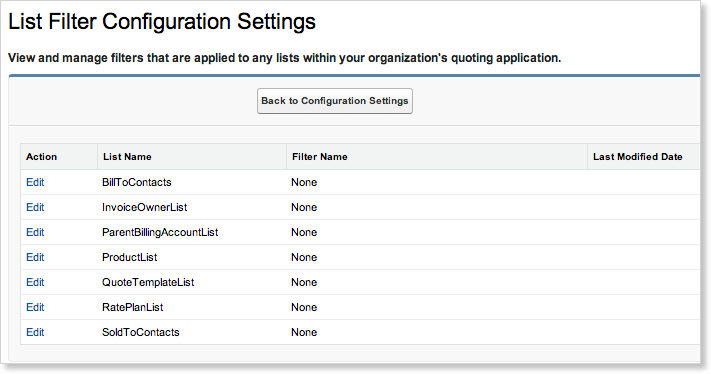
- Click Edit for the list for which you want to view or edit the List Filter.
- On the Edit Filter page, you can optionally enter a description in the Filter Description field.
- In the Filter Condition section, add, edit, or remove a custom filter condition.
- To remove a custom filter condition, click X Remove.
- See below for adding or editing a filter condition.
- You cannot edit or remove the pre-defined system conditions marked with a lock icon.
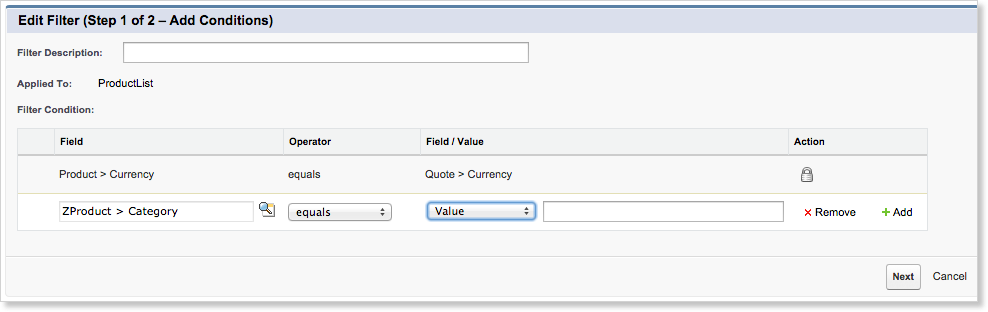
- Click Next to save your changes and to join filter conditions. The Current Segmentation shows the saved segmentations, and even if you remove a condition, the segmentation text is not refreshed until you click Next.
To add or edit a custom filter condition to a List Filter:
- In the Filter Condition section on the Edit Filter page, click + Add to add a new condition, or proceed to the next step to edit an existing filter condition.
- In the Field field, click the lookup icon.
- Click the object and the field on which you want to filter. The field does not have to be displayed in the UI, but it has to be a field of the object being displayed.
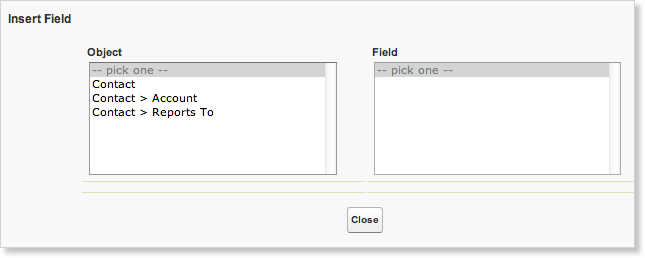
- Click Close.
- Click the Operator field, and select the comparison operator you want to use in the condition.
- Click the Field / Value field, and select Value to use a static value as a filter value. Then enter a static value in the next field.
- If you entered a string type of field in the Field field in Step 2, enter a string value without double quotes or single quotes in this field.
- If you are entering a date/time value, use the format: yyyy-MM-dd HH:mm:ss
- Alternatively, click the Field / Value field, and select Field to use an object field as a filter value. Click the lookup icon in the next field, and select the object and the field as a filter value. Click Close.
- The Current Logic field shows the saved conditions, and even if you added or changed a condition, the logic text is not refreshed until you click Next.
- Click Next to save your changes and to join filter conditions.
To reset custom settings on a List Filter:
When you reset a List Filter, the custom settings on the filter, such as the filter description or custom filter conditions, are removed. The pre-defined system filter conditions are not reset with the Reset action.
- On the Zuora Config tab, click List Filter Configuration Settings.
- Click Reset next to the filter you want to reset.
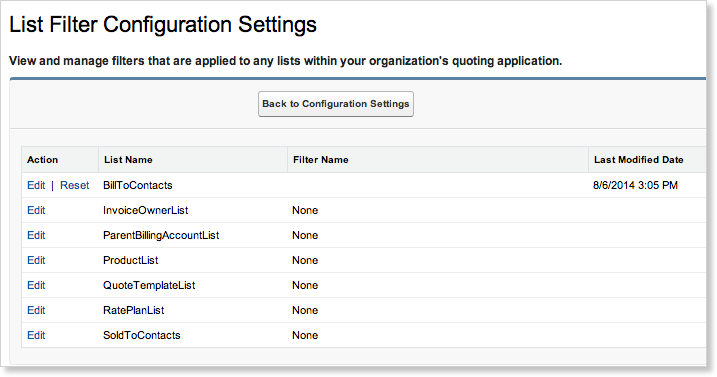
- Click Reset to confirm.
