Translate and Localize Payment Pages 2.0
This article describes how to add translations to your Payment Pages 2.0.
On the Add Translations to Hosted Payment Method page, you can do the following to add one or more translations to the payment page:
- Download Resource Bundle Template.
- Use the Resource Bundle Template to create a Resource Bundle translation file.
- Upload the translated Resource Bundle file and assign a locate to the translations.
Download Resource Bundle Template
The Resource Bundle Template is the template file you use to create translation files for Payment Pages 2.0.
To download the Resource Bundle Template:
- On the Preview Hosted Payment Method Page, click Go to the localization and translation setup page in the Page Preview section. Alternatively, in the Hosted Pages List, click Translate for the Payment Page.
- On the Add Translations to Hosted Payment Method page, click Resource Bundle Template to download the template file.
Translate Payment Pages 2.0
After you download the Resource Bundle Template, you edit the file to provide translations.
To localize the texts and labels on a Payment Pages form:
- Open the downloaded Resource Bundle Template file,
resource_bundle_template.txt, in a text editor, and type the translated labels and texts for the keys. See the table below for descriptions of the keys. - Save the resource file with a clearly identifiable locale name, e.g.
resource_buncle_fr.txtfor the French translation file.
The following European languages must be saved and uploaded using the ISO-8859-1 encoding for the Payment Page form to be correctly displayed in those locales:
- French
- Canadian French
- Italian
The following keys are available in the Resource Bundle Template for translation in all types of Payment Pages. There is a specific set of keys for each payment method type of Payment Pages.
| Key | Description |
|---|---|
| page.label.required | Legend text for the required field mark |
| page.title | Payment Pages 2.0 form title |
| page.desc | Payment Pages 2.0 form description |
| page.selectOne | Instruction text for the credit card expiration date pull-down menu |
| page.label.submit | Label for the submit button |
| page.message.requiredField | Error message for missing required fields |
| page.message.creditCard.blacklistedBin | Error message for an invalid card prefix string defining cards that cannot be added |
| page.message.creditCard.cityBlocked | Error message for an invalid city |
| page.message.creditCardNumber.invalidCreditCard | Error message for an invalid credit card number |
| page.message.creditCardType.invalidCreditCardType | Error message for an invalid credit card type |
| page.message.creditCardType.invalidCreditCardCVV | Error message for an invalid CVV |
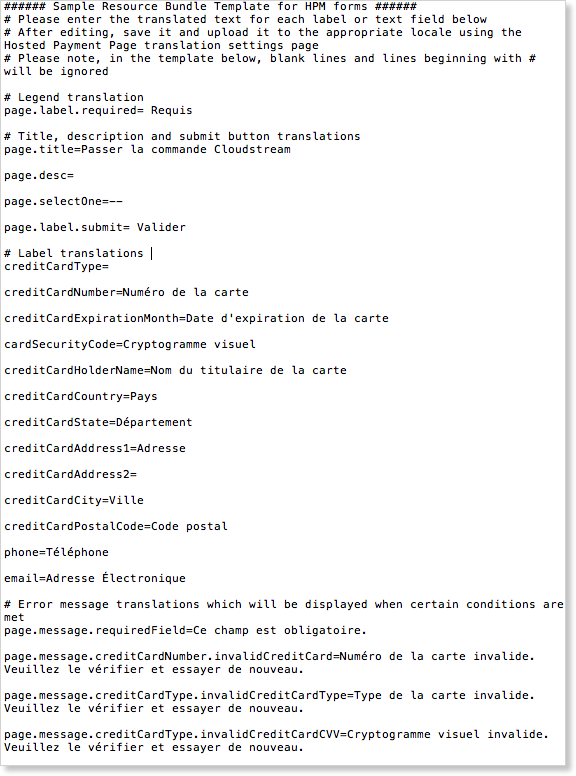
Here's a sample resource file translated in to French:
Upload the Translated Resource File and Assign a Locale
To upload the translated resource file:
- On the Add Translations to Hosted Payment Method page, click the Locale field and select the locale for the resource file that you are about to upload.
- Click Choose File.
- Select the file you translated and click Open.
- Click upload.
- Click preview hosted page to preview the payment page in the translated locale.
Configure Payment Pages 2.0 in Multiple Languages
Once you have uploaded your translations, your payment form can be displayed in multiple languages. In your client code, add a logic to assign the client locale parameter based on the client locale setting. At runtime, the translation is dynamically loaded based on the logic, and your payment form is displayed in user's locale.