Configure Portal Features
Configuration steps
After you have configured the user interface of the portal, you are ready to configure the data and features for your portal.
- In the Setup page of your Ecommerce Portal instance, click the CONFIGURATION tab.
- Complete the information in the Domain Information section.
- The Customer Portal URL displays the URL of the portal login page. You need to submit a ticket at Zuora Global Support to change the system-assigned portal URL to a domain owned by your company.
By default, the portal URL is in the format ofhttps://apps.ecommerce-portal-<number>.zuora.com
You can change it to something like the following URL:https://payments.<yoursite>.com
- Select a default route from the Set Default Route dropdown list. The default route identifies the landing page which end users will be directed to when accessing the portal. The available routes upon installation are:
- login - Direct end users to the login page of the portal.
- products - Direct end users to the products page of the portal. The products page displays all products in the Customer Catalog. This route is only available if you are using the Subscriber Portal with the Subscription Management feature enabled.
- The Customer Portal URL displays the URL of the portal login page. You need to submit a ticket at Zuora Global Support to change the system-assigned portal URL to a domain owned by your company.
- (Optional) In the SSO Providers section, set up an SSO provider.
- Click + Add new provider. The New Provider dialog is then displayed.
- Select the name of the identity provider you are using for SSO from the Name dropdown list. Subscriber Portal now supports the following types of SSO providers:
- auth0: Select if you are using the Auth0 provider.
- okta: Select if you are using the Okta provider.
- jwt: Select if you are using JSON Web Token (JWT) SSO. Subscriber Portal currently supports HS256 and RS256 as the JWT algorithms.
- saml: Select if you are using the SAML identity provider.
- Complete other settings based on the selected value from the Name dropdown list. See the Settings for different provider types section below for more details.
- Click Create Provider.
- In the Cutover Date section, set the effective date for all viewable customer information. The cutover date filters the transactional data and prevents the data before this date from being viewed in the portal. For example, the cutover date is useful when migrating from one portal or system to the Subscriber Portal. It prevents the legacy data used for the catch-up bill run migration from being displayed.
The system will pull the transaction data after the cutover date (exclusive of the cutover date). For example, if you would like to show all data after September 1, 2019, you should enter 2019 August 31 for the cutover date.
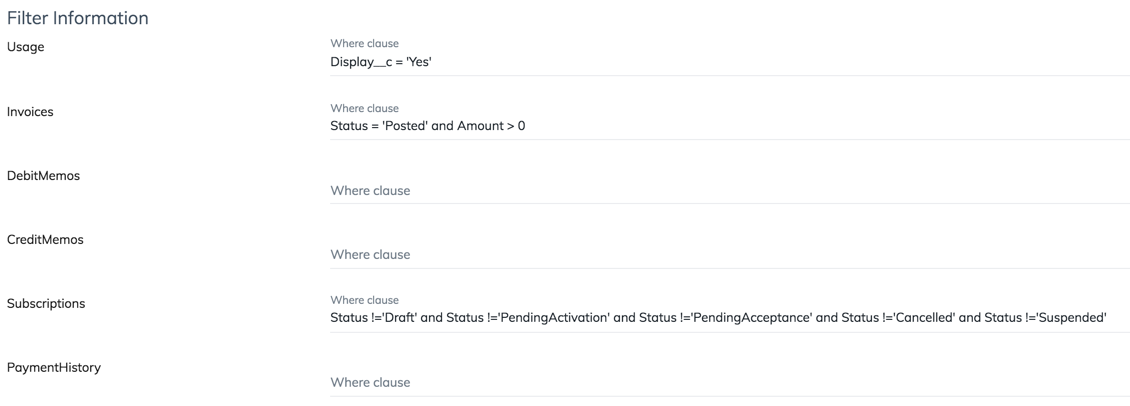
- In the Filter information section, you can customize your own filters to locate the desired resource.
Note: The REST APIs for Usage, Debit Memo, and Credit Memo do not support filters, so the statement is currently evaluated as a string. This means the filter conditions like dates and numbers cannot work as expected for these objects apart from the=comparison.

- Configure the Payment Page details in the portal. You must ensure that you have created a Payment Page in your Zuora tenant. See Create a Hosted Payment Page in Zuora for more information on how to create a payment page in your Zuora tenant. Note that when creating a new Payment Page in Zuora, you must complete the Basic Information pane as follows:
After a Payment Page in Zuora is created, complete the following fields based on the Payment Page configuration:
Click + Add new payment page to add additional payment pages if you have more than one Payment Page.
- In the Hosted Domain field, enter the Customer Portal URL displayed in Configuration tab.
- Enter
/dashboardin the Callback Path field.

- Type - The payment method type that will be captured by the payment page.
- Name - The name displayed to end users to describe the type of payment methods.
- Payment Page Id - The ID provided by the corresponding Hosted Payment Page configured in Zuora. In order to obtain the Payment Page Id, navigate to Settings > Payments > Setup Hosted Pages > Actions > Show Page ID in your Zuora tenant.
- (Optional) Enter the Promo Code URL and Promo Code API Token of your Promo Codes app instance in the Promo Code Settings section. Promo Codes is a separate app that you can purchase in Zuora Marketplace, and is not required for the Subscriber Portal's use.
- in the Payment Constraints section, enter the minimum and maximum amounts of payments that will be accepted via the portal. The default amount is dependent on the selected currency in Zuora environment.
- In the Tenant Information section, complete the configurations.
- Select the time zone associated with your Zuora tenant. Aligning the portal time zone with your Zuora tenant time zone can avoid errors when making payments.
- Select the Enable zuora orders check box if your tenant uses the Zuora Orders feature.
- Select the Enable zuora invoice settlement if the Invoice Settlement feature is enabled for your tenant. Depending on whether the Invoice Settlement feature is enabled, your Zuora tenant uses different sets of APIs to process payments, unapplied payments, and so on. This setting is to ensure that your portal uses the same APIs as your Zuora tenant.
- Select the Enable credit and debit memos check box if you want to expose credit memos and debit memos to end-users. With this setting enabled, tabs for credit memos and debit memos will be displayed in the portal.
- In the Feature Configuration section, enable the features for the portal .
- User Roles - This feature enables you to restrict the accessibility of the portal to certain Zuora contacts. To restrict the accessibility of the portal, you must create a custom field on the Contact object called KongRole with one of the following values in your Zuora tenant:
A contact can be associated with multiple accounts. If a contact is whitelisted in one account and blacklisted in another, he can view the details of the account with the whitelist role setting, but cannot view the details of the account with the blacklist role setting.
This feature is an Admin Option and is not enabled by default. Submit a request at Zuora Global Support to enable this feature.
- whitelist - Allows a contact to view all information and perform all functions in the portal.
- blacklist - Prevents a contact from viewing the information of this account in the portal.
- Shopping - This feature enables you to acquire customers through an E-commerce shopping experience. (This feature request is in progress and not available for use at the moment.)
- Usage Screen - This feature enables a Usage page in the portal that displays Usage data.
- User Roles - This feature enables you to restrict the accessibility of the portal to certain Zuora contacts. To restrict the accessibility of the portal, you must create a custom field on the Contact object called KongRole with one of the following values in your Zuora tenant:
- In the Configure Your Custom Endpoints section, add in a query in Zuora Object Query Language (ZOQL) to obtain the information to be displayed in the portal. See ZOQL for more information.
- In the Field Display Configuration section, configure the fields that will be viewed and edited by end users in the portal.
- Click Account Fields, Contact Fields, or Usage Fields.
- Select the check box for the desired fields.
- For Account Fields and Contact Fields: You can optionally enter the custom name for each field. Note that any edit completed by end subscribers will be displayed within their account or contact information stored in your Zuora tenant.
- For Usage Fields: The following default Usage fields and any other Usage field configured in your Zuora tenant will be viewed by end users: Subscription Number, Submission Date Time, Unit of Measure, Start Date Time, and Quantity.
- Click Done to save the configuration.
- In the Password Strength section, select the password strength requirements for end users in the dropdown list.
Password strength is applied when portal users create or reset portal passwords. You can also create a password strength by entering a Regex expression. For example, to ensure a special character is included, enter a Regex expression that includes any of these characters (@$!%*?&).
This setting is not available in the admin portal for solutions using SSO. - In the Configure Your Translations text box, provide user-friendly translations of the pre-defined identifiers in Zuora. The default translation is automatically populated and available for editing.
- Select the default language for the portal in the Pick Default Language dropdown list. Note that this setting will change the language for only the portal instead of your Zuora tenant.
- Click Save Settings to save the configuration.

Settings for different providers
Subscriber Portal supports various types of SSO providers. The following table describes the settings you should configure for each provider:
| Setting | auth0 and okta | jwt | saml | |
|---|---|---|---|---|
| Client ID |
Required The Okta or Auth0 client ID. |
N/A | N/A | |
| URL |
Required The URL where your users should sign in. For example, |
N/A |
Optional The URL where your users should sign in. For example, |
|
| JWT Token Validator | N/A |
Optional Enter a JWT token and click Validate to validate your JWT token. It will indicate what fields are missing and what values might be incorrect. You must first save your JWT provider with your secret or public key before validating the JWT token. The validator can be used for both HS256 and RS256 tokens. Note: This form cannot indicate whether |
N/A | |
| JWT Algorithm | N/A |
Required You can select from the following algorithms:
|
N/A | |
| Public Key | N/A |
Required for RS256 Must be in the PEM format. See jwt.io for more examples. |
N/A | |
| Secret Key |
Required The Auth0 or Okta client secret key If the secret key is base64 encoded, select the Is key base64 encoded checkbox. |
Required for HS256 The shared secret key used to verify your JWT. If the secret key is base64 encoded, select the Is key base64 encoded checkbox. |
N/A | |
| IDP Certificate | N/A | N/A |
Required This field is only available if you use the SAML provider. It is the signing certificate of your identity provider. Enter the certificate from your IDP’s metadata. The certificate should be in the PEM format. |
|
| User Lookup Field |
Optional By default, the provider searches for the If you use something other than |
Optional By default, the provider searches for the If you use something other than |
Required This field is the name of the SAML auth response attribute that the provider will look for to log in users by matching the value of this field against the UID of users registered in the portal. In this setting, you should specify the name of the attribute containing this information in the name format used by the IDP, instead of its user-friendly name. For example, if your IDP uses the name format like |
|
| Account ID Field |
Optional Since users can be associated with multiple accounts in Zuora, you can optionally specify a Zuora account ID in the auth response that users see upon logging in. To specify this setting, enter the field name the provider should search for. This can be the name of any top-level key in the auth response. |
Optional Since users can be associated with multiple accounts in Zuora, you can optionally specify a Zuora account ID in the auth response that a user should see upon logging in. To specify this setting, enter the name of the field in the JWT payload the provider should search for. This can be the name of any top-level key in the auth response. |
Optional Since users can be associated with multiple accounts in Zuora, you can optionally specify a Zuora account ID in the auth response that a user should see upon logging in. To specify this setting, enter the name of the field in the auth response attributes the provider should search for. Similar to User Lookup Field, this should be specified in the name format used by the IDP. After creating a SAML provider in the admin portal, you can access the Subscriber Portal metadata at |
|
Additional information
- If you use JWT SSO, the provider requires that the JWT payload contains the
iatandjtifields for security purposes. - Once a secret or public key is saved on the provider, you must click the Replace button next to the field to clear and change it again.
- If you use the SAML provider, after creating a SAML provider in the admin portal, you can access the Subscriber Portal metadata at
<portal url>/auth/saml/metadata. Use it to configure your IDP to trust the portal as a service provider.
Important URLs
<portal url>/auth/{provider_name}/starts the handshake on the portal side. The{provider_name}should be okta, auth0, or saml, and cannot be jwt.<portal url>/auth/{provider_name}/callbackis where the portal expects the authentication response. The{provider_name}should be okta, auth0, jwt, or saml. If you use jwt as the provider, the token must be passed as a query parameter or as form data (hidden field). The token parameter name can be either jwt or id_token.
What to do next
Now you are ready to work with Subscriber Portal.