Billing: CustomBillingDocument
The custom billing document task generates a billing document PDF file based on an HTML template, and then attaches the generated PDF file to the billing document that is Draft or Posted status. You can customize your billing document template using HTML tags, CSS, images, JavaScript and Liquid expressions.
If Invoice Settlement is not enabled, only generation of invoice files is supported. If Invoice Settlement is enabled, generation of credit memo and debit memo files is also supported.
Compared with the Microsoft Word Mail Merge invoice template in Zuora, an HTML template provides more advanced controls as well as more room for customization.
A valid HTML template should include three parts: body, header, and footer. The body part is specified in the Template tab. The header and footer parts are specified in the Advanced Settings tab.
For PDF generation, the task uses the page.pdf component of the Puppeteer Node library. For attaching PDFs to billing documents, the task uses the Zuora API that uploads files for billing documents. For each billing document, a maximum of 50 PDF files can be uploaded. For details about the API operation, see Upload File For Invoice in the API Reference.
To test the output of your template, save your template as an HTML file and open it in Chrome (version 77.0.x or later). You can then select Print and use Save as PDF as the destination. The maximum size of a PDF file to upload is 4 MB. If the size of the saved PDF is greater than 4 MB, you need to downsize your template accordingly.
For a complete use case and template code examples, see the "Custom Invoice" workflow template under the Invoicing category. This template is explained in Customize invoice templates using HTML.
A timeout error will occur if this task is not completed in 3 minutes.
Task settings
Template
- Document Type: Select the billing document type.
- Document Id: Select or specify a data field to identify the billing document. Ensure you retrieve document IDs in upstream tasks.
- Template: Enter your body template in this text area. The header and footer of your template should be entered in the Advanced Settings tab.
- Enable Email: Select this option if you want to send the generated billing document to the selected email address.
- Include additional email: Select this option if you want to send the generated file also to the billing document owner via email.
- Use email template: Select this option if you want to use the default email template (instead of the HTML template) in the emails.
- Preload Data: Select this option to automatically load invoice data according to the invoice ID instead of querying the data.
If you need to use custom fonts in your template, ensure to use font binary in the template instead of loading fonts from a website to avoid performance issues.
Advanced Settings
- Paper Size: Select the page size that you want to use. The options include Letter, Legal, Tabloid, Ledger, A0, A1, and A2.
- Margin Left, Margin Right, Margin Top, and Margin Bottom: Margins are in pixels. See the diagram below for the different parts and margins of a template. Ensure that the margin-top is greater than the height of the header template, and the margin-bottom is greater than the height of the footer template.
For example, if your header HTML is 200 px high, you must specify a number larger than 200 for the margin-top, in order for the header HTML to display on the document. You also need to consider padding above and below the header and footer templates.
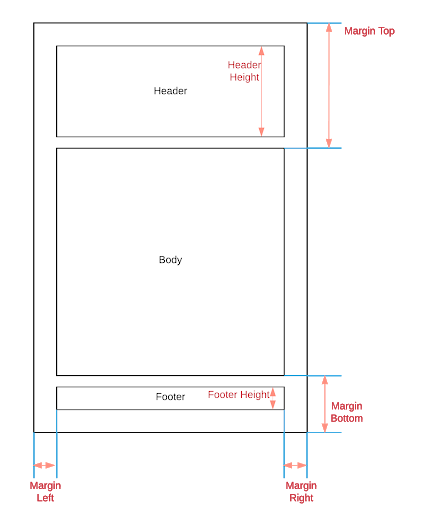
- Header Template and Footer Template: The header and footer templates are HTML templates. Javascript and online fonts or images are not supported in the header and footer templates. To use images in the header or footer, convert them into Base64-encoded strings.
You can download a header template example and a footer template example and start to build your own templates.
To test the sizes of your header and footer, save the HTML and view it in the Chrome browser. You may need to test-run the workflow to see how the margin values affect the layout of the document.
Data manipulation in HTML templates
There are two ways you can manipulate data to be used in HTML templates.
- Use <script> tags within the HTML template.
If you want to do simple data evaluation and manipulation, you can take this approach. See the section below for details. - Use a JSON Transform task prior to the Custom Invoice task.
If you need to do complex data grouping and sorting, you can take this approach. Complete the data manipulation using the JSONata processor in the JSON transform task and then use Liquid to reference the transformed data in the custom invoice task.
To learn more about the JSON Transform task, see Logic: JSON Transform.
Using <script> tags within the HTML template
You need to enclose your JavaScript code within <script> tag. To insert JavaScript code into the HTML template, use the standard HTML DOM methods (getElementById element and innerHTML property).
Below is an example of including <script> element in an HTML template. Note that the <script> is placed after the <body> element. This is to ensure that the "invoiceItemQuantity" element exists before you use the innerHTML property to set the value of this element.
<!doctype html>
<html>
<head>
<style>
.invoice-box, .invoice-box table {
           width: 100%;
           line-height: inherit;
           text-align: left;
           table-layout: fixed;
           background-color: transparent;
           border-collapse: collapse;
           max-width: 800px;
           font-size: 12px;
           font-weight: 300;
           font-family: 'Gill Sans', sans-serif;
       }

</style>
</head>

<body>
<div id="invoiceItemJSON"></div>
</body>

<script>
   const invoiceItems = {% if Data.InvoiceItem %}
                           {{- Data.InvoiceItem | to_json -}};
                       {%- endif -%}
   var firstInvoiceQuantity = invoiceItems[0].Quantity;
   document.getElementById("invoiceItemQuantity").innerHTML = firstInvoiceQuantity;
</script>
</html>
In the JavaScript code, you can reference the data in the payload of the workflow using Liquid. A Liquid logical statement starts with "{%" and ends with "%}". A Liquid data expression is enclosed within " and ". The Custom Invoice task parses Workflow data in Liquid before processing the whole <script> code.
You can reference external JavaScript libraries.
To include images in body, header, or footer templates, use the <img> HTML tag. To include images in these templates, convert the images into Base64-encoded strings and reference the strings in the <img> tag. For the body template, you can also use an online image by specifying its URL as the value for the src attribute in <img> tag.
Using external fonts in templates
You can use external fonts in templates. To do so, complete the following steps:
- Download the font file that you want to use in your invoice templates.
- Convert the font file to WOFF.
- Generate a Base64 string for the WOFF file.
- Use the @font-face rule to define this font in your CSS. For example:
@font-face { font-family: 'your-font-name'; src: url(data:application/x-font-woff;charset=utf-8;base64,PASTE-BASE64-HERE); font-style: normal; font-weight: 400; } - Reference the font with the font name that you define in Step 4. For example:
.invoice-box.header {
    width: 100%;
    margin-left: 10px;
    margin-right: 10px;
    margin-top: 10px;
    font-size: 11px;
    text-align: left;
    font-family: 'your-font-name';
  }
For more information about how to encode a font file with Base64, see this page.
View the output
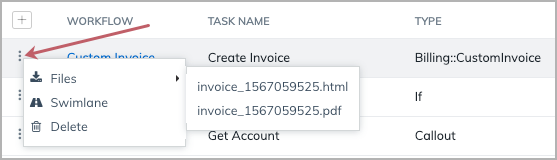
If the task runs successfully, you can view the output in the Tasks tab. Click the menu icon on the left of the task and hover on Files. You can select either the HTML or PDF version of the document. The PDF file is generated based on the HTML file. If you want to do one-time changes, you can modify the HTML file and then generate a PDF file based on the HTML file.
You can also view the PDF in Zuora UI. It is shown in the History section of the specific document.
An invoice PDF that is attached by a Custom Invoice task is marked as "uploaded". An invoice PDF that is generated using the template in Zuora is marked as "generated".

If you regenerate the billing document PDF from Zuora, the default Microsoft Word Mail Merge template will be used. If you want to regenerate the billing document PDF using the HTML template, you need to run the workflow again.