Configure Apple Appstore Connector
The Appstore Connector app is not available for sale now. However, we will continue to support it for customers who already purchased this app.
After installing the Zuora to Apple Appstore Sync app, take the following steps to set up the app:
- Configure the product rate plan
- Add custom field
- Create a Zuora account and subscription
- Configure the schedule of the Sync
Configure Product Rate Plan
You must ensure the product rate plans in Zuora are configured to match the pricing or free trial periods defined in the Apple app. Each Apple receipt should include only one Zuora subscription to a product. Currently, the Apple Appstore Connector does not support discounts or the use case where multiple products are included in one Apple receipt.
Add Custom Field
Take the following steps to add the custom field for Apple Appstore Connector:
- Navigate to Platform > Object Manager in the left navigation menu, and then click the Standard Objects tab.
- Locate the Subscription object and click Subscription in the Label column.
- Click the Create icon
 to add a custom field with the following information:
- Name: SourceSystem
- (Optional) Description: Custom field for Apple Appstore Connector.
- Field Type: Picklist
- Max Length: 20
- Picklist Options: Apple
- Do not select the Required check box.
Note that the
SourceSystemcustom field should only be created once for all Appstore Connectors, including Amazon, Apple, and Google Play. If theSourceSystemcustom field already exists, add Apple to the Picklist values.
- Click Save & Close to save the field.
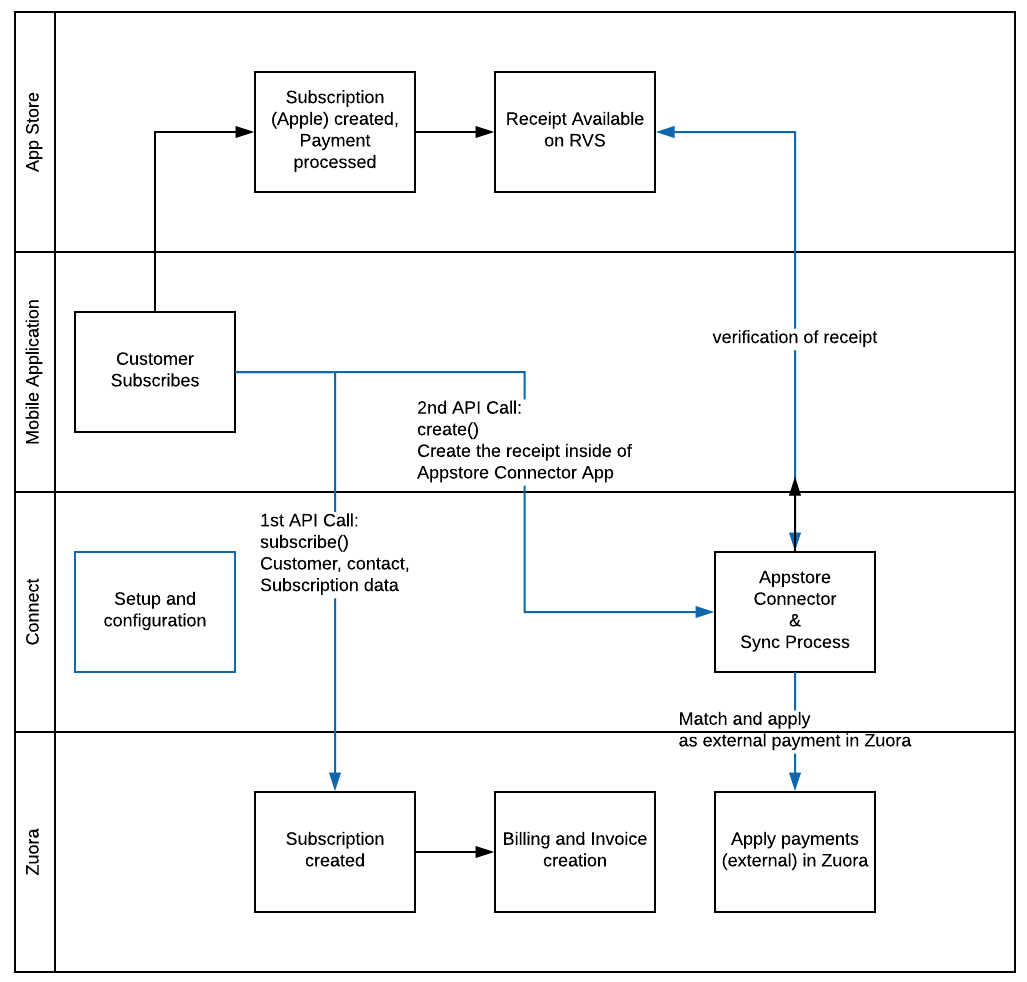
Create Zuora Account and Subscription
When an end-user purchases an Apple app, their Apple user credentials are validated. A subscription in Apple App Store is created and a receipt ID is generated after the validation. The Apple app will then make a request to Zuora through the Subscribe API to create the end user’s Zuora subscription ID. The SourceSystem__c custom field is included in the Subscribe request. The subscription ID is then transferred back to the Apple app and aligned with the Apple receipt ID.
The Apple app will then use the configured Create API request to the Appstore Connector to create the receipt in the Appstore Connector app. A curl request is provided in the Sample curl request (API Token) section in the Settings tab. Use this curl request to send the subscription number and receipt ID in Apple to the Appstore Connector app.
Note that neither Zuora nor the Appstore Connector app processes any payment. All payments are handled through the Apple App Store.
Apple Receipts and Zuora Subscriptions
The execution of the Appstore Connector depends on if the term-start and term-end dates of Zuora invoice items match the set period in Apple. You should ensure that the non-renewable subscriptions and their auto-renew settings align with the app's charge periods. Failure to align the subscription charges and the resulting invoice items with the charges on Apple receipts may stop the app from running as expected.
The following table describes the mapping relationships between the receipts in the Apple App Store and Zuora subscriptions:
| Apple Receipt | Description | Zuora Subscription Settings |
|---|---|---|
| Auto-renewable Apple Receipts | Charges will happen multiple times over the lifetime of Apple receipt. |
or
|
| Non-renewable (Termed) Apple Receipts | Charges such as one-time charges happen only once during the lifetime of the Apple receipt. | Termed subscriptions with the Auto Renew field set to no |
Invoice in Zuora and Corresponding Apple Receipt
The charge dates of the invoice items in Zuora should match the receipt date in the corresponding Apple receipt.
Configure Appstore Connector Schedule
- Launch the installed Appstore Connector app instance.
- Click the Settings tab.
- Complete the schedule details:
- Select Apple for Connector Types. If you are using multiple connectors, more than one connector can be selected.
- Enter or select a date in the Ignore Invoices Due Before field. The source system will ignore the invoices that were processed before this date. In addition, optionally select the following check boxes as needed:
- Support Discounts - Allows the connector to correctly parse discount objects.
- Use Both Date and Time for Cancellations Instead of Exclusively Date - Using both date and time allows subscriptions to be cancelled at the exact date and time instead of just the date.
- Select one of the following days to be used as the payment date from the Payment Date dropdown list:
- Invoice due date - The day where the invoice is due.
- Day of Processing - The day where the payment starts processing.
- In the Apple section, complete the following configuration:
- (Optional) Select the Cancel Test Receipts check box to remove all Apple test receipts from the Apple environment.
- Select one of the following subscription cancellation types from the Cancellation Type dropdown list:
- Specific Date - Subscriptions are cancelled on a specific date.
- End of Last Invoice Period - Subscriptions are cancelled at the end of the last invoice period.
- Blocked - Subscriptions are cancelled because they get blocked.
- (Optional) Select the Enable Orders check box if your Zuora tenant uses Orders. If this check box is not selected but the Orders feature is used, the app will not operate as intended.
See the Zuora Knowledge Center for more information related to the Orders feature. - Select Other in the Payment Method drop-down list.
- Select the time zone from the Timezone drop-down list. Zuora strongly recommends you to select the same time zone as for your Zuora tenant to avoid payment errors.
- In the drop-down list next to Timezone, select the time frame of the schedule and complete the details of the selected time frame. The Timezone field and schedule builder are used to set how frequently the data is synchronized. It is recommended to set a Daily schedule and align the timezone to your Zuora tenant, which can align operations and ensure the app displays the latest data. The Interval field displays the specified schedules as a Cron expression and needs no further configuration.
If you have enabled multiple connectors, they will execute based on the same schedule but be processed separately by the Source System identified in the subscription.
- Click Update.
After the details have been updated, the date and time of the Next Execution will be displayed and the Running status will be updated to Yes.