Reconcile Data Between Zuora and NetSuite
Overview
Before performing the NetSuite Integration, you must reconcile data between Zuora and NetSuite.
Reconciling Revenue Recognition Code and Template Values
The Zuora Revenue Recognition Code Names and NetSuite Revenue Recognition Template Names must match exactly.
- In Zuora, go to Settings > Billing > Manage Revenue Recognition Codes.
- In NetSuite, go to Lists > Accounting > Revenue Recognition Templates.
Reconciling Currency Values
The Zuora Currency Alphabetic Codes and NetSuite Currency Symbols must match exactly.
- In Zuora, go to Settings > Billing > Customize Currencies.
- In NetSuite, go to Lists > Accounting > Currencies.
If you have not configured NetSuite to use Multiple Currencies, Zuora recommends that you inactivate all currencies in Zuora other than the currency used in NetSuite.
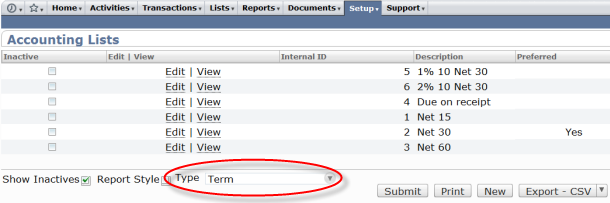
Reconciling Payment Term Values
The Zuora Payment Term Name and NetSuite Payment Terms must match exactly. For example, you might need to modify NetSuite to rename "Due on Receipt" to "Due Upon Receipt" to match Zuora.
- In Zuora, go to Settings > Billing > Payment Terms.
- In NetSuite, go to Setup > Accounting > Accounting Lists. Set the Type to
Termto view all of the payment terms configured in NetSuite.
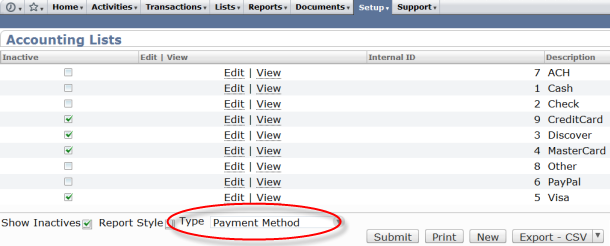
Reconciling Payment Method Values
The Zuora Payment Method Name and NetSuite Payment Methods must match exactly.
- In Zuora, go to Settings > Payments > Payment Method.
- In NetSuite, go to Setup > Accounting > Accounting Lists. Set the Type to
Payment Methodto view all of the payment methods configured in NetSuite.
The Zuora values differ from what is displayed in the user interface. You will need to modify NetSuite to match the actual values:
- ACH
- Cash
- Check
- CreditCard
- Other
- PayPal
- WireTransfer
- DebitCard
- CreditCardReferenceTransaction
Important: You must match the names exactly, including the lack of spaces in the values. For example, CreditCard.
When creating NetSuite Payment Methods to correspond to Zuora Credit Card methods, do not check the box to enable CREDIT CARD. If this is enabled, the integration will fail because NetSuite will expect full credit card details for the payment and attempt to process the credit card transaction.
Using a Deposit To Account
The Payment or Refund sync will use the Deposit To Account configured in NetSuite for a given Payment Method. If you have not configured a Deposit To Account, the Payment Method will instead use Undeposited Funds.
Configuring Zuora Accounting Codes
You must also configure several types of Zuora records with various NetSuite accounting information to correctly sync and affect GL accounts.
To view and/or modify NetSuite Accounts, go to Lists > Accounting > Accounts.
| In this Zuora record... | ...change the value of this field... | ...to this NetSuite value. | Used for Integration or Reporting? |
|---|---|---|---|
| Product Rate Plan Charge | Accounting Code | Full name of an active Account of type Income |
|
| Product Rate Plan Charge | Deferred Revenue Account (custom) | Full name of an active Account of type Deferred Revenue |
|
| Payment Method | Payment Accounting Code | Full name of an active Account of type Bank (starting with the NetSuite Account Number) |
|
| Payment Method | Refund Accounting Code | Full name of an active Account of type Bank |
|
| Tax Code | Accounting Code | Internal ID of the Non-Inventory Sale Item created for the Tax Code
Make sure that you have assigned the correct income account on this item. If the the income account is incorrect, the item cannot be referenced on an invoice. |
|
The Full Name identifies the hierarchy of the Account, using a colon to separate the levels. Include a space character before and after the colon. For example: My Parent Account : My Child Account : My Grandchild Account
To obtain the Internal ID, view the Item and look at the URL in your browser's Address bar. The Internal ID is the last part of the URL. For example, in https://system.netsuite.com/app/common/item/item.nl?id=2, the Internal ID is 2.
Creating NetSuite Items for Zuora Tax Codes
Important: If Zuora taxation features are enabled, you must perform these steps before generating any invoices that will be synchronized to NetSuite.
If Zuora taxation features are enabled for the Zuora tenant, you must create a Non-Inventory Sale For Item in NetSuite for each Tax Code configured in Zuora. To create the item in NetSuite, navigate to List > Accounting > Items > New, and select Non-Inventory Items for Sale.
To obtain the NetSuite Internal Id, view the given Item, and look in the browser address bar. For example, in https://system.netsuite.com/app/common/item/item.nl?id=41, the Internal NetSuite Id is 41. After creating the NetSuite Item, you need to:
- Go to Settings > Finance > Manage Chart of Accounts Recognition Codes. Create an accounting code with Name as the NetSuite Internal Id and Type as Sales Tax Payable.
- Go to Settings > Finance > Configure Accounting Codes. Set the Tax Code's Accounting Code to the one you just created in the last step.
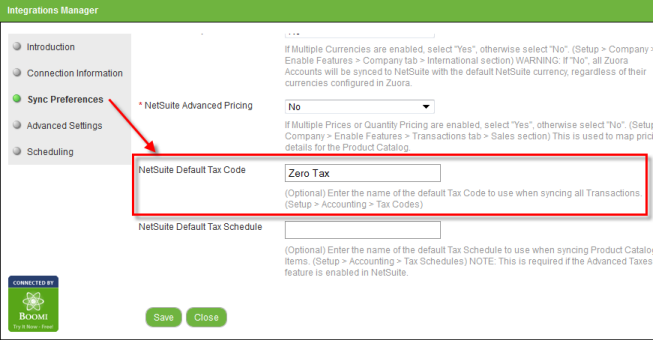
Default NetSuite Tax Code
For clients that require the Tax Item to be specified on NetSuite Invoices and Credit Memos, you must configure a Default NetSuite Tax Code in the Integration Setup to use when syncing Invoices and Invoice Item Adjustments. The values must be the exact name of a valid, active Tax Code in NetSuite.
You can view the list of Tax Codes in NetSuite by selecting Setup > Accounting > Tax Codes.
Coordinating Taxes with NetSuite Add-ons
Some add-on NetSuite modules, such as Avalara’s AvaTax, require the Tax Item to be populated even if Zuora is calculating taxes. In these cases, create a NetSuite Tax Code with a 0% tax rate and configure that Tax Code as the NetSuite Default Tax Code in the Integration Setup.
Configuring a Default NetSuite Tax Schedule
For NetSuite clients with the Advanced Taxes feature enabled , you must configure a Default NetSuite Tax Schedule in the Integration Setup to use when syncing Product Rate Plan Charges. Create this Tax Schedule (if it does not already exist) and configure it in NetSuite to not calculate taxes if tax is calculated by Zuora. You can view the status of the Advanced Taxes feature in NetSuite by selecting Setup > Company > Enable Features, selecting the Accounting tab, then viewing Advanced Taxes in the Advanced Features section.
Configuring a Default NetSuite Location
For clients with Multi-Location Inventory enabled, or if Locations are required for NetSuite transactions, you must configure a Default NetSuite Location in the Integration Setup to use when syncing Zuora transactions. This value must be the exact name of a valid, active Location in NetSuite. For sub-Locations, enter the fully-qualified, name using a colon, to separate sub-locations. Include a space character before and after the colon. For example: My Location : My Sub Location
You can view the status of the Multi-Location Inventory feature in NetSuite by selecting Setup > Company > Enable Features, selecting the Items & Inventory tab, then viewing Multi-Location Inventory in the Inventory section.