DRAFT How to use JavaScript in HTML invoice templates
The HTML Templates feature is generally available for invoices as of Zuora Release 2022.02.R2, and for credit and debit memos as of Zuora Release 2022.05.R1.
The HTML Templates feature provides you the flexibility to design and customize HTML invoice templates by using an online editor. With merge fields and decorator functions, you can easily manipulate data by formatting, filtering, grouping, transforming, and aggregating data. Additionally, you can also use custom cascading style sheets (CSS) to adjust the page layout, look-and-feel, page break, and so on.
However, the HTML Templates feature cannot support all use cases out of the box (OOTB). You can use JavaScript to extend the OOTB functionalities.
Add JavaScript codes to HTML invoice templates
To add JavaScript codes to your HTML invoice template, perform the following steps:
-
In your HTML invoice template, click the Rows block where you want to configure JavaScript codes.
The Content panel is displayed on the right of the template editor. -
In the Content tab, drag and drop the HTML component into the HTML template.
-
In the HTML template, click the HTML block.
The Content panel is displayed on the right of the template editor. -
In the HTML section, type JavaScript codes in the HTML code editor.
For example, you can type the following JavaScript codes in the HTML code editor:<strong id='greeting'></strong> <script> document.getElementById('greeting').innerText = 'Hello World'; </script> - Click Save to save the configurations.
- Click Preview to switch to the Preview mode.
- In the Preview Settings section, select an existing account and one invoice to preview the rendering result.
You can see the Hello World text displayed on the generated invoice PDF file.
Pass data to your JavaScript code
In the context of templating, JavaScript is not attractive without the ability to manipulate data. To understand how HTML templates pass data to your JavaScript code, it is best practice to understand how JavaScript works in the context of template-based document generation.
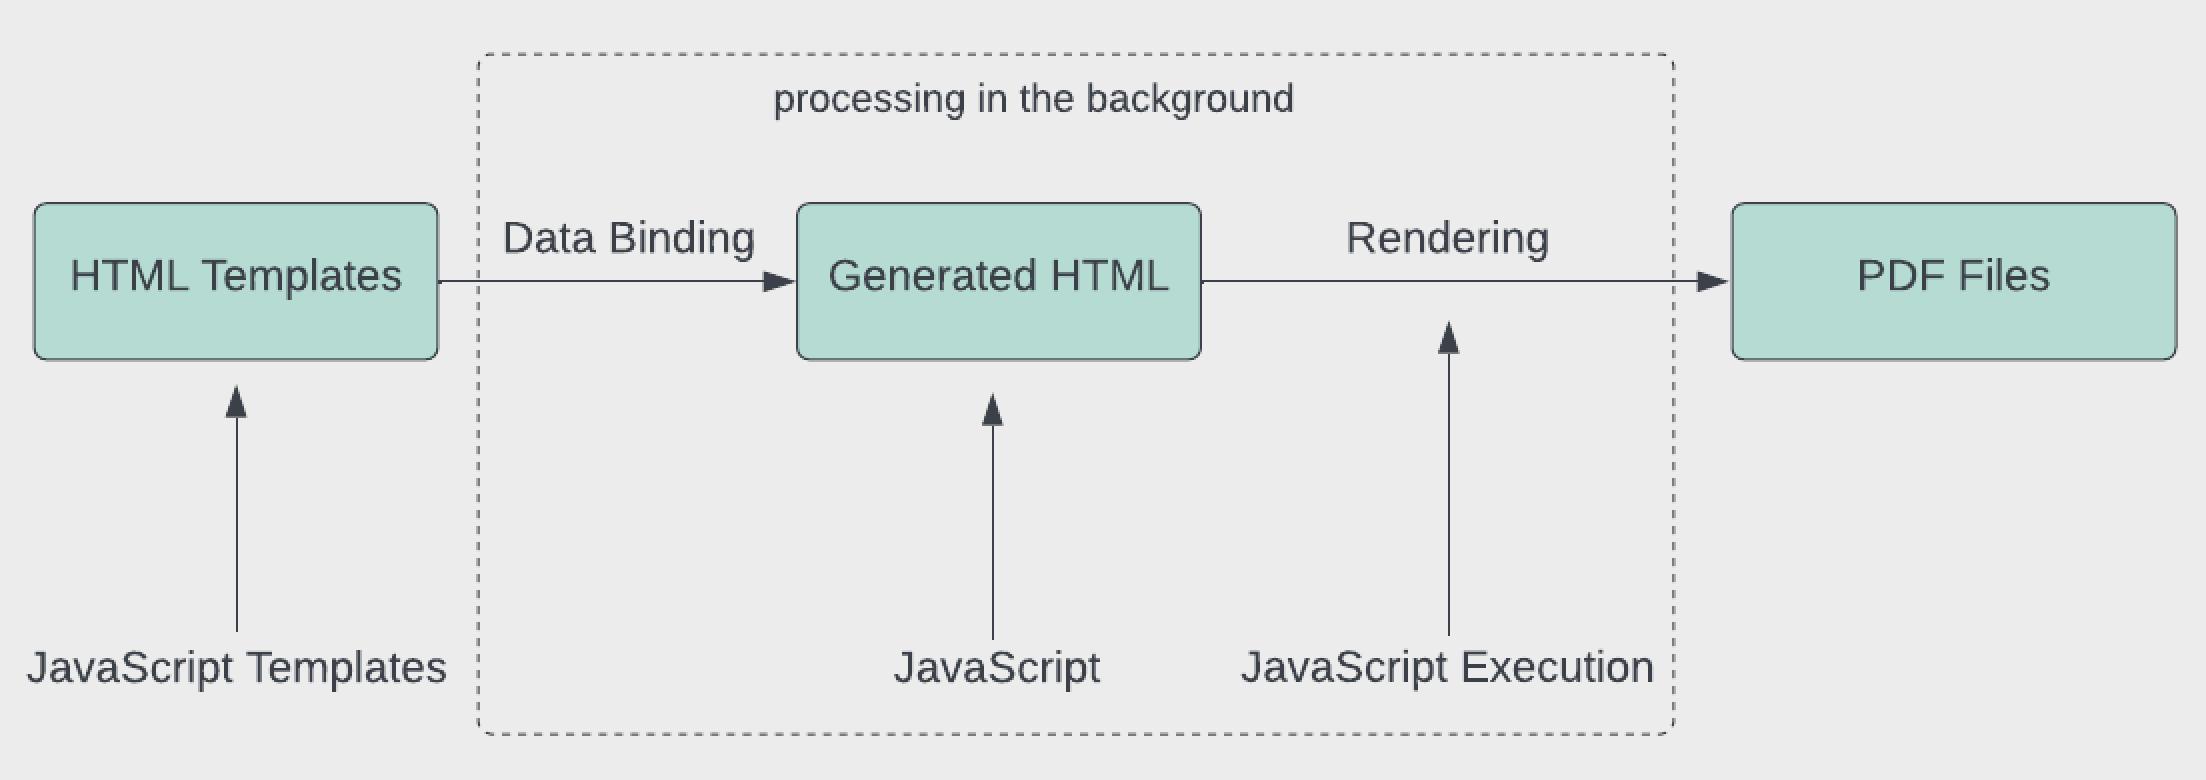
When adding a snippet of JavaScript codes to an HTML template by using an HTML component, you can consider the JavaScript code snippet as a JavaScript template, which is part of the HTML template. The HTML template eventually produces JavaScript codes after the data binding phase.
For example, if you type the following JavaScript codes in the HTML code editor of an HTML invoice template:
<divid='container'></div>
<script>
document.getElementById('container').innerText ="{{Invoice.InvoiceNumber}}";
</script>
After data binding, the generated HTML is as follows:
<divid='container'></div>
<script>
document.getElementById('container').innerText ="INV-00000101";
</script>
The preceding example is the way that you can pass data to your JavaScript code. It is easier to understand how JavaScript works to consider it as template-based code generation.
With this idea in mind, you can pass complex data to your JavaScript code. For example, you can type the following snippet of JavaScript template codes in an HTML invoice template by using an HTML component:
<label>Recent Total Balance:</label><span id='recentTotal'></span>
<script>
var invoicesOfAccount =[
{{#Invoice.Account.Invoices}}
 {
 "id":"{{Id}}",
 "number":"{{InvoiceNumber}}",
 "balance":{{Balance}},
 "amount":{{Amount}},
 "invoiceDate":"{{InvoiceDate}}"
 },
{{/Invoice.Account.Invoices}}
];
var totalBalanceInLast30Days = invoicesOfAccount
 .filter(invoice=> invoice.invoiceDate >=(new Date(Date.now()-30*24*60*60*1000)).toISOString().substr(0,10))
 .reduce((sum,inv)=> sum + inv.balance,0);
document.getElementById('recentTotal').innerText = totalBalanceInLast30Days;
</script>
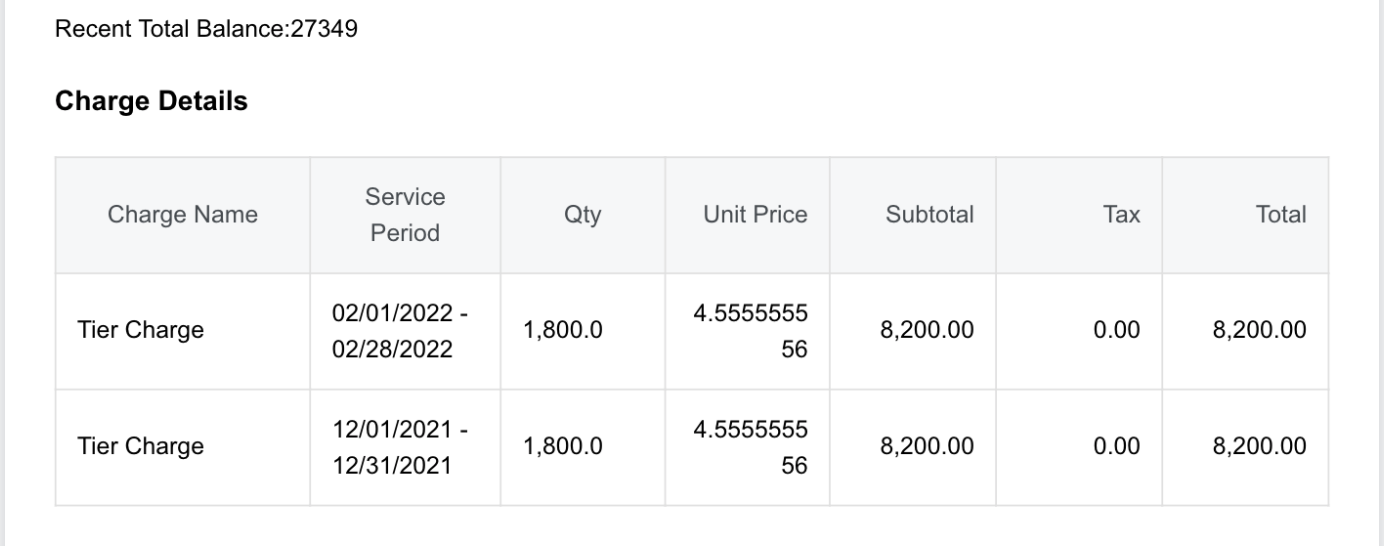
In the preceding JavaScript template sample, you declare a variable to hold all invoices of an account, filter all the invoices whose InvoiceDate is in the last 30 days, and then add up the balances of the filtered invoices. After data binding, the generated variable declaration is as follows in the generated HTML:
<script>
var invoicesOfAccount = [
  {
    "id": "2c92c8957d5847df017d63f1ef9277a2",
    "number": "INV00000051",
    "balance": 0.0,
    "amount": 8271.0,
    "invoiceDate": "2021-11-27"
  },
  {
    "id": "2c92c8957c12843e017c1512c80a0404",
    "number": "INV00000044",
    "balance": 0.0,
    "amount": 94210.0,
    "invoiceDate": "2021-10-08"
  },
  {
    "id": "2c92c895796534100179683f0f9f0515",
    "number": "INV00000028",
    "balance": 0.0,
    "amount": 108.0,
    "invoiceDate": "2020-06-01"
  },
  {
    "id": "8a90f3207e9bd34c017e9f7beaae0346",
    "number": "INV00000061",
    "balance": 27349.0,
    "amount": 27349.0,
    "invoiceDate": "2022-02-01"
  },
];
...
</script>
When previewing the template, you can see the following rendering result example on the generated invoice PDF file:
Common use cases
With the capability to pass data to JavaScript, you can implement a number of use cases that might or might not be supported OOTB. This section describes some common use cases that you might want to implement with JavaScript in HTML invoice templates.
Configuring barcodes
In HTML invoice templates, you can configure barcodes by using the Wp_Barcode merge field. However, currently, this merge field only supports popular barcode types. For more information, see Configure barcodes in HTML invoice templates.
If your business requires a barcode that is not included in the list of supported barcode types, you can either leverage the JavaScript library approach or submit your request in Zuora Community. You can also use JavaScript in HTML invoice templates to generate barcodes including Swiss QR codes, use your own fonts for barcode text, configure S, and configure QR code styling. For more use cases, see Use JavaScript in your template.
To use JavaScript in HTML invoice templates to generate barcodes, perform the steps documented in Add JavaScript codes to HTML invoice templates. In this use case, you can type the following JavaScript codes in the HTML code editor:
<!-- ① -->
<script type="text/javascript" src="https://cdnjs.cloudflare.com/ajax/libs/bwip-js/3.0.4/bwip-js.min.js"></script>
<!-- ② -->
<canvas id="qrcodeCanvas"></canvas>
<script>
  try {
    // The return value is the canvas element
    let canvas = bwipjs.toCanvas('qrcodeCanvas', {
        bcid:        'qrcode',       // Barcode type
        text:        '{{Invoice.InvoiceNumber}}',    // ③
    });
  } catch (e) {
      // `e` may be a string or Error object
  }
</script>
When previewing the template, you can see the following QR code displayed on the generated invoice PDF file:

In the preceding JavaScript code snippet, bwip-js is a JavaScript library to generate various barcode images, and it is just used for demonstration purposes in this article. You can use your own JavaScript library to generate barcodes.
Read the following information to understand how data transformation works in the preceding output:
- ①: Loads the bwip-js library when rendering the HTML.
- ②: Creates a canvas element to draw the barcode image.
- ③: Replaces the merge field with a real invoice number.
Keep in mind that the merge field substitution occurs before the HTML rendering, so theqrcodecontent is replaced with something likeINV00000028.
The bwip-js library supports various barcode types. For more information, see the full list of supported BWIPP barcode types and Symbologies Reference.
Swiss QR Codes
When configuring HTML invoice templates, you can use the following JavaScript code script sample to generate Swiss QR Codes:
<script type="text/javascript" src="https://cdnjs.cloudflare.com/ajax/libs/bwip-js/3.0.4/bwip-js.min.js"></script>
<canvas id="barcodeCanvas" style="width:46mm;height:46mm;"></canvas>
<script>
  try {
    // The returned value is the canvas element
    let canvas = bwipjs.toCanvas('barcodeCanvas', {
        bcid:        'swissqrcode',
        text:        `SPC
0200
1
CH5800791123000889012
S
Robert Schneider AG
Rue du Lac
1268
2501
Biel
CH


199.95
CHF
K
Pia-Maria Rutschmann-Schnyder
Grosse Marktgasse 28
9400 Rorschach


CH
SCOR
RF18539007547034

EPD`,
      scale: 2
    });
  } catch (e) {
      // `e` might be a string or Error object
  }
</script>
You can replace the hard-coded text defined in the text property with merge fields. When previewing the template, you can the following Swiss QR Code image displayed on the generated invoice PDF file:

The measurements of the Swiss QR Code image for printing must always be 46mm x 46mm, excluding the surrounding quiet zone. Due to the differences between printing and screen resolutions, you have to adjust the scale parameter to generate an image with the right size.
Alternatively, you can use the CSS style to specify the canvas size, for example:
<canvasid="barcodeCanvas"style="width:46mm;height:46mm;"></canvas>
Configuring charts
When configuring an HTML invoice template, you can also use JavaScript to add charts like a bar chart or pie chart to the template.
For example, if you want to create a bar chart by using the Chart.js library, type the following JavaScript codes in the HTML code editor:
<script src="https://cdn.jsdelivr.net/npm/chart.js@3.7.0/dist/chart.min.js"></script>
<!-- container needs to use relative position -->
<div style="width: 100%;display: flex; justify-content: center;">
    <div class="chart-container" style="position: relative; height:200px; width:400px;">
        <div>
            <canvas id="myChart" style="margin: 0 auto;"></canvas>
        </div>
        <script>
            const ctx = document.getElementById('myChart').getContext('2d');
            const myChart = new Chart(ctx, {
                type: 'bar',
                data: {
                    labels: [{{#Invoice.Account.Invoices|SortBy(InvoiceDate,ASC)}}"{{InvoiceDate}}",{{/Invoice.Account.Invoices|SortBy(InvoiceDate,ASC)}}],
                    datasets: [{
                        label: 'Invoice Trend',
                        data: [{{#Invoice.Account.Invoices|SortBy(InvoiceDate,ASC)}}{{Amount}},{{/Invoice.Account.Invoices|SortBy(InvoiceDate,ASC)}}],
                        backgroundColor: [
                            'rgba(255, 99, 132, 0.2)',
                            'rgba(54, 162, 235, 0.2)',
                            'rgba(255, 206, 86, 0.2)',
                            'rgba(75, 192, 192, 0.2)',
                            'rgba(153, 102, 255, 0.2)',
                            'rgba(255, 159, 64, 0.2)'
                        ],
                        borderColor: [
                            'rgba(255, 99, 132, 1)',
                            'rgba(54, 162, 235, 1)',
                            'rgba(255, 206, 86, 1)',
                            'rgba(75, 192, 192, 1)',
                            'rgba(153, 102, 255, 1)',
                            'rgba(255, 159, 64, 1)'
                        ],
                        borderWidth: 1
                    }]
                },
                options: {
                    responsive: true,
                    maintainAspectRatio: false,
                    scales: {
                        y: {
                            beginAtZero: true
                        }
                    }
                }
            });
            // resize the canvas size
            myChart.canvas.parentNode.style.width = "400px";
            myChart.canvas.parentNode.style.height = "200px";
            </script>
    </div>
</div>
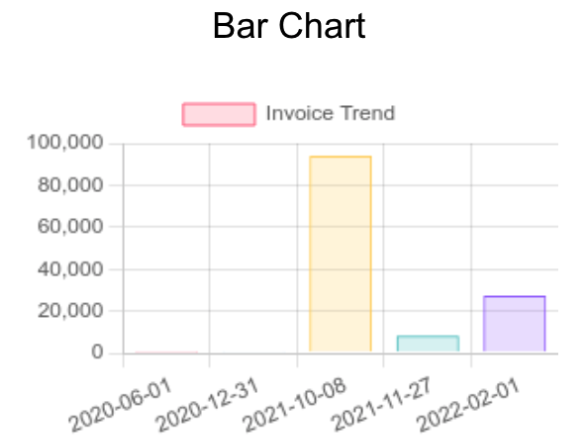
When previewing the template, you can see the following bar chart displayed on the generated PDF file:
In the preceding code example, the important lines are as follows:
data: {
  labels: [{{#Invoice.Account.Invoices|SortBy(InvoiceDate,ASC)}}"{{InvoiceDate}}",{{/Invoice.Account.Invoices|SortBy(InvoiceDate,ASC)}}],
...
  datasets:[{
    data: [{{#Invoice.Account.Invoices|SortBy(InvoiceDate,ASC)}}{{Amount}},{{/Invoice.Account.Invoices|SortBy(InvoiceDate,ASC)}}],
...
}],
...
}
The labels property iterates a list section Invoice.Account.Invoices|SortBy(InvoiceDate,ASC), and constructs an array of InvoiceDate, which is used to anchor the bar on the X-axis. And similarly, the data property constructs the dataset for the Y-axis.
Sending outgoing requests
With JavaScript, you can also send outgoing requests to fetch external data and use it in your HTML invoice templates.
For example, if you do not want to use either the Wp_Barcode merge field or JavaScript libraries to generate barcodes, instead, you have an API endpoint returning a barcode image. With JavaScript, you can fetch that image and add it to an HTML invoice template.
The following information is a JavaScript code sample that you can use to issue an outgoing request to fetch JSON data from GitHub:
<div id="main"></div>
<script>
fetch('https://api.github.com/orgs/zuora')
  .then(response => response.json())
  .then(data => {
    document.getElementById('main').innerHTML = JSON.stringify(data);
  })
  .catch(error => document.getElementById('main').innerHTML = error)
</script>
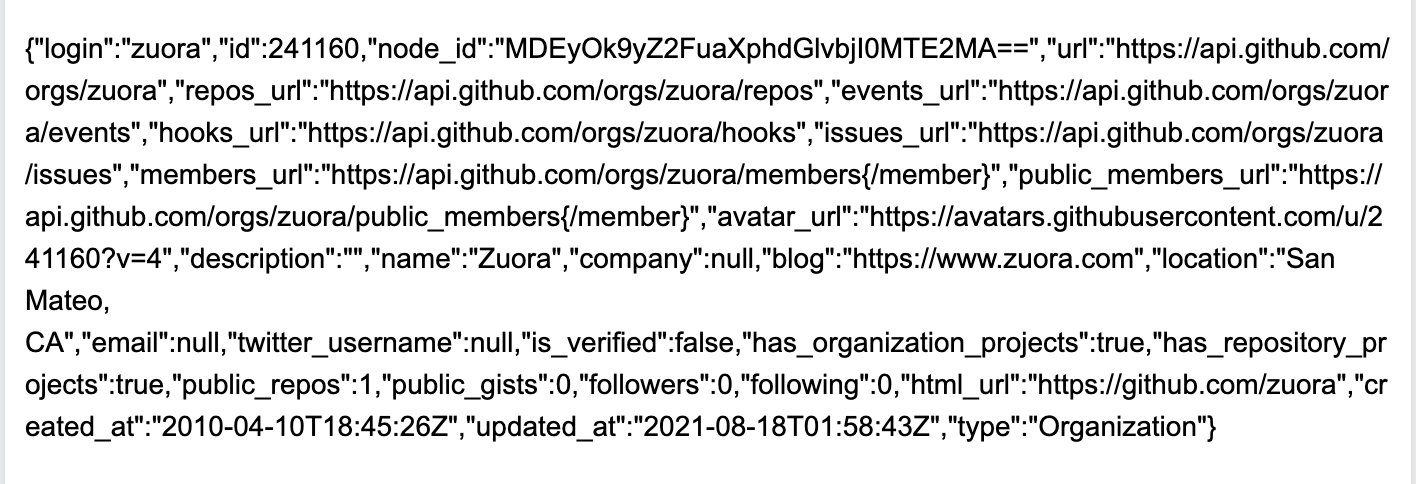
The following data is the example JSON data that you use the preceding JavaScript code sample to fetch from GitHub:
{
    "avatar_url": "https://avatars.githubusercontent.com/u/241160?v=4",
    "blog": "https://www.zuora.com",
    "company": null,
    "created_at": "2010-04-10T18:45:26Z",
    "description": "",
    "email": null,
    "events_url": "https://api.github.com/orgs/zuora/events",
    "followers": 0,
    "following": 0,
    "has_organization_projects": true,
    "has_repository_projects": true,
    "hooks_url": "https://api.github.com/orgs/zuora/hooks",
    "html_url": "https://github.com/zuora",
    "id": 241160,
    "is_verified": false,
    "issues_url": "https://api.github.com/orgs/zuora/issues",
    "location": "San Mateo, CA",
    "login": "zuora",
    "members_url": "https://api.github.com/orgs/zuora/members{/member}",
    "name": "Zuora",
    "node_id": "MDEyOk9yZ2FuaXphdGlvbjI0MTE2MA==",
    "public_gists": 0,
    "public_members_url": "https://api.github.com/orgs/zuora/public_members{/member}",
    "public_repos": 1,
    "repos_url": "https://api.github.com/orgs/zuora/repos",
    "twitter_username": null,
    "type": "Organization",
    "updated_at": "2021-08-18T01:58:43Z",
    "url": "https://api.github.com/orgs/zuora"
}
When previewing the template, you can see the following JSON data displayed on the generated invoice PDF file:
Restrictions and limitations
When using JavaScript in HTML invoice templates, keep the following restrictions and limitations in mind:
- JavaScript is executed at the PDF rendering phase, so outgoing requests might significantly slow down PDF file generation, and probably end up with a timeout error.
- If the JavaScript execution process exceeds 30 seconds, a timeout error occurs.
- The endpoint resources for outgoing requests have to be CORS-enabled. Otherwise, the outgoing requests are blocked.
- HTML invoice templates support outgoing requests through JavaScript, but it is best practice to not use it in Production environments because outgoing requests make the document generation process vulnerable. Use it at your discretion.
- The third-party JavaScript libraries or scripts that you use are not part of Zuora products, so it is your own responsibility to implement, test, and maintain them.