Build Your State Sub Rule
To build your sub rule containing the Journey State decision nodes, complete the following steps:
- Navigate to the feature to which you want to add the Journey State decision node as follows:
- Select Products from the main menu
- Select Features from the menu options
- Select the feature from the list
- Select the version to update
The rules builder displays
- Select the circle beneath Registered in the user type selector bar
A blank canvas displays.
- Select the Sub Rules segment title
- Drag the Sub Rule decision node to the rules canvas
The Sub Rule dialog box displays.
Complete this dialog box as follows:
- Enter Journey State in the Title text box
- Select the Save button
A blank sub rule canvas displays.
- Select the User segment title
- Add Journey decision nodes for each state, as follows:
- Drag the Journey State decision node to the sub rule canvas
The State dialog box displays.
Select Engaged from the State menu and select the Save button
- Drag another Journey State decision node to the sub rule canvas
The State dialog box displays.
Select VIP from the State menu and select the Save button
- Drag another Journey State decision node to the sub rule canvas
The State dialog box displays.
Select Lapsed from the State menu and select the Save button
- Drag another Journey State decision node to the sub rule canvas
The State dialog box displays.
Select Registered from the State menu and select the Save button
- Drag the Journey State decision node to the sub rule canvas
- Select the Sub Rules segment title
- Create outputs for each state, as follows:
- Drag the Output Option decision node to the sub rule canvas
The Output Option dialog box displays.
Enter Engaged in the Title text box and select the Save button.
An Engaged output is added to the sub rules canvas.
- Drag another Output Option decision node to the sub rule canvas
The Output Option dialog box displays.
Enter VIP in the Title text box and select the Save button.
A VIP output is added to the sub rules canvas.
- Drag another Output Option decision node to the sub rule canvas
The Output Option dialog box displays.
Enter Lapsed in the Title text box and select the Save button.
A Lapsed output is added to the sub rules canvas.
- Drag another Output Option decision node to the sub rule canvas
The Output Option dialog box displays.
Enter Registered in the Title text box and select the Save button.
A Registered output is added to the sub rules canvas.
- Drag the Output Option decision node to the sub rule canvas
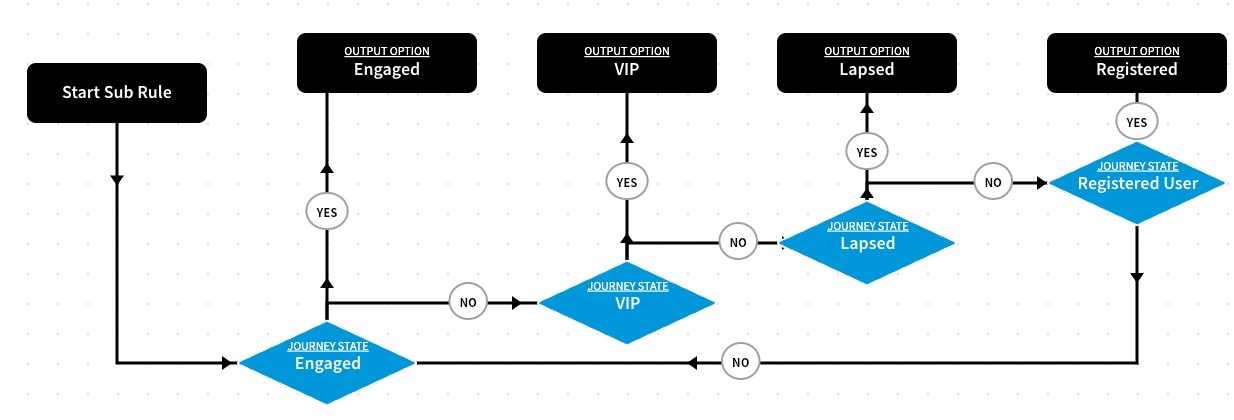
- Connect the nodes as follows:
- Connect the Start Sub Rule to the Engaged decision node
- Connect the No output of the Engaged decision node to the VIP decision node
- Connect the Yes output of the Engaged decision node to the Engaged Output Option
- Connect the No output of the VIP decision node to the Lapsed decision node
- Connect the Yes output of the VIP decision node to the VIP Output Option
- Connect the No output of the Lapsed decision node to the Registered decision node
- Connect the Yes output of the Lapsed decision node to the Lapsed Output Option
- Connect the No output of the Registered decision node to the Engaged decision node
- Connect the Yes output of the Registered decision node to the Registered Output Option
The sub rule is similar to the following:
- Select the Done button to save your sub-rule and return to the main rules canvas
We can now finish building the main rule.