Define a Registration Form
To define the fields in your registration form, select the Registration button.
The fields that are available for update differ depending on whether or not you have selected the Use Passwordless Authentication checkbox in the Add an Outcome screen.
For further information on completing the fields if you have not selected the checkbox, see the Register with a Password section.
For further information on completing the fields if you have not selected the checkbox, see the Register without a password section.
Register with a Password
If you have not selected the User Passwordless Authentication checkbox, the Registration screen displays as illustrated below:
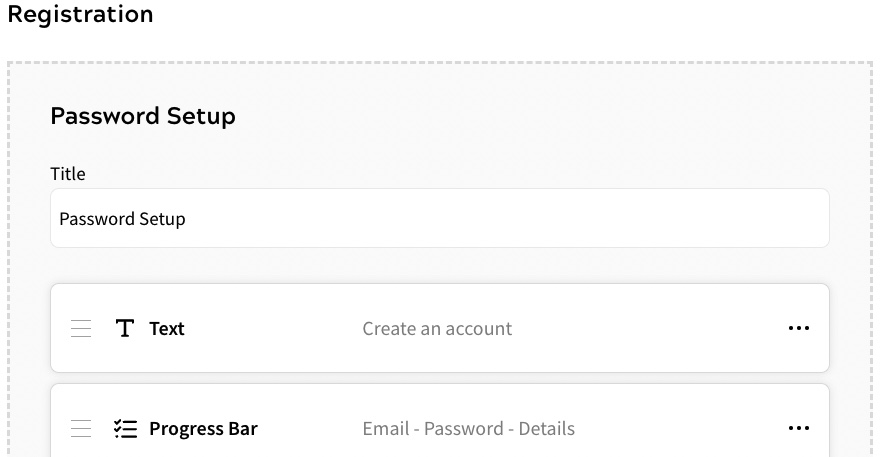
You can define multiple steps in this screen. By default, two steps are available, as follows:
- Password Setup. This step is required and cannot be removed
- Section. This step is optional, and can be removed by selecting the remove (
 ) icon in the top right of the box
You can add further sections as required.
You can edit the steps in the registration form, as follows:
- Edit the Password Setup step
To edit the Password Setup step, complete the following steps:
- Enter the name for this step in the Title text box. By default, this is pre-filled with Password Setup
Note: The title is for internal use only and does not appear in the form.
- If required, edit the introductory text displayed on the register section of your form. By default, this is pre-filled with Create an account
To edit the text, complete the following steps:
- Select the three dots at the end of the Text row
- Select Edit
The Text dialog box displays, as illustrated below:
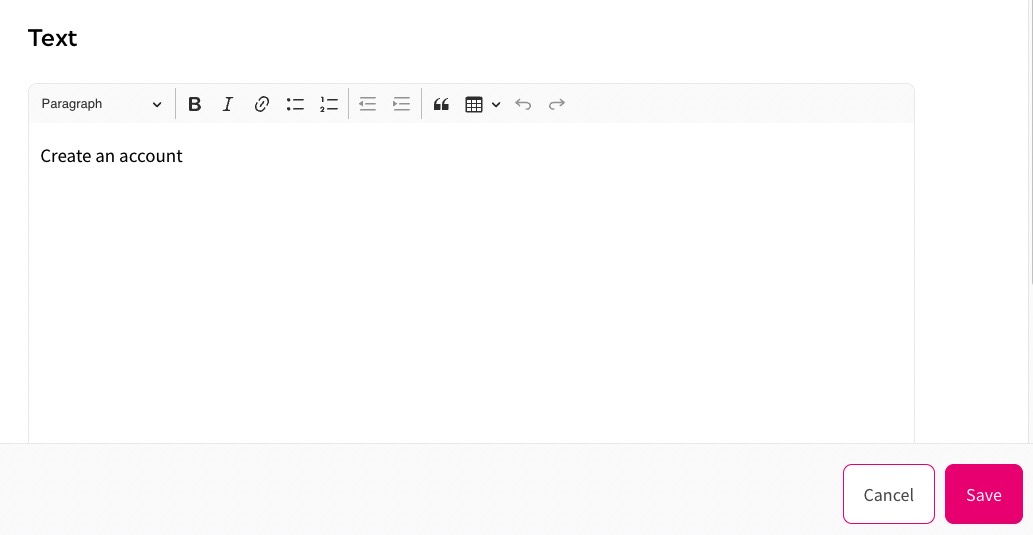
- Enter the text you want to display in the text box
Note: If you want to format the text, for example to include a heading or a list, use the formatting bar at the top of the text box.
- Select the Save button to save your changes and return to the Registration screen. Selecting the Cancel button displays the Registration screen without saving any changes
- If required, edit the labels that display on the progress bar
To edit the labels, complete the following steps:
- Select the three dots at the end of the Progress Bar row
- Select Edit
The Progress Bar dialog box displays, as illustrated below:
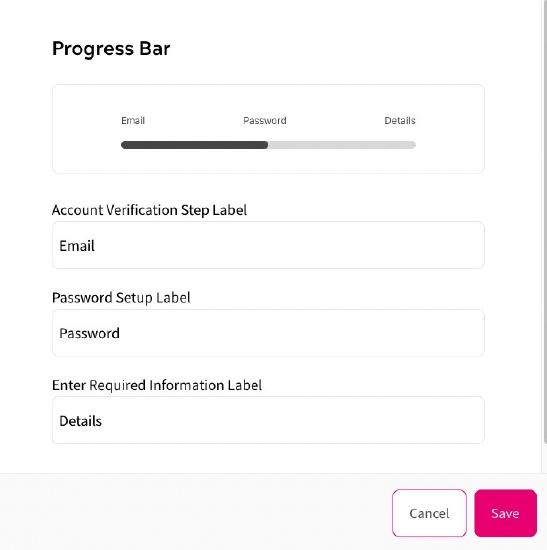
- Enter the label you want to display for the account verification step in the Account Verification Step Label text box. By default, this is pre-filled with Email
- Enter the label you want to display for the password setup step in the Password Setup Label text box. By default, this is pre-filled with Password
- Enter the label you want to display for the details step in the Enter Required Information Label text box. By default, this is pre-filled with Details
- Select the Save button to save your changes and return to the Registration screen. Selecting the Cancel button displays the Registration screen without saving any changes
- If required, define the field that allows the end user to enter their email address
To edit the text displayed, complete the following steps:
- Select the three dots at the end of the Email Address row
- Select Edit
The Enter Email Address dialog box displays, as illustrated below:
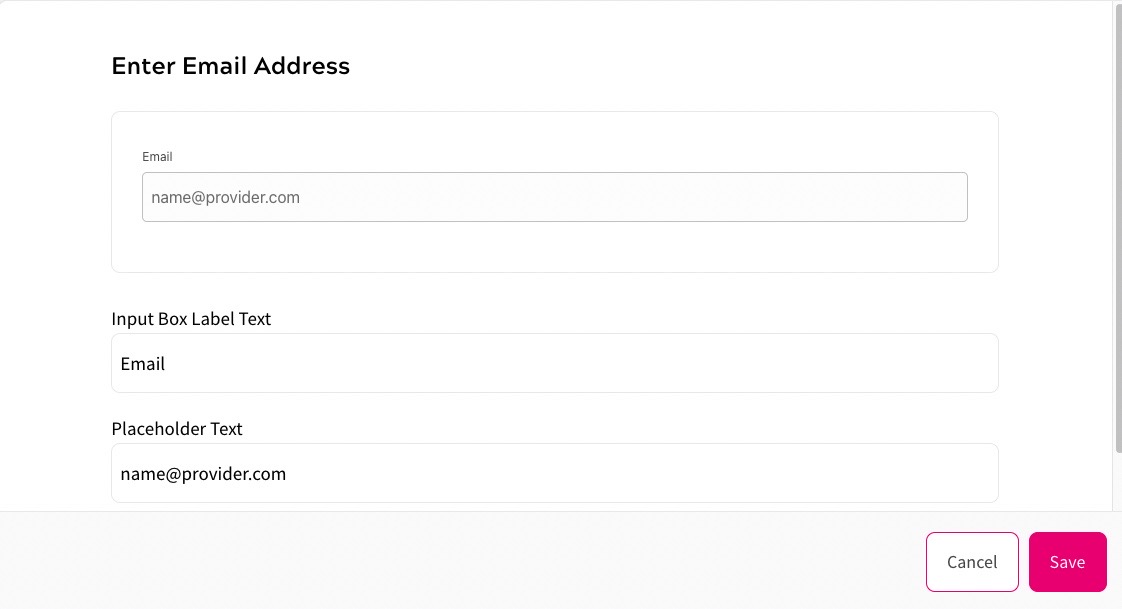
At the top of the Enter Email Address dialog box, you can see a representation of the email address field as it appears in your form.
- Enter the label you want to display above the email address field in your form in the Input Box Label Text text box. By default, this is pre-filled with Email
- Enter the text you want to display in the email address field in your form in the Placeholder Text text box. By default, this is pre-filled with name@provider
- Select the Save button to save your changes and return to the Registration screen. Selecting the Cancel button displays the Registration screen without saving any changes
- If required, define the field that allows the end user to specify their password
To edit the text displayed, complete the following steps:
- Select the three dots at the end of the Password row
- Select Edit
The Password Set Up dialog box displays, as illustrated below:
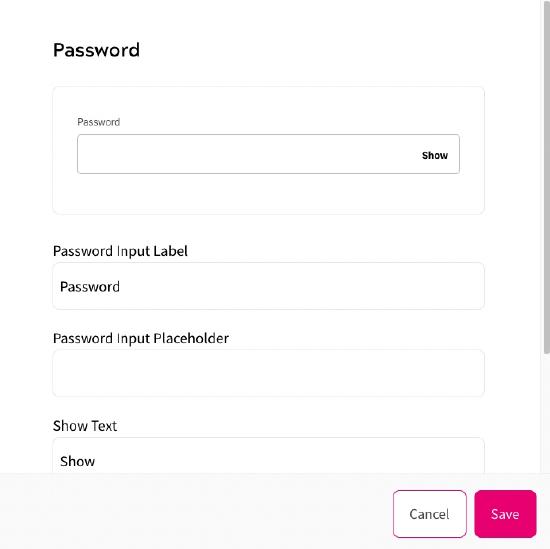
At the top of the Password Set Up dialog box, you can see a representation of the email address field as it appears in your form.
- Enter the label you want to display above the email address field in your form in the Password Input Label text box. By default, this is pre-filled with Password
- Enter the text you want to display in the password field in your form in the Password Input Placeholder text box
- Enter the text to display in the link, which allows the end user to display their password as it is entered, in the Show Text text box. By default, this is pre-filled with Show
- Enter the text to display in the link, which hides the password as it is entered, in the Hide Text text box. By default, this is pre-filled with Hide
- Select the Save button to save your changes and return to the Registration screen. Selecting the Cancel button displays the Registration screen without saving any changes
- If required, edit the button label for the button that your end user can use to move to the next step in your registration form
You can edit the colour of your button using the Style Guide. For further information on defining your style guide, see the Define Your Style Guide topic.
To define the text used on the button, complete the following steps:
- Select the three dots at the end of the Button (Continue) row
Note: If you remove subsequent steps, this changes to Button (Submit) and the user can use it to submit their registration.
- Select Edit
The Button dialog box displays, as illustrated below:
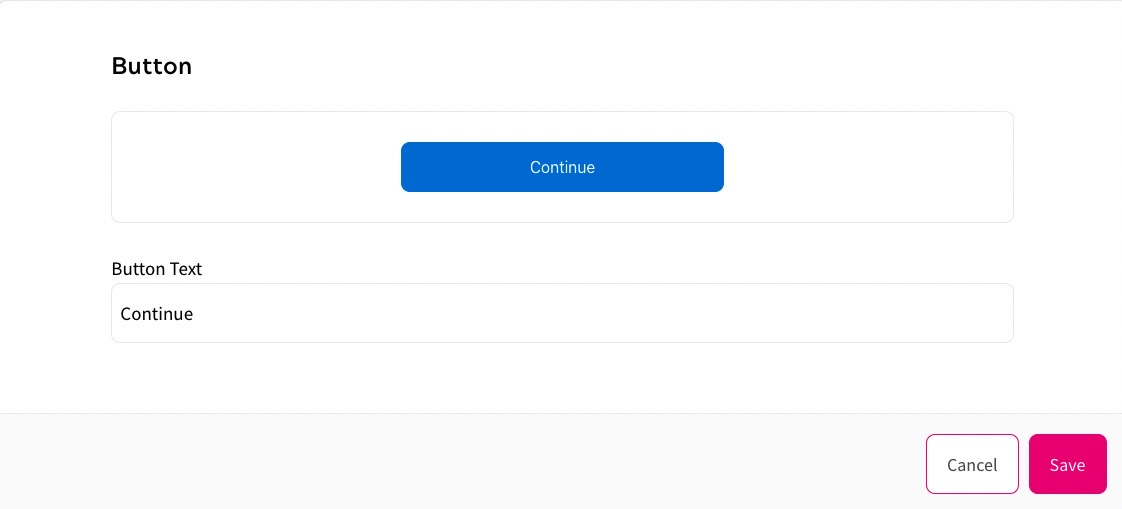
At the top of the Button dialog box, you can see a representation of the button as it appears in your form.
- Update the text in the Button Text text box. By default, this is pre-filled with Continue
Note: If you remove subsequent steps, this changes to Submit.
- Select the Save button to save your changes and return to the Registration screen. Selecting the Cancel button displays the Registration screen without saving any changes
- Select the three dots at the end of the Button (Continue) row
- Enter the name for this step in the Title text box. By default, this is pre-filled with Password Setup
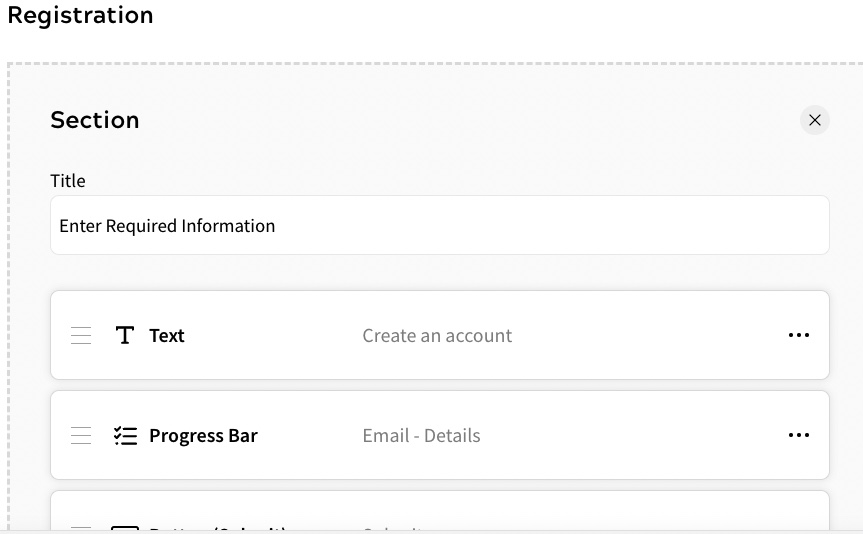
- Edit the Section step
To edit the Section step, complete the following steps:
- Enter the name of the step in the Title text box. By default, this is pre-filled with Enter Required Information
Note: The title is for internal use only and does not appear in the form.
- If required, edit the introductory text displayed on the register section of your form as described in step a of step 1 above. By default, this is pre-filled with Create an account
- If required, edit the progress bar labels as described in step a of step 1 above
- If required, edit the button label for the button that your end user can use to submit their login credentials
Note: You can edit the colour of your button using the Style Guide. For further information on defining your style guide, see the Define Your Style Guide topic.
To define the text used on the button, complete the following steps:
- Select the three dots at the end of the Button (Submit) row
- Select Edit
The Button dialog box displays, as illustrated below:
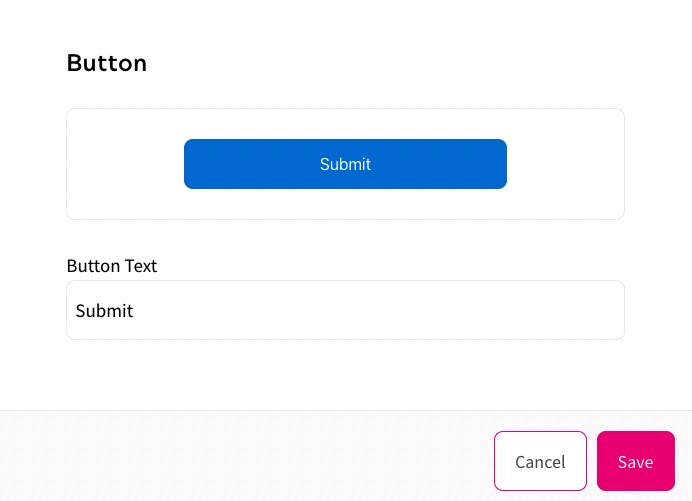
At the top of the Button dialog box, you can see a representation of the button as it appears in your form.
- Update the text in the Button Text text box. By default, this is pre-filled with Submit
Note: If you add subsequent steps, the row name changes to Button (Continue) and the user can use it to move to the next step. If you add subsequent steps, the pre-filled text changes to Submit.
- Select the Save button to save your changes and return to the Registration screen. Selecting the Cancel button displays the Registration screen without saving any changes
- If you want to add a field to obtain further information from the end user, select the Add A User Attribute button
Note: You must have defined user attributes for any fields that you want to add. For further information on user attributes, see the User Attributes topic.
The User Attribute dialog box displays, as illustrated below:

To add a single field, select the Add button at the end of the row for the user attribute you want to add. The Registration screen displays with the field added in the step.
To add multiple fields, select the checkbox beside the user attributes you want to add, then select the Add Selected button. The Registration screen displays with each user attribute added as a field in the step.
If you want to make a user attribute field mandatory in your registration form, select the Required toggle at the end of the row for the relevant user attribute.
To edit the display of a user attribute field in your registration form, complete the following steps:
- Select the three dots at the end of the row for the relevant field
- Select Edit
The Edit dialog box displays, as illustrated below:
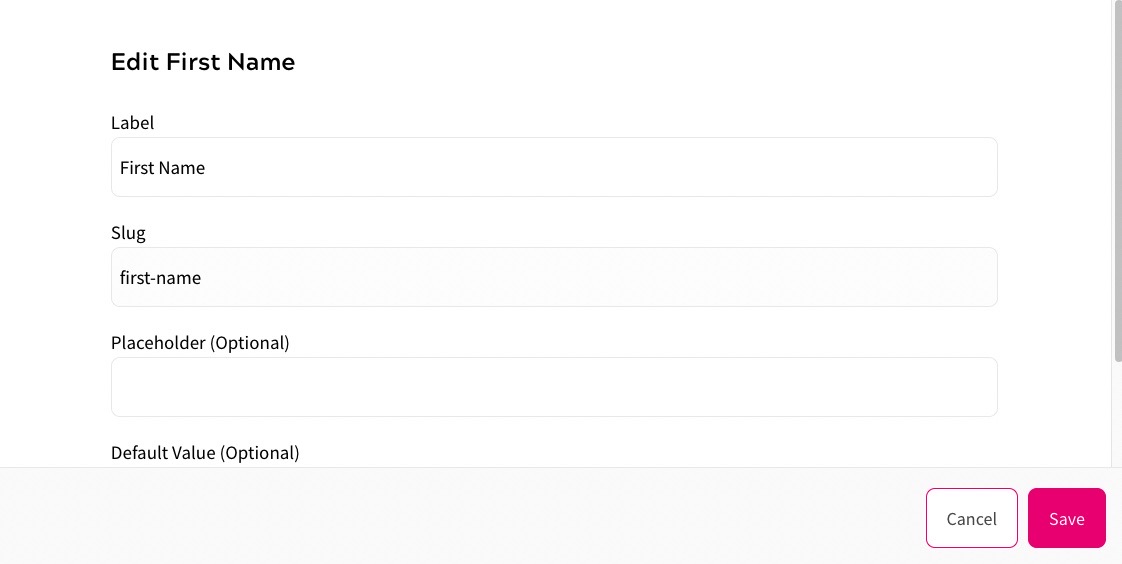
- Edit the label displayed above the field in the Label text box. By default, this is pre-filled with the name of the user attribute
- If required, edit the text displayed in the field in the Place Holder (Optional) text box. By default, this is blank
- If required, edit the default value of the field in the Default Value (Optional) text box
- Select the Save button to save your changes and return to the Registration screen. Selecting the Cancel button displays the Registration screen without saving any changes
For information on editing the user attribute, see the User Attributes topic.
To delete a user attribute field, select the three dots at the end of the row for the relevant field, then select Delete.
- If you want to add custom text to your form, select the Add Custom Text button
The Text dialog box displays. Complete the dialog box as described for the Text field above.
- Enter the name of the step in the Title text box. By default, this is pre-filled with Enter Required Information
- If required, select the Add a Section button to add a step to your registration form
By default, the new section contains the following fields:
- Title
You can edit this as described above
- Progress Bar
You can edit this as described above.
A further step is added to the progress bar for this section; ensure that you update the New Section x Label text box. By default, this is pre-filled with New Section x
- Button (Submit)
You can edit this as described above.
Note: The button for the previous section is automatically updated to Button (Continue) and the pre-filled text reverts to Continue. If necessary, edit the button text for this button accordingly.
You can also do the following:
- Select the Add A User Attribute button to add user attribute fields to this step as described above
- Select the Add Custom Text button to add a custom text field to this step as described above
Note: You can add as many steps as you require.
- Title
- Select the Done button to save your changes and return to the Form Builder screen
Register without a Password
If you have selected the User Passwordless Authentication checkbox, the Registration screen displays as illustrated below:
You can define multiple steps in this screen. By default, one step is available, named Section. This step is required and cannot be removed.
You can add further sections as required.
You can edit the steps in the registration form, as follows:
- Edit the Section step
To edit the Section step, complete the following steps:
- Enter the name of the step in the Title text box. By default, this is pre-filled with Enter Required Information
Note: The title is for internal use only and does not appear in the form.
- If required, edit the introductory text displayed on the register section of your form as described in step b of step 1 in Register with a Password. By default, this is pre-filled with Create an account
- If required, edit the progress bar labels as described in step c of step 1 in Register with a Password above
- If required, edit the button label for the button that your end user can use to move to submit their registration as described in step d of step 2 in Register with a Password above. By default, this is pre-filled with Submit
- Enter the name of the step in the Title text box. By default, this is pre-filled with Enter Required Information
- If you want to add a field to obtain further information from the end user, select the Add A User Attribute button
Note: You must have defined user attributes for any fields that you want to add. For further information on user attributes, see the User Attributes topic.
The User Attribute dialog box displays. You can configure the user attribute field as described in step e of step 2 in Register with a Password above.
- If you want to add custom text to your form, select the Add Custom Text button
The Text dialog box displays. Complete the dialog box as described for the Text field step b of step 1 in Register with a Password.
- If required, select the Add a Section button to add a step to your registration form
A section is added. You can configure the section as described in step 3 of Register with a Password.
- Select the Done button to save your changes and return to the Form Builder screen