Example Trials
The Trials node is a very flexible tool that can be used in the following ways:
- In a single feature or redirect for a single user type
- With a Consumption Tracker that uses the same count across different features or redirects, or different user types
We provide examples that take you through using the Trials decision node as follows:
- A basic trial that is used only in a single feature and user type
- An advanced trial that uses a consumption tracker, which is used in two user types and two types of feature implementation
Create a Basic Trial
To create a basic trial for a single feature and user type, complete the following steps:
- Select Products from the main menu
- Select Features from the menu options
- Select the feature for which you want to create a trial, or add a feature as described in the Creating and Managing Zephr Features topic
We are using the Article feature in this example.
- If you selected an existing feature, select the version for which you want to create a trial
- Select the user type to which you want to apply the rule
We are using the Anonymous user type.
- In the Rules Builder, select the Access segment title
- Drag the Trials node to your canvas
The Trial dialog box displays, as illustrated below:
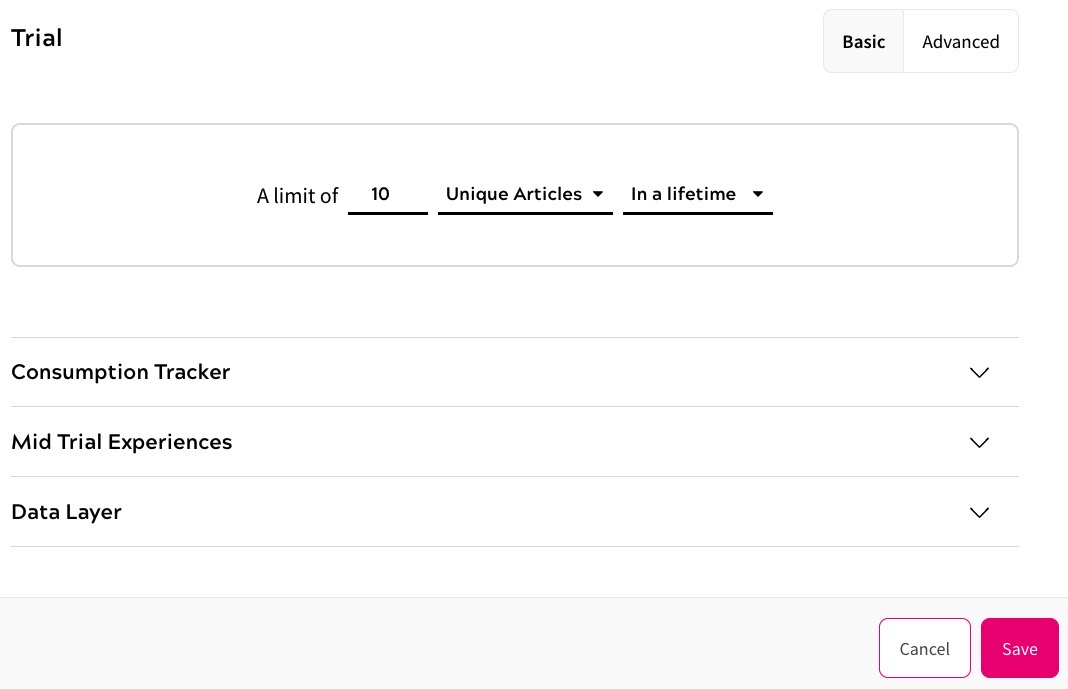
- Enter the number of views to allow in the Limit of field
- Select the type of view to count against the defined number of views from the first drop-down. The options are as follows:
- Unique Article
This is the default. The number of views is counted by each different article viewed by the end user.
We are using this setting in this example.
- Page View(s)
Select Page View(s) if you want to count all page views, including pages that have previously been viewed by the end user.
- Unique Article
- Select the period for which the limit applies from the second drop-down. The options are as follows:
- In a lifetime
This is the default. The limit applies as follows:
- For Anonymous user types, for the session
- For Registered and Customer user types, for one year
We are using this setting in this example.
- In a calendar
If you select this option, a further drop-down displays. Select the period from the drop-down. The options are as follows:
- Week
Select Week to measure the period from Monday to Sunday.
- Month
Select Month to measure the period from the 1st of the month.
- Day
Select Day to measure the period by the day.
- In the last
If you select this option, a further field displays. Enter the number of days against which to measure the period.
- Week
- Select the Save button to save your trial and return to the Rules Builder with the Trials decision node added. Selecting the Cancel button displays the Rules Builder without adding the Trials decision node
- In a lifetime
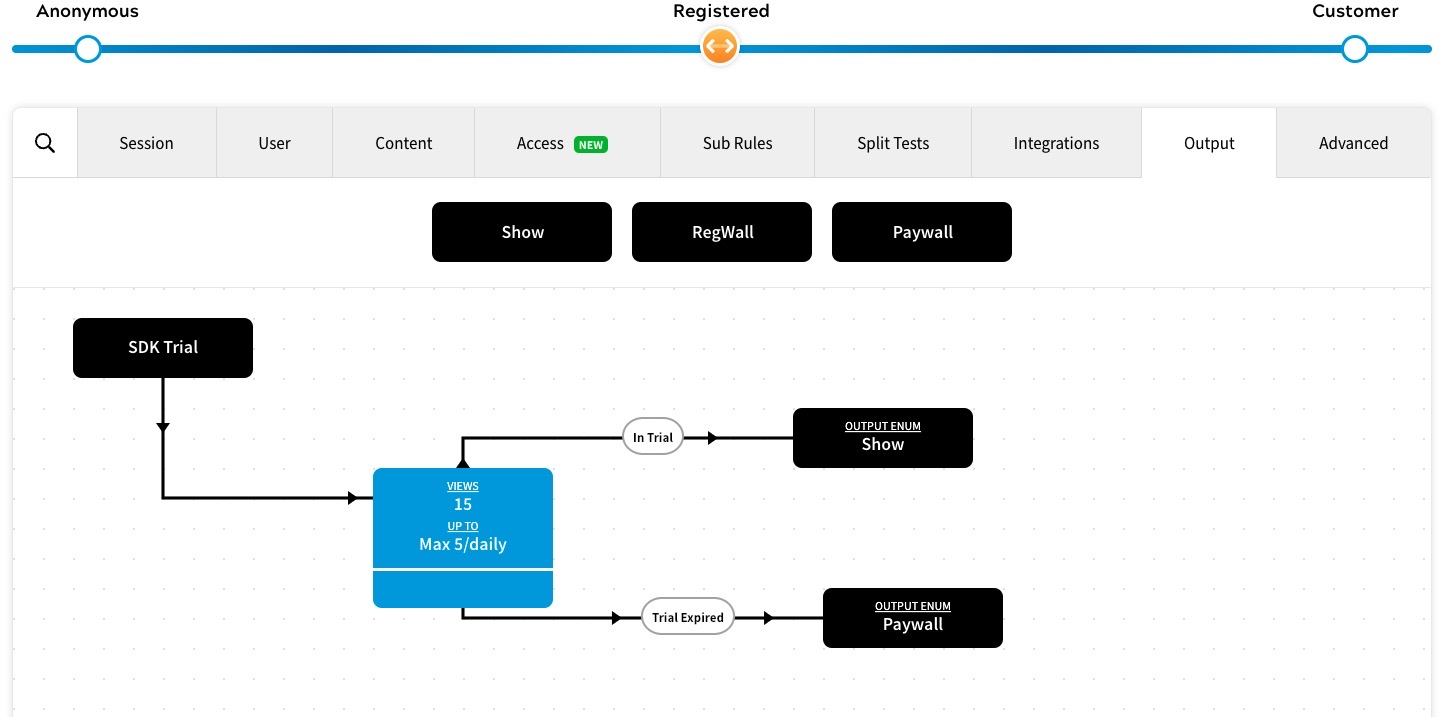
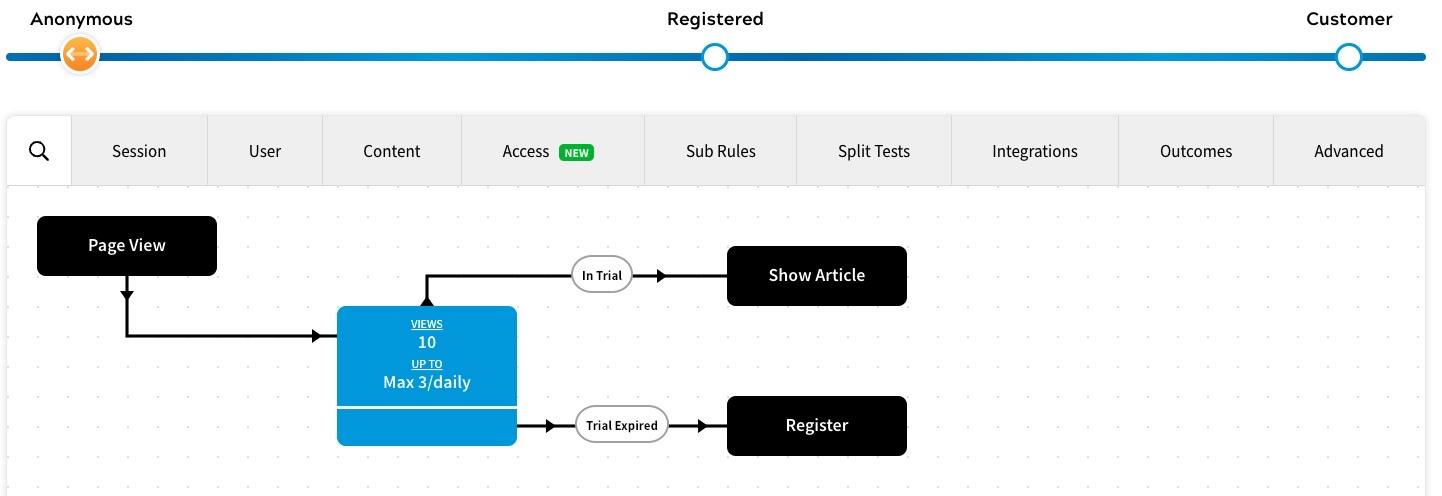
You can now complete the rule. For example, in the rule illustrated below an anonymous user is allowed to view ten articles, after which they are presented with a registration wall:

Create an Advanced Trial
To create an advanced trial that uses a consumption tracker, which is used in two user types and two types of feature implementation, we must do the following:
- Create a trial for our Anonymous user types in our HTML feature for use in your website
- Create a trial for our Registered user types in our HTML feature for use in your website
- Create a trial for our Anonymous user types in our SDK feature for use in your app
- Create a trial for our Registered user types in our SDK rule for use in your app
The steps for creating the trial for each user type in each rule implementation are the same. Repeat the steps for your user types in each type of rule implementation.
Once this is done, the consumption tracker is used each time the user consumes the feature, whether they are accessing the feature as an Anonymous or Registered user type, or using your website or app.
To create your Advanced trial for the Anonymous user type, complete the following steps:
- Select Products from the main menu
- Select Features from the menu options
- Select the feature for which you want to create a trial, or add a feature as described in the Creating and Managing Zephr Features topic
- If you selected an existing feature, select the version for which you want to create a trial
The Rules Builder for the Anonymous user type displays.
- In the Rules Builder, select the Access segment title
- Drag the Trials node to your canvas
The Trial dialog box displays.
- Select the Advanced button from the top right of the dialog box
The Advanced options display, as illustrated below:
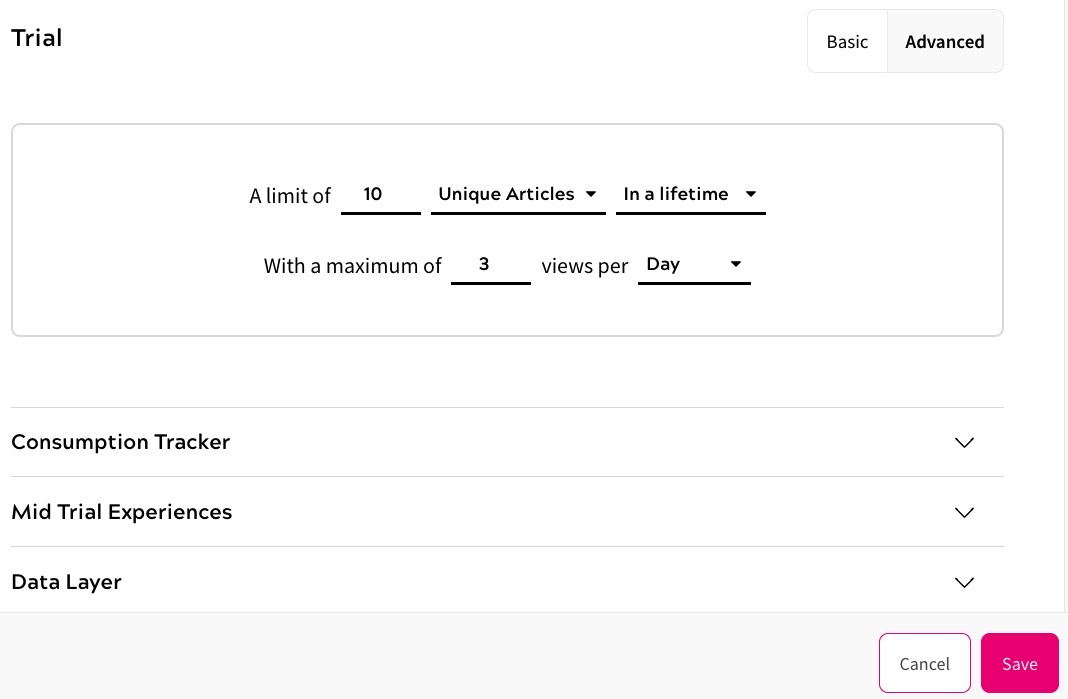
- Define the limit and the period for which it applies, as follows:
- Enter the number of views to allow in the Limit of field
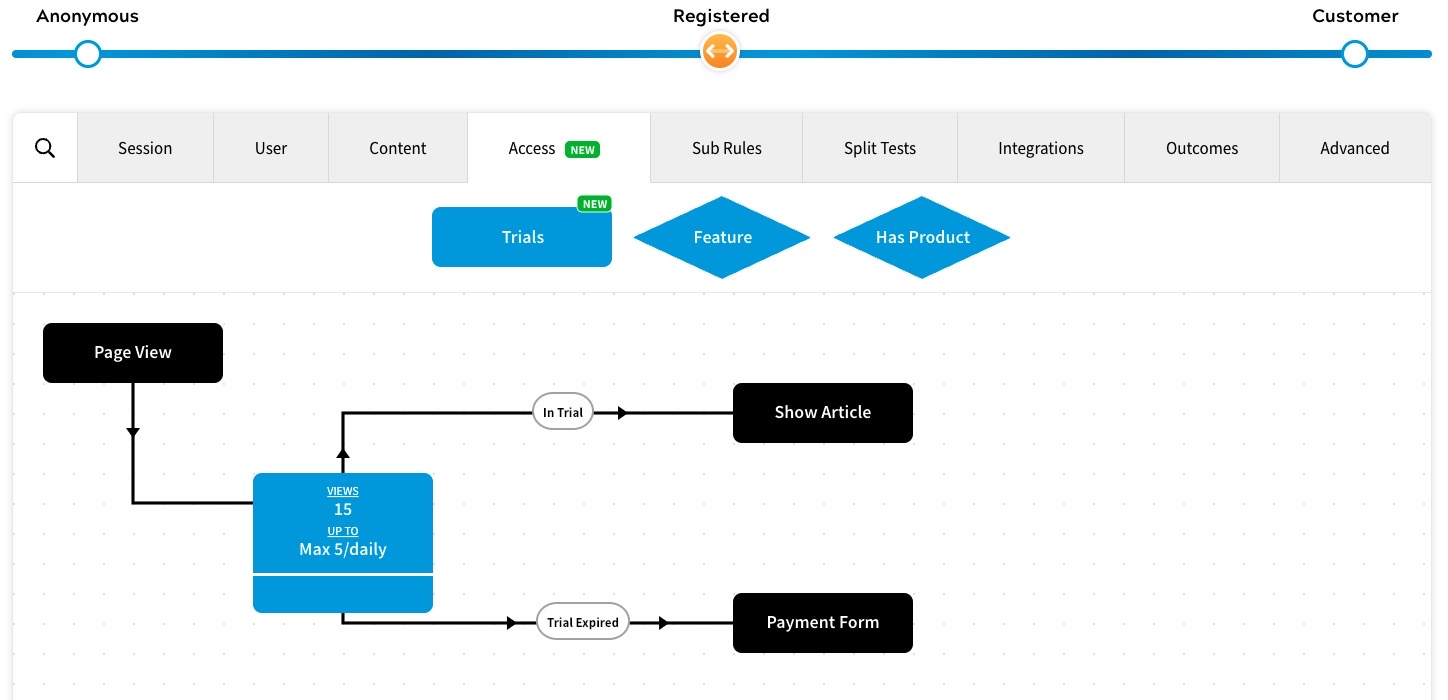
For Anonymous users, we have set a limit of ten views.
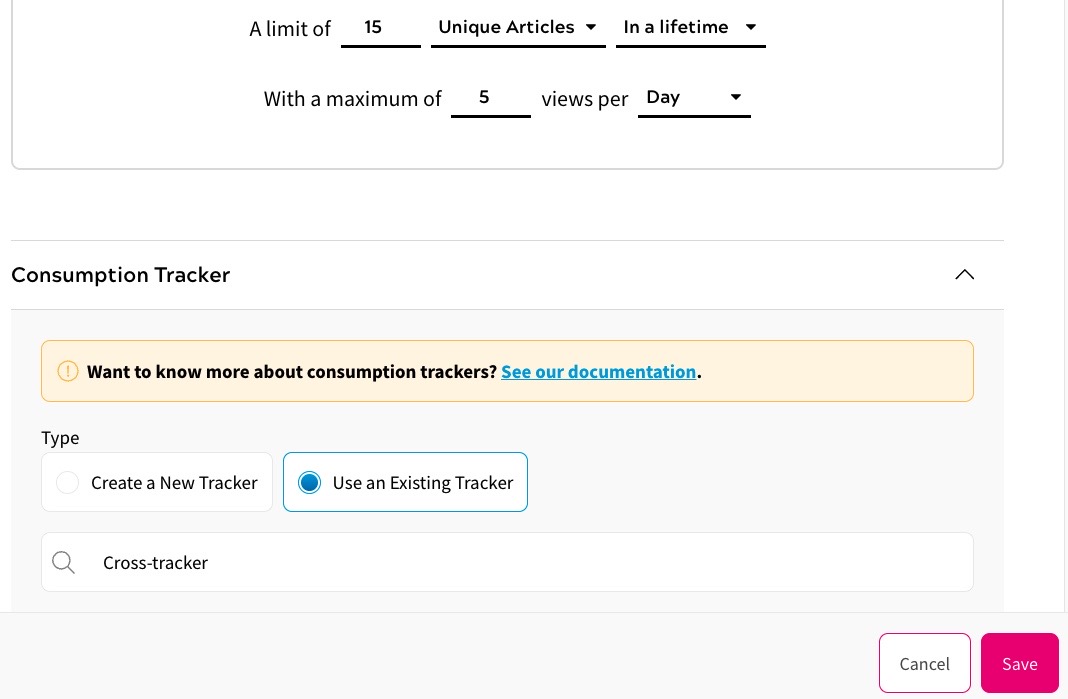
For Registered users, we have set a limit of 15 views.
This means that as an Anonymous user, your end user can use up to ten views before needing to register. When the end user registers, the number of views they had in the Anonymous trial is included in the number of rules counted in the Registered trial.
For example if an anonymous end user views five articles and then registers, the count measured against the Registered user type limit starts at five. This means that the user has ten further views before they encounter the limit set for the Registered user type.
- Select the type of view to count against the defined number of views from the first drop-down. The options are as follows:
- Unique Article
This is the default. The number of views is counted by each different article viewed by the end user.
We are using this setting in this example.
- Page View(s)
Select Page View(s) if you want to count all page views, including pages that have previously been viewed by the end user.
- Unique Article
- Select the period for which the limit applies from the second drop-down. The options are as follows:
- In a lifetime
This is the default. The limit applies as follows:
- For Anonymous user types, for the session
- For Registered and Customer user types, for one year
We are using this setting in this example.
- In a calendar
If you select this option, a further drop-down displays. Select the period from the drop-down. The options are as follows:
- Week
Select Week to measure the period from Monday to Sunday.
- Month
Select Month to measure the period from the 1st of the month.
- Day
Select Day to measure the period by the day.
- Week
- In the last
If you select this option, a further field displays. Enter the number of days against which to measure the period.
- In a lifetime
- Enter the number of views to allow in the Limit of field
- Define the maximum number of views and the period for which it applies, as follows:
- Enter the maximum number of views allowed in the defined period in the With a maximum of field
For the Anonymous user type, we have set a limit of three views.
For the Registered user type, we have set a limit of five views.
- Select the period for which the limit applies from the second drop-down. The options are as follows:
- Day
This is the default. Select Day to measure the period by the day.
We have used this setting for both Anonymous and Registered user types.
- Week
Select Week to measure the period from Monday to Sunday.
- Month
Select Month to measure the period from the 1st of the month.
- Lifetime
The limit applies as follows:
- For Anonymous user types, for the session
- For Registered and Customer user types, for one year
- Day
- Enter the maximum number of views allowed in the defined period in the With a maximum of field
- Set the Consumption Tracker, as follows:
- Select the Consumption Tracker drop-down
- For the Anonymous user type, select the Create a New Tracker radio button
- For the Anonymous user type, create the consumption tracker to use across your user types and rule implementations by entering a name for the tracker in the Tracker Name text box.
For the Registered user type in this rule implementation and both user types in the other rule implementations, select the Use an Existing Tracker and select the tracker you created for the Anonymous user type above in any of the following ways:
- Enter the name of the tracker in the text box. As you type, the matching options are listed under the text box. Select the tracker you require from the list
- Select the Or browse all trackers link. All existing trackers are listed. Select the tracker you require from the list
- If you want to report the use of the trial in the data layer, for example to use in analytics applications, complete the following steps:
- Select the Data Layer drop-down
- Select the Report trial usage in Data Layer toggle
- To report used credits, enter the data layer key for the credits used in the Trial credits used data layer key text box
- To report remaining credits, enter the data layer key for the remaining credits in the Trial credits remaining data layer key text box
- To report maximum credits used, enter the data layer key for the maximum credits used in the Max credits used data layer key text box
- To report the maximum credits remaining, enter the maximum credits remaining in the Max credits remaining data layer key text box
Note: The Data Layer options are not displayed if you are using an SDK implementation.
- Select the Registered user type from the user type selector, and repeat steps 6 to 11
- Select the Save button to save your trial and return to the Rules Builder with the Trials decision node added. Selecting the Cancel button displays the Rules Builder without adding the Trials decision node
Save and publish this rule, then repeat the steps above for the SDK rule implementation.
The completed Trials dialog box looks similar to the following in both rule implementations:
- Anonymous:

- Registered:
The completed rules look similar to the following:
- Anonymous HTML feature rule:
- Registered HTML feature rule:
- Anonymous SDK feature rule:
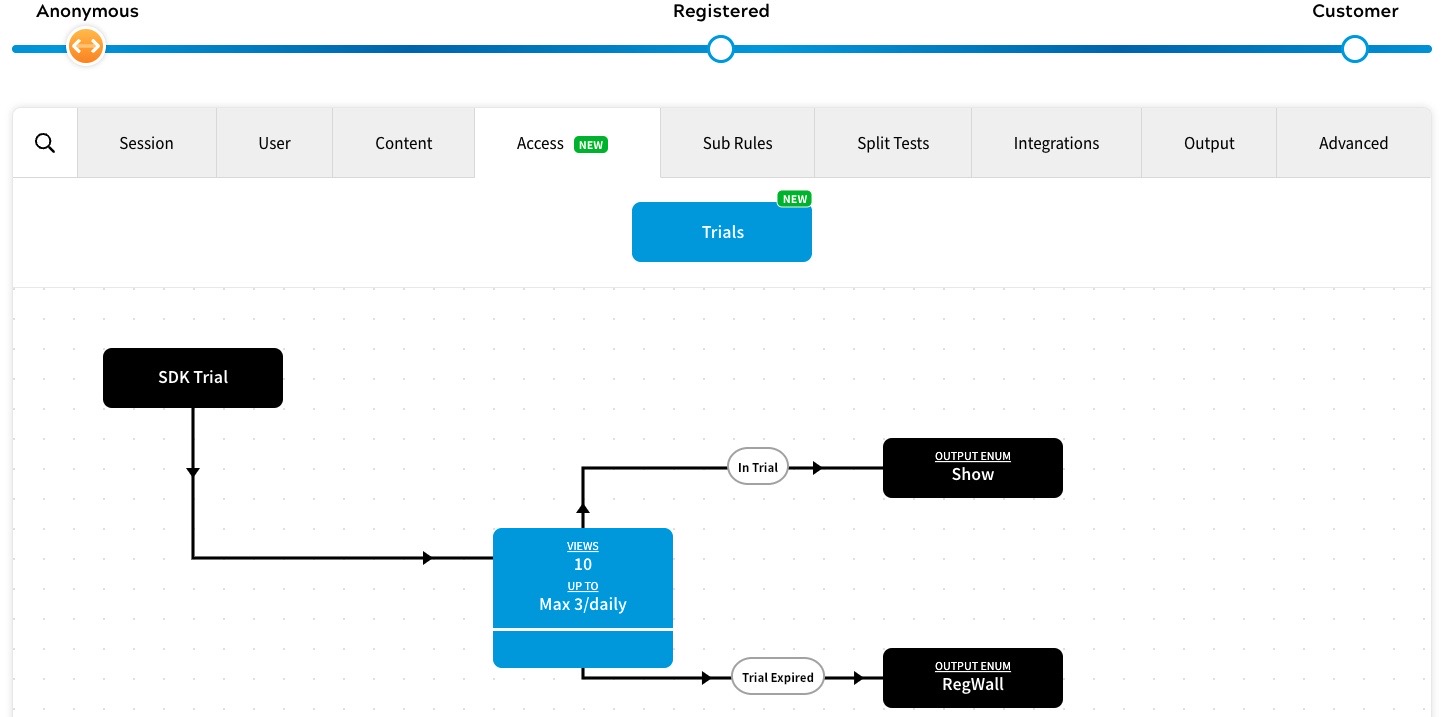
- Registered SDK feature rule: