Using Zephr's Data Layer with Google Analytics
This guide explains how Zephr can deliver paywall and user interaction information to Google Analytics, using the Zephr Data Layer feature.
Zephr does not have a native Analytics module. We focus on what we do best: Identity Management, Access Control, and Journey Orchestration.
However, Zephr can supplement your analytics by sending the relevant data to the website Data Layer.
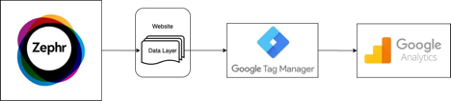
The process will work as follows:
- The user configures Zephr to trigger events and attributes to push to the Data Layer
- Google Tag Manager reads the Data Layer and stores the relevant data points as GTM variables
- Google Analytics reads those GTM variables
- Google Analytics provides the analytics necessary to report on usage, acquisition, and conversion.
The schema below exemplifies the process to follow:
Data Layer
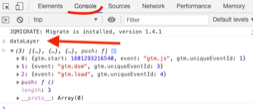
The Data layer sits between the application layer and the experience layer of the website.
You can view the current data layer information for your website by inspecting your browser console, typing dataLayer and pressing <Enter>.
Configuring your Data Layer within Zephr
In general terms, there are four types of data points Zephr can pass to the data layer:
- User Attributes
- Activity
- Products
- Test Groups
To learn more about these data points, including how to configure them, read our Data Layer user guide.
Once the Data Layer is configured, head over to the site, refresh the page. You should now be able to see the new variables and/or outcomes necessary for Google Tag Manager to work.
Google Tag Manager
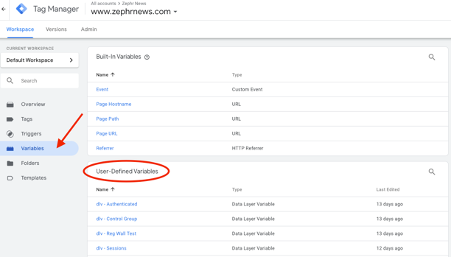
The next step is to configure Google Tag Manager (GTM). GTM is the intermediary that will capture the information presented in the Data Layer and store it against variables that Google Analytics will use to build analytics.
Note: The Google Academy is an excellent (free) resource to understand the Google Analytics ecosystem and terminology. We recommend you visit it.
Follow the instructions on the Google Academy to set up new variables. Note that the variables created must match the keys created through the data layer within your Zephr configuration.
At this point, you have completed the link between the Data Layer and GTM.
Google Analytics
The final step involves Google Analytics reading the GTM variables and reporting upon them.
The Academy also has resources on Google Analytics.
Before setting up the reporting you need to understand the differences between hits, sessions, pageviews, etc. This is an important terminology for creating reporting metrics. We recommend this Google Academy Course.
Linking GTM Variables and Google Analytics Custom Dimensions
The following steps will help you link your GTM variables on to GA dimensions:
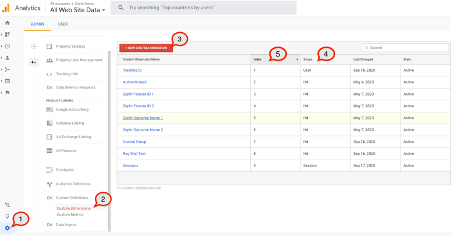
- In Google Analytics go to Admin > Property > Custom Definitions > Customer Dimensions
- Create a new custom dimension
- Define the scope: session, hit, etc
- Obtain the Index number for the custom dimension
Back in Tag Manager
- Add a new custom dimension
- Provide the index and map it to the variable you created previously
You are now able to report on those custom dimensions using the standard Google Analytics dashboards and reports. Visit the academy to learn how to obtain and interpret those results.
We have now joined all the dots between Zephr passing the data to the data layer, Google Tag Manager reading the data layer and storing the information onto variables, and finally Google Analytics reading those GTM variables to create analytics and insight on the measurement points offered by Zephr.