BlueConic
BlueConic is a Customer Data Platform (CDP) with capabilities around multidimensional user segmentation, data analysis and modelling based on gathered interaction data.
The Zephr BlueConic integration aims to operate as a means to send configured profile data to BlueConic, and also to pull back BlueConic segments for use in Zephr rules.
Pre-requisites
NOTE: Before activating the extension, you will need to have secured user consent to share data between the two systems.
NOTE: If you are using the Zephr CDN, to gather segments from BlueConic, Zephr needs to inject a small script to the browser on page load. Please contact your CSM to have the script injection feature activated for your Zephr Organisation before using this extension. If you are not using the Zephr CDN, you can still deploy a script to your frontend, which can POST segments to the Zephr subdomain for your site. Please see the Reference section below for more details.
Along with this:
- Any BlueConic Profile Properties you wish to integrate with Zephr defined in your BlueConic environment
- A Profile Property in which to store the user’s email address – it is recommended to use the default
emailproperty for this. - A Profile Property defined to hold the Zephr tracking ID for a given user
- A BlueConic API Access connection configured and activated
- Any Zephr User Attributes which you wish to map to BlueConic Profile Properties defined in your Zephr environment
Behaviour
Actions attempted by the Zephr BlueConic integration fall into two main categories:
- Syncing data from Zephr to BlueConic
- Pulling segmentation data from BlueConic for use in Zephr decisions
Data Syncing
When the extension is switched on, Zephr will sync user profile data to BlueConic when a Zephr user record is created or updated (for details of mapping configuration between Zephr User Attributes and BlueConic Profile Properties, please see below). The user email as stored in Zephr is used as the primary key between the two systems.
Segmentation Usage
Zephr will also register an HTTP segment listener against any Zephr sites for which you have activated the extension. This endpoint will accept a JSON array of BlueConic segment IDs POSTed along with a valid Zephr session cookie.
If you are using the Zephr CDN to deliver your site to end-users, the extension will also inject a small script to the browser, which will collect segments for a given user on each page load and POST back to the HTTP segment listener for the site.
To make any collected segments usable, the extension will provide extra canvas nodes to allow decision making on segment membership. Currently ‘featured segments’ (where segments are chosen from a drop-down) and ‘manual’ nodes are provided (for more details on usage, please see below).
NOTE: As segment data is being retrieved and POSTed asynchronously from the browser to the Zephr backend, there may be cases where no segment data is available for a given user on first page load. Any rules you create using segments should take account of this.
Configuration
To enable the BlueConic Extension within Zephr, navigate to Settings > Extensions > BlueConic. You’ll find the BlueConic integration in the Customer Data Platform category. If you cannot see this option, email support@zephr.com.
Once on the configuration screen, you’ll see three sections – API Configuration, Profile Properties Mapping and Segments.
API Configuration
In this section, enter the Consumer Key and Consumer Secret from the relevant BlueConic API Connection.
You’ll also need to add the subdomain on which your BlueConic environment is hosted: https://<yoursubdomain>.blueconic.net
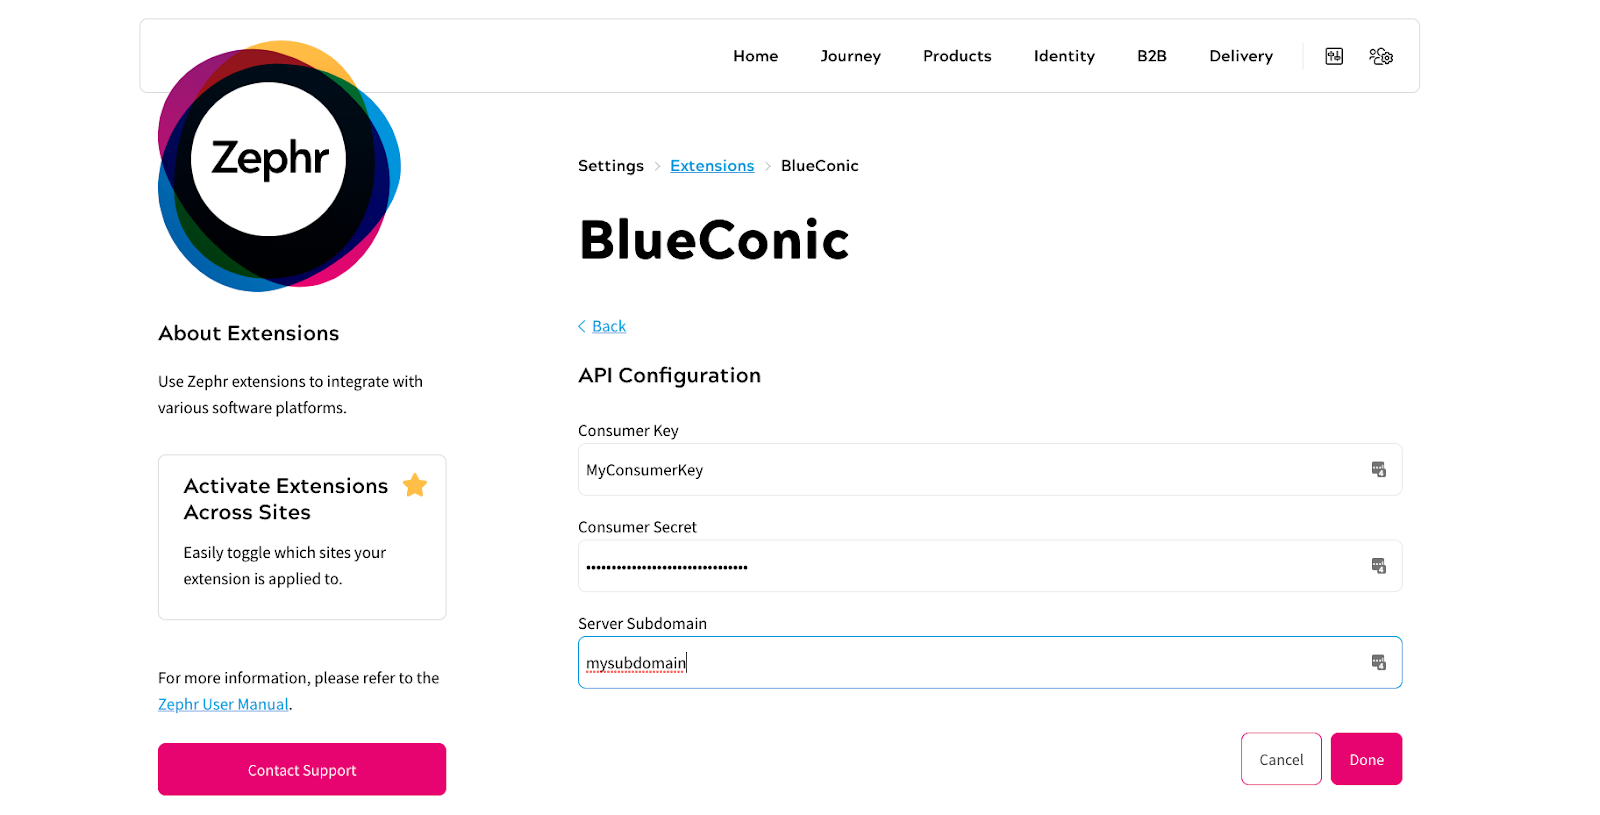
Once added, click Done.
Profile Properties Mapping
This section takes 3 inputs:
- The ID of the Profile Property to which you wish to map the user’s email address.
- The ID of the Profile Property to which you wish to map the Zephr Tracking ID
- An input which takes an array of JSON objects, used to map chosen Zephr User Attributes to chosen BlueConic Profile Properties.
The format of the expected input is as follows:
[
    {
        "zephrAttributeId": "<zephr_user_attribute_1_id>",
        "blueconic": {
            "profilePropertyId": "<blueconic_profile_property1_id>",
            "type": "<blueconic_profile_property1_datatype>"
        }
    },
    {
        "zephrAttributeId": "<zephr_user_attribute_2_id>",
        "blueconic": {
            "profilePropertyId": "<blueconic_profile_property2_id>",
            "type": "<blueconic_profile_property2_datatype>"
        }
    },
    ...
]
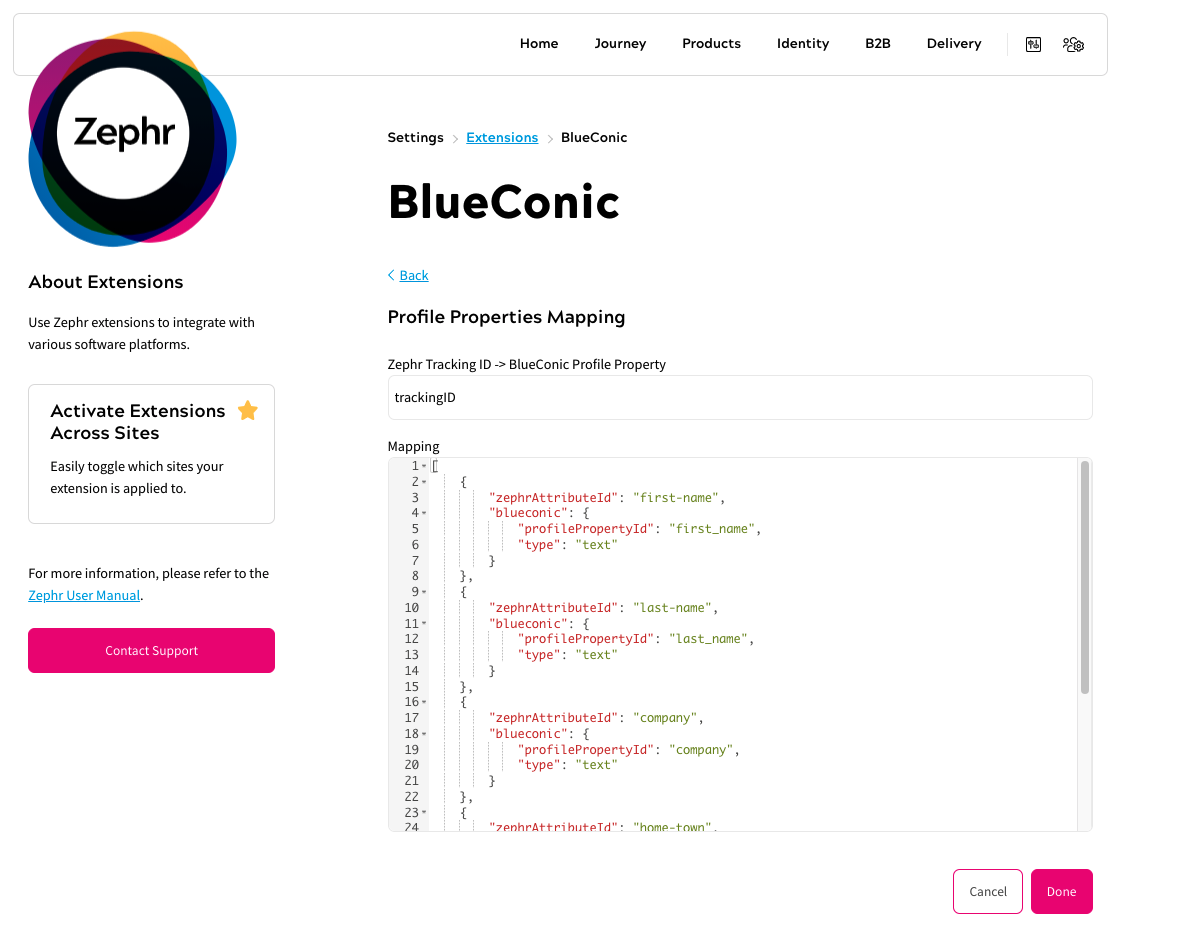
Please see here for more details on available data types in BlueConic.
Once complete, click Done.
Segments
This section includes a single JSON input to configure available options on the ‘Featured Segments’ node on the rules canvas.
Input takes the form of a flat JSON object, where keys are the BlueConic segment IDs and the values are the human-readable segment name you want displayed on the node configuration dropdown when selecting a segment in your rule.
The format is as follows:
{
    "seg1": "Segment 1",
    "seg2": "Segment 2",
    "seg3": "Segment 3"
}
Activate Plugin
Once you’ve input the relevant details, confirm which of your Sites the extension should be active on. To do this, use the toggles for each site under the Activate Plugin section, or choose Select All Sites.
Once completed, click Save. Your extension is now enabled.
Usage
Once configured and activated, most of the extension functionality should be automatic.
To use the canvas decision nodes, navigate to the relevant Feature or Redirect Rule and select the BlueConic tab from the rules palette. You will then be able to drag either the ‘Manual’ or ‘Featured Segments’ decision nodes onto your canvas and complete your Rule as usual.
For the Manual node, you will need to add the raw BlueConic Degment ID as a string to the input.
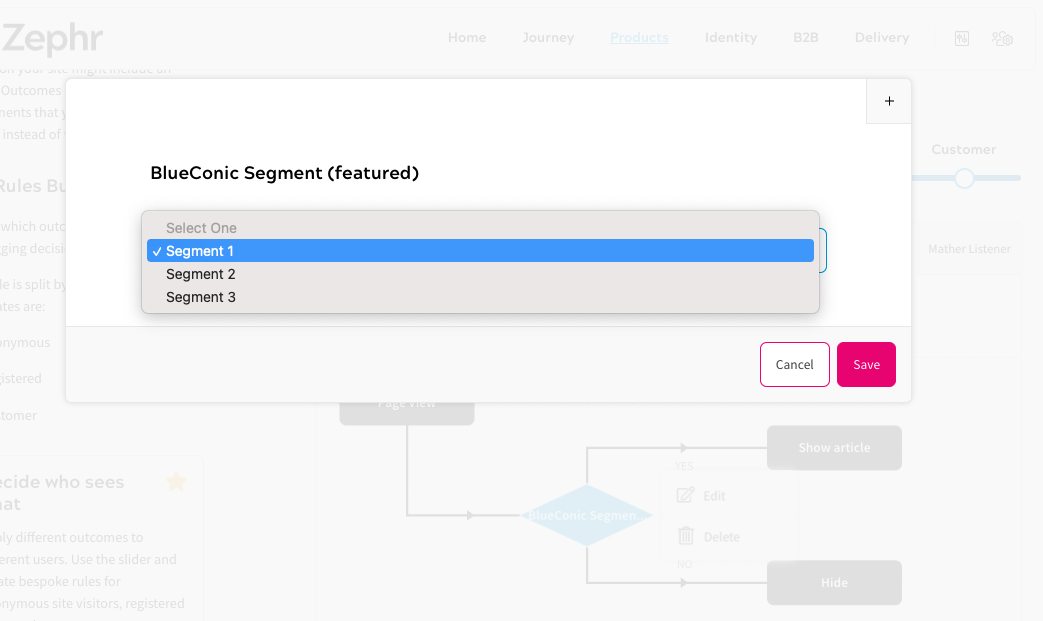
For the Featured Segments node, you will be able to choose from one of the pre-configured options via a drop down.
Reference
The script injected to the browser is based on the code example provided by BlueConic on this page.
<script>
(function postSegmentsWhenReady() {
       function postSegments() {
       var segments = window.blueConicClient.getSegments().map((el) => {
            return el.id
        });

       if (segments.length) {
          var retrieveSegmentsXhr = new (XMLHttpRequest || ActiveXObject)('MSXML2.XMLHTTP.3.0');
          retrieveSegmentsXhr.open('POST', '/plugins/public/blueconic/segments', true);
          retrieveSegmentsXhr.setRequestHeader('Content-type', 'application/json');
          retrieveSegmentsXhr.withCredentials = true;
          retrieveSegmentsXhr.send(JSON.stringify(segments));
       }
    }

    if (typeof window.blueConicClient !== 'undefined' &&
       typeof window.blueConicClient.event !== 'undefined' &&
       typeof window.blueConicClient.event.subscribe !== 'undefined') {
       postSegments();
    } else {
    window.addEventListener('onBlueConicLoaded', function () {
       postSegments();
       }, false);
    }
})();
</script>
If you are creating your own script to POST segments to the HTTP listener, you should be able to use the script above as an example. Please remember to include:
- A valid session ID for your user in the `Cookie` header – e.g.
Cookie: blaize_session=70635d53-b265-4156-bd8d-ec479a95dec5 - Any segments that you retrieve from BlueConic should be included in the request body as a stringified JSON array of strings.