Sailthru
The Zephr Sailthru extension allows you to:
- Create, update and delete Sailthru Users when Zephr Users are created, updated or deleted
- Trigger automated emails from the Sailthru Lifecycle Optimizer within Zephr Rules
- Register purchase events in Zephr with the SailThru Purchase API
These features allow a user to opt into your Sailthru-based marketing seamlessly, whilst allowing you to trigger automated marketing flows wherever needed.
Configuring the Sailthru Extension
To enable the Sailthru Extension within Zephr, navigate to Settings > Extensions > Sailthru. If you cannot see the Sailthru option in your list of Extensions, email support@zephr.com.
Once on the configuration screen, you’ll see three sections – Sailthru API Details, Sailthru/Blaize Mapping and Activate Plugin.
Sailthru API Details
First, click Sailthru API Details. Here, you’ll need to input the following information:
- Sailthru API Key
- Sailthru API Secret
Once complete, click Save. If you are unsure of these details, consult your Sailthru Documentation.
Sailthru/Blaize Mapping
Following this, you will need to add some mapping configuration. Click Sailthru/Blaize Mapping, here, you’ll need to add:
- Default list for new users
- Zephr/SailThru attribute mapping
- Zephr Product Price mapping
- Zephr Canvas/Sailthru Events configuration – this will be used for triggering events within the Sailthru Lifecycle Optimizer
The ‘Default list for new users’ is simply the list on which each new user created in Zephr should arrive.
The ‘Zephr/SailThru attribute mapping’ allows you to map your User Schema Attributes to the Attributes stored against a user within a Sailthru List. For example, the following mapping would be used to map User Schema Attributes of First Name and Last Name, along with the Zephr Registration Date and Tracking ID:
{
  "tracking_id": "trackingId",
  "registered": "registerDate",
  "attributes": {
    "first-name": "firstName",
    "last-name": "lastName"
  }
}
Email is the key identifier between Sailthru and Zephr, so this doesn’t need to be added to your mapping.
The ‘Zephr Product Price Mapping’ allows you to record a price paid when registering an event with the SailThru Purchase API. The format for this mapping is a simple JSON object, with the Zephr product IDs as the keys and the price paid (in USD cents) as the value. For example, a mapping with a single product, purchased for $10.99 would be:
{
    "my-zephr-product-id": 1099
}
The ‘Zephr Canvas/SailThru Events’ section allows you to add arbitrary events for points in your Zephr rules where you want to send a message to a corresponding receiver in the SailThru Event API. First, you will need to define the events you wish to capture with a JSON array of objects. Each object in the array should have a name and a label key. For example:
[
    {
        "name": "event_1",
        "label": "Event 1"
    },
    {
        "name": "event_2",
        "label": "Event 2"
    },
    {
        "name": "event_3",
        "label": "Event 3"
    }
]
In parallel with (or before) adding your event configuration to Zephr, you will also need to add receivers for your events in the SailThru Lifecycle Optimizer. To do this:
- Sign into your SailThru account
- Navigate to a Lifecycle Optimizer Flow (or create a new one)
- Click the “Entry” node and choose the “Custom Event (API)” trigger
- In the ‘Event Name’ field, enter the value corresponding to the name key in the relevant Zephr event config object
You can then add any further Action, Check, Test or Wait configuration as needed to your Flow.
When your details are correct, click Done.
Activate Plugin
Once you’ve input the relevant details, confirm which of your Sites the extension should be active on. To do this, use the toggles for each site under the Activate Plugin section, or choose Select All Sites.
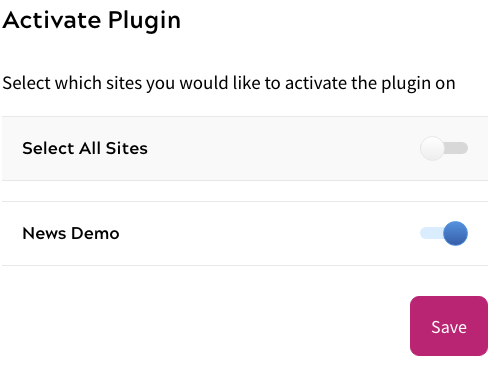
Once completed, click Save. Your extension is now enabled and all users who are created within Zephr will be added as users within Sailthru.
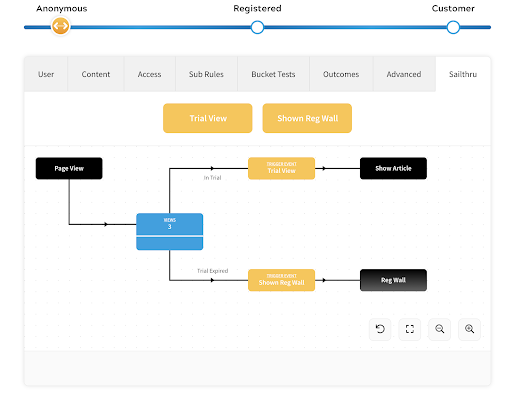
Triggering Automated Marketing within a Zephr Rule
As part of our integration with Sailthru, we’ve created a way for you to trigger automated marketing, sent via Sailthru, from within a Zephr Rule. This feature uses the Sailthru Lifecycle Optimizer, and adds a new Sailthru option for you to drag and drop into the Zephr Canvas when creating a Rule.
As mentioned above, in order for Sailthru to listen for Zephr triggers, you will first need to build a new flow within your Sailthru Lifecycle Optimizer with a custom event API, the event name, and the action to be done. Details on how to do this can be found in the Sailthru documentation page for the Lifecycle Optimizer.
Once set up, navigate to the Zephr rule where you would like to trigger the Lifecycle Optimizer from. Within the decision point palette, you will see a tab for Sailthru, click into this then drag the relevant Event onto your Rule Canvas. Connect this node into your rule at the point you would like the email triggered.
Once you’re happy with your rule, click Save. Remember you will need to Publish your rule in order for it to go live on your site.