Login Providers
Use login providers to allow end-users to register and log in using Social Sign-In.
Zephr Admin Users can add access links to the following OAuth 2.0 Social Sign On providers on both a global and site-specific basis:
- Apple
- Microsoft
Once configured, you can use the login providers in Zephr’s out-of-the-box Registration Forms and Pages to simplify end user registration and sign in.
To set up a login provider, you must create a global login provider, as described in the Create Global Login Providers section below. You can then do the following:
- Set login providers for each site, as described in the Add Login Provider to Site topic
- Use login providers on a form, as described in the Login, Registration and Forgot Password Forms section
- Use login providers on a page, as described in the Pages section
Create Global Login Providers
To create a global Login Provider, complete the following steps:
- Select the Settings icon
- Select Login Providers
The Login Providers screen displays, as illustrated below:

- Select the Add a Login Provider button
The Add Login Provider screen displays, as illustrated below:
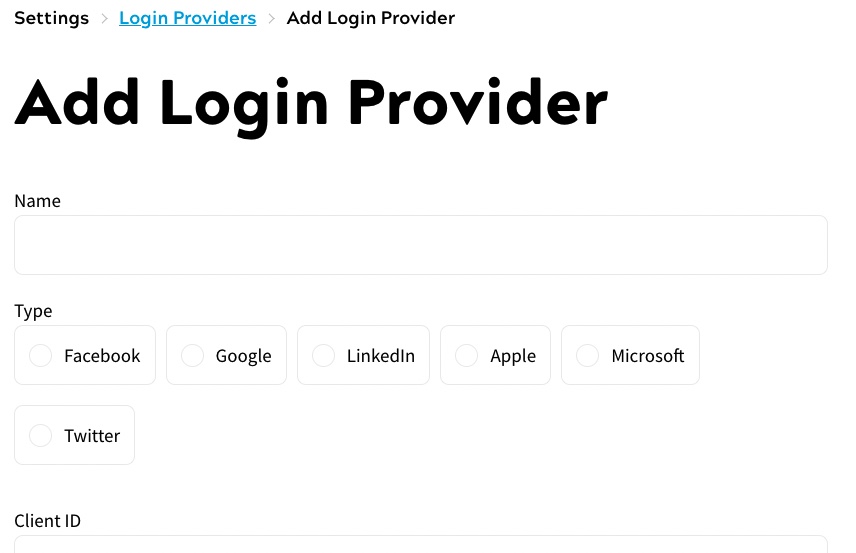
- Enter a name for the login provider in the Name text box
- Select the login provider from the Type radio buttons. The options are as follows:
- Apple
- Microsoft
- To use the selected login provider by default for all new sites, select the Use this login provider as default for all new sites checkbox
Note: Global login providers are not added to existing sites. You can manage the login provider used for a site, as described in the above section.
- Enter the client ID for the selected login provider in the Client ID text box
- Enter the secret key for the selected login provider in the Client Secret text box
Note: For further information on obtaining the client ID and secret key for your chosen login provider, see the Obtain Client ID and Secret Key section below.
- Select the Add User Attribute and Field Name button to associate a user attribute with a field name used by your login provider
The information returned from the login provider populates the User Profile Information in the Admin Console and is used to pre-fill relevant sections of the form. For further information on the User Profile Information, see the Users topic.
The Attribute Mapping dialog box displays, as illustrated below:
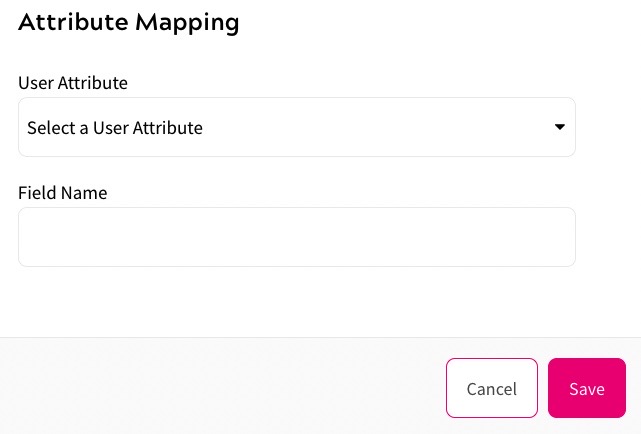
To map a user attribute to a field name, complete the following steps:
- Select the user attribute from the User Attribute drop-down menu
- Enter the field name to map to the selected user attribute in the Field Name text box
If the login provider uses nested fields, enter the nested field names in this text box, separated by a period (.).
Note: For further information on obtaining the field names for your chosen login provider, see the Obtain Exposed Field Names section.
- Select the Save button to save your changes and return to the Add Login Provider screen. Selecting the Cancel button displays the Add Login Provider screen without saving any changes
- Select the Save button to save your changes and return to the Login Providers screen. Selecting the Cancel button displays the Login Providers screen without saving the login provider
Repeat these steps to add another global login provider.
You can add as many global login providers of the same type as you require; for example, you can add multiple different Facebook login providers. However, each site can only use one login provider of each type.
Obtain Client ID and Secret Key
For information on obtaining the client ID and secret key for each login provider, refer to the following documentation: