Custom Variables In Custom Components
In this example, we create custom variables that can be used in Custom Component Blocks, such as modals, footers, or in-page content blocks.
We add a Meter Remaining count to a website footer, which displays on the site as illustrated below:

We trigger the meter variable on page views. To do this, we use a sub rule, and the a Trial with remaining counts defined.
In this example, we do the following:
- Create and host the component, then add it to the Component Library
- Create a sub rule containing a trial using remaining views to allow us to run a custom script
- Build the main rule
Create Your Component
To display a footer on your site, you must host a footer component and add it to your Zephr Component Library.
In your component code, you must reference the variable that you want to display using a mustache template. For example, if your variable is called meter, your code must contain a {{meter}} reference, as shown in the following extract:
<b><mark>You have read {{meter}} articles</mark><b>
For further information on using mustache variables in your component templates, see the User Variables in Component Templates topic.
You must remember to make a note of the name of the variable that you use in your component, as we use this when we create our sub rule.
When you have created and hosted your component, add it to your Zephr Component Library.
For further information on using the Component Library, see the Component Library section.
Add Your Sub Rule
To keep our main rule simple and clear, we build the meter footer rule in a sub rule.
To display the meter countdown in the footer component, we use a trial with remaining counts. When the remaining counts are reached, we use a script to save the counter to the variable for use when the user in in the trial.
To add your sub rule, complete the following steps:
- Navigate to the feature we created in the Build Your Feature topic as follows:
- Select Products from the main menu
- Select Features from the menu options
- Select the feature
For this example we use the Article feature
- Select the version to update
The rules builder displays
- Select the Access segment title
- Drag the Trials decision node to the rules canvas
The Trial dialog box displays, as illustrated below:
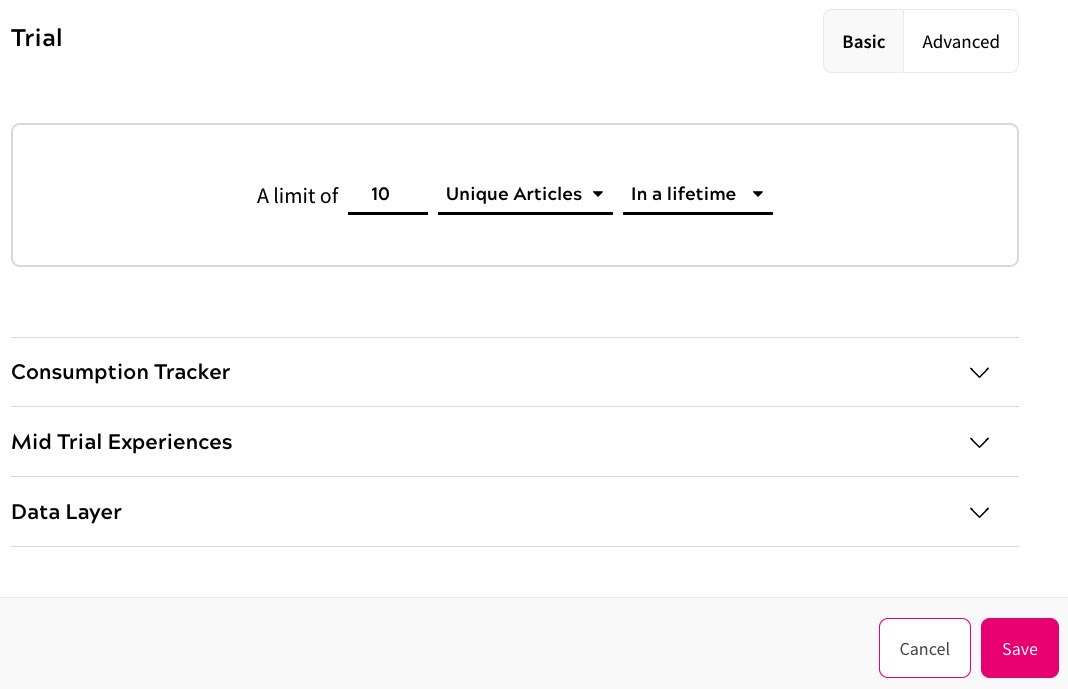
Complete this dialog box as follows:
- Enter 4 in the A limit of field
This limits the allowed views to four.
- Select Page Views from the first drop-down
This means that every view is counted toward the limit; even repeat views of the same content.
- Select In the last from the second drop-down
This allows you to define the duration for which the limit applies.
- Enter 7 in the last field
This limits the duration to seven days.
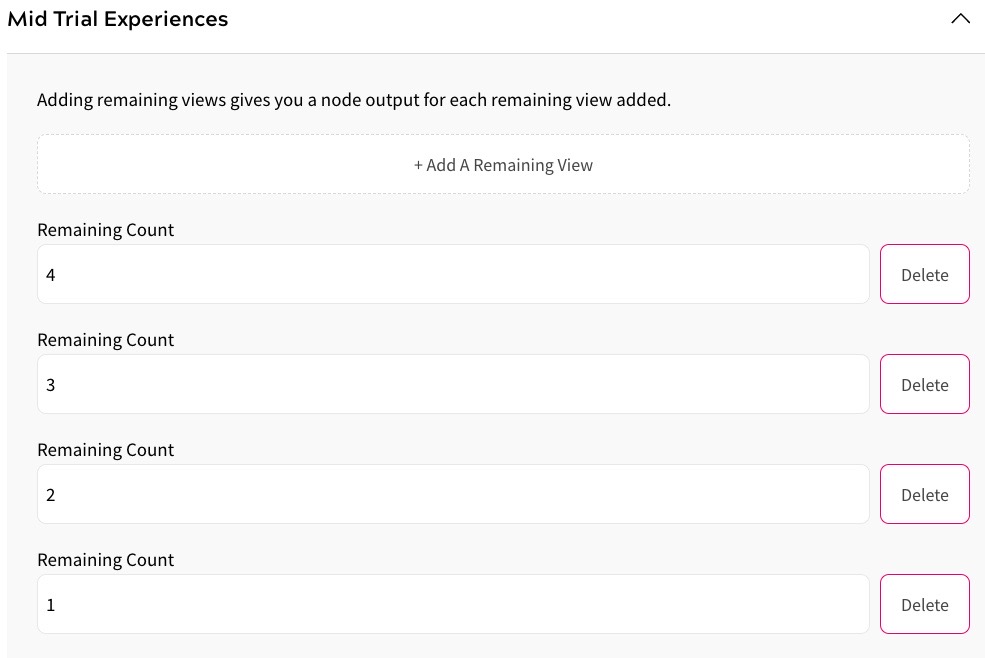
- Select the Mid Trial Experiences button
- Select the Add A Remaining View button
- Enter 4 in the Remaining Count text box
This adds a node when the meter count reaches four remaining views.
- Repeat step f to add remaining counts of 3, 2, and 1
Your Mid Trial Experiences section looks similar to the following:
- Select the Save button
Your Trial decision node is added to the sub rule canvas.
- Enter 4 in the A limit of field
- Select the Advanced segment title from the decision bar
- Drag the Run Custom Script decision node to your sub rule canvas
The Custom Script dialog box displays.
Complete this dialog box as follows:
- Enter
uiComponentScope["meter"] = "4";in the text boxNote: In this script, we use the variable we set up,
meter, and a remaining count of four. If you used a different variable name or remaining count, these fields must be changed to match your configuration. - Select the Save button
The Custom Script decision node is added to your sub rule canvas.
- Enter
- Connect the 4 Remaining node from the Trial decision node to the Custom Script decision node
- Repeat steps 4 and 5 to add a script for the other remaining counts and connect the other Remaining nodes to the relevant custom script decision node
Note: Remember to change the remaining count field to the count relevant for the script.
We now have four Custom Script decision nodes on your sub rule canvas, which are connected to the related remaining count nodes.
- Select the Sub Rules segment title from the decision bar
- Drag the Output Option decision node to your sub rule canvas
The Output Option dialog box displays.
Complete this dialog box as follows:
- Enter In Trial in the Title text box
- Select the Save button
The In Trial output option is added to the sub rule canvas.
- Connect the In Trial node of the Trials decision node and all the Custom Scripts to the In Trial output option
- Drag another Output Option decision node to your sub rule canvas
The Output Option dialog box displays.
Complete this dialog box as follows:
- Enter Trial Expired in the Title text box
- Select the Save button
The Trial Expired output option is added to the sub rule canvas.
- Connect the Trial Expired node of the Trials decision node to the Trial Expired output option
Your rule looks similar to the following:
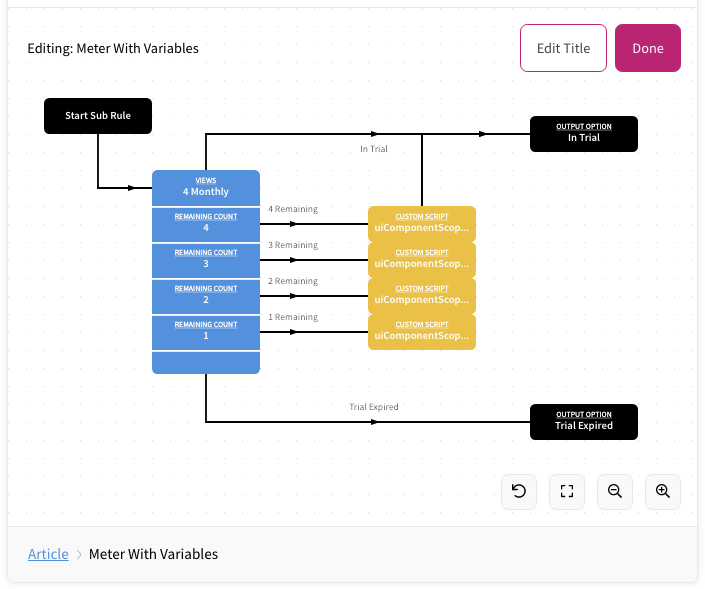
- Select the Done button to save your sub rule and return to your main rules canvas
The sub rule is added to the main rule as a pink box.
Build Your Main Rule
To build your main rule, complete the following steps:
- Connect the Page View node to the Sub Rule decision node
- Create a custom component block outcome
To create your custom component block outcome, follow the instructions in the Add an Outcome and the Create a Custom Component Block topic. Make sure that you use the component that you created in the Create Your Component section.
- Connect the In Trial Node of the Sub Rule to the Footer outcome
- Create a registration form outcome
To create your registration form outcome, follow the instructions in the Create Your Registration Form Outcome topic from the end-to-end example. To distinguish this form from the one built for that example, enter Registration in the Title text box of the Add an Outcome screen
- Connect the Trial Expired node of the Sub Rule to the Registration outcome
Your main rule is similar to the following:
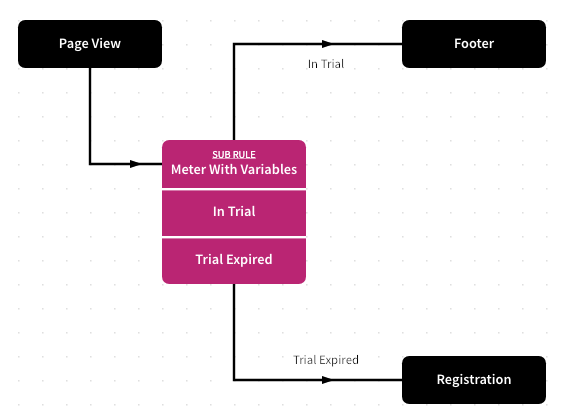
- Select the Save As New Version button
You can now publish your feature, as described in the Publish Your Feature topic from the end-to-end example.