Create a user schema
In Zephr, your User Schema refers to the series of fields and attributes that you save against your user. Your user schema is used in a lot of places. On a User’s Identity page, you will see the information that they have provided against those fields. In Registration and Data Capture forms, the User Schema is provided as available fields to add to your form. Within rules, User Schema fields can, if added as Decision Points, be used to segment users based upon the information they have provided you.
With this in mind, setting up your User Schema is one of the first tasks you’ll want to do when you first start using Zephr.
Default Fields
Before adding your own User Schema, it’s important to know that some information is stored by Zephr, by default, so you won’t need to add certain fields.
By default, Zephr stores a user’s email address, username, password, and registration date, along with a unique user ID (the Zephr ID), and a tracking ID. As such, none of these fields need to be added. Instead, add any additional information you wish to store, such as First and Last Name, Country, Job Title, or Favourite Colour.
How to Create a User Schema
In this tutorial, you will learn the steps required to Create a User Schema within Zephr.
Select Settings > Identity Management
In the User Schema section, click the Add Attribute button. Type your field name into the Label Section and choose a Type from the drop down menu.
Should you select a different type of HTML field from the drop-down list, such as Select, you’ll automatically be presented with the option to create input fields to populate the selection. This is done by choosing Add Option.
Other optional fields include Internal Description to provide an internal reference for administrators, Public Description to explain a field in more detail for front end users, choosing if the field is mandatory by ticking required, and choosing is the field should be available as a Decision Point within the Rules Builder by checking Decision Point.
Take into consideration the following when looking at the Required? and Decision Point options:
When a field is set to Required? within the User Schema, it will need to be provided in ALL cases where a User is being created, whether that’s by the end user on your website, via API, or via manual entry in the Zephr Identity area. If it is required, you’ll need to ensure the field is available on all public Registration Forms. If there are instances where you will not want to provide this information, we recommend you leave this unchecked. When unchecked, you may still choose to make it required for end users, by ticking the Required? box on your Registration Form.
For Decision Point, this off by Default. Whilst any field could be used as a Decision Point, for example creating a Rule that provides a different experience for users named Gwen, it is unlikely that you’ll have a use case where all User Schema fields are required to meet you Access Model. If you do not intend to use the field within a Decision Point, we recommend keeping this switched off to ensure there is no effect on performance.
When Decision Point is checked, you’ll notice that the previously unavailable User Field option is available in the Feature Builder navigation.
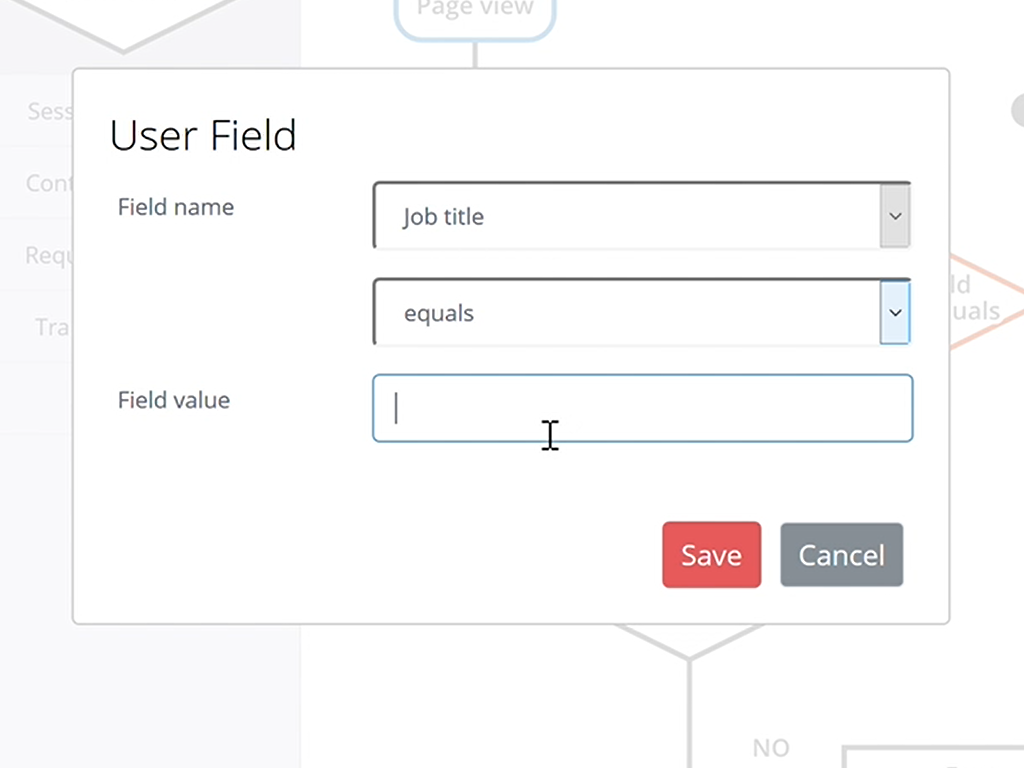
Choose the user field you wish to create a rule against under Field Name, and then enter the value you wish the decision to be made based
In this example, implementing this for a logged in User enables you to create unique journeys for users based upon their Job Title.
Once you’ve added all of your User Schema fields, navigate to Identity > Users and click into a User Profile or, if you don’t have any Users yet, click Add User. Here you’ll see the fields you created in your User Schema displayed under the Attributes section.
Reordering the User Schema
The Zephr User Schema determines the information that can be stored against a user’s profile in Zephr. The order of the User Schema also determines the order in which you see this information on an individual user profile, and within the broader user list.
To reorder the User Schema:
- Login to the Admin Console
- Click the Cog Menu, then choose Identity Management
- Scroll down to User Schema
- Use the Arrow Buttons next to each line to drag and drop the fields into your preferred order.
These changes will be saved when you navigate away from the page, and will be reflected in both an individual user’s profile, and on the user list (with the two highest user schema fields being displayed next to the email address).