Create ramp deals
This tutorial demonstrates how to create a ramp deal by creating an order.
In this tutorial you will subscribe a customer to a product for 3 years, starting 2020/07/01. You will set up a Ramp with three Intervals for this subscription. At the beginning of the second year, the price will change to $1200. At the beginning of the third year, the price will change to $1400. You will specify the price changes in the order using product updates.
In this tutorial, you will set the following dates:
- The date when the order is signed: 2020/07/01
- The contract effective date, service activation date, and customer acceptance date of the subscription: 2020/07/01
- The start date of the first term of the subscription: 2020/07/01
- Interval 2 start date: 2021/07/01
- Interval 3 start date: 2022/07/01
- The contract effective date, service activation date, and customer acceptance date of the first Update product order action with the price changed to $1200: 2021/07/01
- The contract effective date, service activation date, and customer acceptance date of the second Update product order action with the price changed to $1500: 2022/07/01
Use the Zuora application
To create a ramp deal by creating an order in the Zuora application:
-
Go to Billing Settings > Default Subscription and Order Settings in the Zuora Billing UI. Make sure the Enable Ramp for Orders? setting is set to Yes. Skip this step if the setting has already been set to Yes.
-
Navigate to Customers > Orders. The Orders page opens.
-
Click Create New Order at the top right. The Create New Order page opens.
-
In the Account field, enter the name of the account that owns the subscription. By default, the account that owns the order will also own the subscription.
You can enter the account by clicking either Account Name or Account Number.
- If you click Account Name, type part of the account name in the Account field and the filtered accounts can be dynamically listed for your selection.
- If you click Account Number, type the complete account number.
-
In the Order date field, enter the order date you are to assign to the order.
-
Click Create a New Subscription at the bottom of the page. The Create Subscription page opens.
-
In the Create a New Subscription area, fill in the information for the following sections:
-
In the Subscription Overview section, in the Type field, select Termed.
-
In the Terms and Conditions section, in the Initial Term field, enter
36for the three-year subscription. -
In the Ramp section, select the Ramp enabled option.
-
In the Number of intervals field, enter or select the number of intervals you want to set in the ramp.
-
In the Description field, you can enter a description for the ramp.
-
The Interval 1 start date and Interval 3 end date fields are by default set to the term start date and term end date of the subscription.
-
In the Interval 2 start date field, you can enter or select the date you want to set as the start date for Interval 2. In the Interval 3 start date field, you can enter or select the date you want to set as the start date for Interval 3. Note the length of each Interval does not have to be equal. In this sample, we will set the start date of Interval 2 as
2021/07/01and the start date of Interval 3 as2022/07/01, so that the length of each Interval is one year.
-
-
In the Trigger Dates section, specify
2020/07/01in the Contract effective, Service activation, and Customer acceptance fields. For more information, see Billing Trigger Dates.
-
-
Click Continue.
-
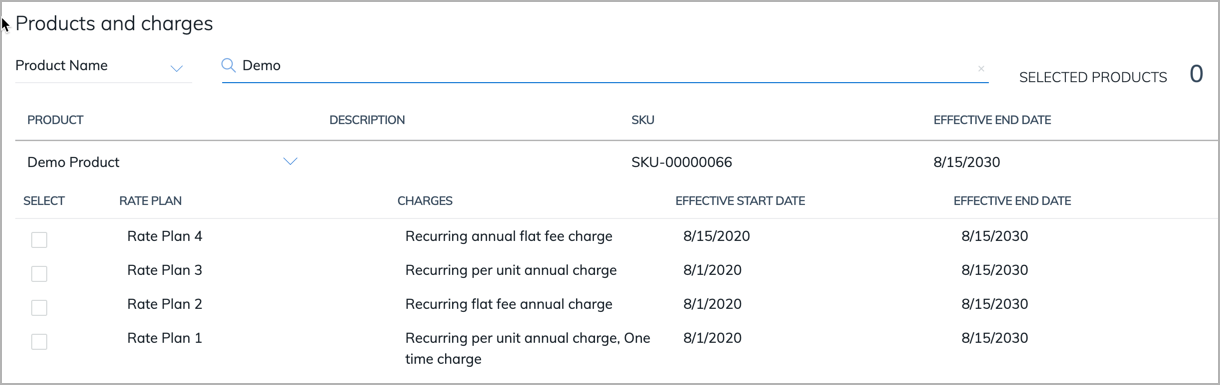
In the Products and charges area, search and locate the product to be added. You can choose to search by product name or by product SKU through the drop-down list next to the Product Name field. The displayed products will dynamically change as you type in the Search field.

-
Click the right arrow ( > ) next to the product name to display the product rate plans and then select the rate plans you want to subscribe to by ticking the corresponding checkboxes.
-
At the bottom of the page, click Add Product.
The selected products and charges are displayed in a table on the Create Subscription page.
-
At the bottom of the page, click Review Order.
The Review Order page opens. In the Associated subscriptions section, the Included Products tab is displayed by default in the All Products view.
-
Update the product to change the price for the second Ramp Interval.
- In the product and charge table, identify to the charge for which you are to update the price, and click the Update link below the corresponding rate plan.

- In the Trigger dates area, specify the beginning date of the second year in the Contract effective, Service activation, and Customer acceptance date fields. You can click the drop-down list icon next to the contract effective date to directly select the Interval 2 start date.
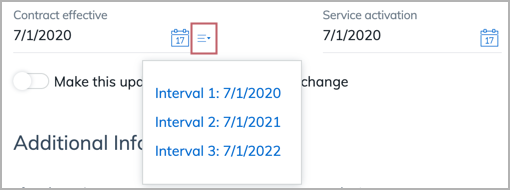
-
Change the price for the second year. In this tutorial, change the PRICE value to 1200.
-
Click Continue.
- In the product and charge table, identify to the charge for which you are to update the price, and click the Update link below the corresponding rate plan.
-
Update the product again to change the price for the third Ramp Interval. This step is similar to the previous step.
-
In the product and charge table, identify to the charge for which you are to update the price, and click the Update link below the corresponding rate plan.
-
In the Trigger dates area, specify the beginning date of the third year in the Contract effective, Service activation, and Customer acceptance date fields. You can click the drop-down list icon next to the contract effective date to directly select the Interval 3 start date.
-
Change the price for the third year. In this tutorial, change the PRICE value to 1400.
-
Click Continue.
-
-
The price displayed in the product and charge table in the Included Products tab is now the price of the last charge segment in each charge. In this tutorial, the price of $1400 for Ramp Interval 3 is displayed in the PRICE column.
Alternatively, you can view the charge price in each Interval by selecting the Interval you want to view in the drop-down menu at the top right of the product and charge table.
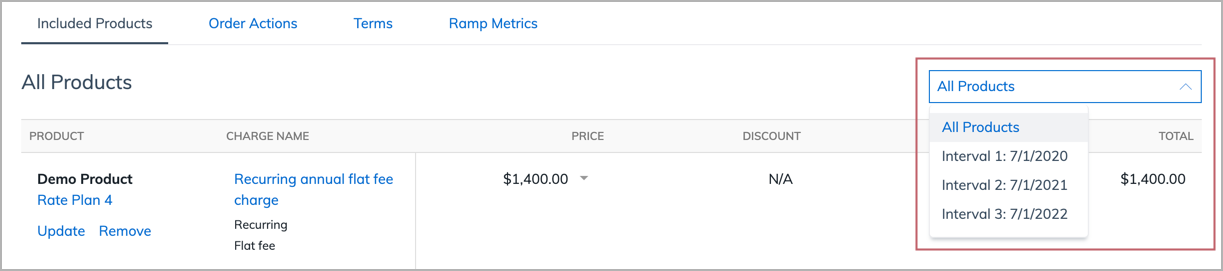
You can also view the price for each of the charge segments in a charge by clicking the down arrow next to the charge price value in the product and charge table

-
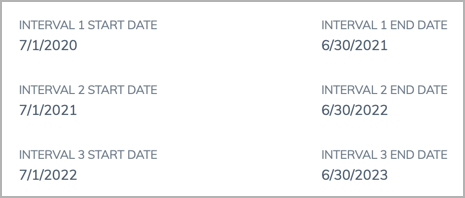
To view and confirm the Interval start and end dates for each Interval in the Ramp, go to the Terms tab and identify to the Ramp section.
-
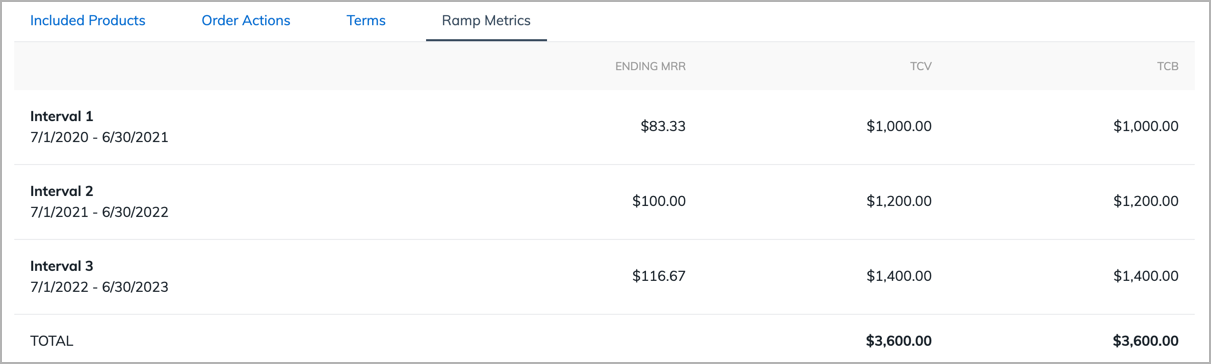
To view the Ramp Metrics for each Interval, go to the Ramp Metrics tab.
-
To activate the subscription, click Activate.


Use the REST API
You can use the "Create order" operation to create a ramp deal.
To create a ramp deal by creating an order:
-
Determine the values of the following variables:
Variable Description $AccountNumThe number of the account that will own the order and the subscription. For example, A00000001.$ProductRPIdThe ID of the product rate plan to subscribe to. For example, 2c92c0f85e5019d7015e513826e650f7.$ProductRPChargeIdThe ID of the product rate plan charge to use when subscribing to the product rate plan. For example, 2c92c0f85e5019d7015e5138b0395347.$TodayToday's date. For example, 2020-07-01.$Interval1_StartDateInterval 1 start date. For example, 2020-07-01.$Interval1_EndDateInterval 1 end date. For example, 2021-06-30.$Interval2_StartDateInterval 2 start date. For example, 2021-07-01.$Interval2_EndDateInterval 2 end date. For example, 2022-06-30.$Interval3_StartDateInterval 3 start date. For example, 2022-07-01.$Interval3_EndDateInterval 3 end date. For example, 2023-06-30.You will also need to provide two unique tokens for use in the API call. In the
CreateSubscriptionorder action you will assign the unique tokens to the rate plan and rate plan charge, respectively. This will enable you to identify the same rate plan and rate plan charge in theUpdateProductorder actions.In this tutorial, you will use "newsub_rp_Ybt80k" as the unique token for the rate plan and "newsub_rpcharge_BE7FHe" as the unique token for the rate plan charge.
-
Use the "Create and activate order" operation to create an order under an existing account:
Request POST /v1/orders/Request Body { "orderDate": "$Today", "existingAccountNumber": "$AccountNum", "subscriptions": [ { "ramp": { "intervals": [ { "name": "Interval 1", "startDate": "$Interval1_StartDate", "endDate": "$Interval1_EndDate" }, { "name": "Interval 2", "startDate": "$Interval2_StartDate", "endDate": "$Interval2_EndDate" }, { "name": "Interval 3", "startDate": "$Interval3_StartDate", "endDate": "$Interval3_EndDate" } ] }, "orderActions": [ { "type": "CreateSubscription", "createSubscription": { "terms": { "initialTerm": { "startDate": "$Today", "period": 36, "periodType": "Month", "termType": "TERMED" }, "renewalTerms": [ { "period": 12, "periodType": "Month" } ], "renewalSetting": "RENEW_WITH_SPECIFIC_TERM", "autoRenew": true }, "subscribeToRatePlans": [ { "productRatePlanId": "$ProductRPId", "uniqueToken": "newsub_rp_Ybt80k", "chargeOverrides": [ { "productRatePlanChargeId": "$ProductRPChargeId", "uniqueToken": "newsub_rpcharge_BE7FHe" } ] } ] }, "triggerDates": [ { "name": "ContractEffective", "triggerDate": "$Today" }, { "name": "ServiceActivation", "triggerDate": "$Today" }, { "name": "CustomerAcceptance", "triggerDate": "$Today" } ] }, { "type": "UpdateProduct", "updateProduct": { "uniqueToken": "newsub_rp_Ybt80k", "chargeUpdates": [ { "uniqueToken": "newsub_rpcharge_BE7FHe", "description": "test_description_regular", "pricing": { "recurringFlatFee": { "listPrice": 1200 } } } ] }, "triggerDates": [ { "name": "ContractEffective", "triggerDate": "$Interval2_StartDate" }, { "name": "ServiceActivation", "triggerDate": "$Interval2_StartDate" }, { "name": "CustomerAcceptance", "triggerDate": "$Interval2_StartDate" } ] }, { "type": "UpdateProduct", "updateProduct": { "uniqueToken": "newsub_rp_Ybt80k", "chargeUpdates": [ { "uniqueToken": "newsub_rpcharge_BE7FHe", "description": "test_description_regular", "pricing": { "recurringFlatFee": { "listPrice": 1400 } } } ] }, "triggerDates": [ { "name": "ContractEffective", "triggerDate": "$Interval3_StartDate" }, { "name": "ServiceActivation", "triggerDate": "$Interval3_StartDate" }, { "name": "CustomerAcceptance", "triggerDate": "$Interval3_StartDate" } ] } ] } ], "processingOptions": { "runBilling": false, "collectPayment": false } }To create the order under a new account instead of an existing account, specify the
newAccountfield instead of theexistingAccountNumberfield.
To preview invoices for the new subscription, use the "Preview order" operation.