Configure product filters and quick filters
CPQ X allows you to easily configure the following types of filters:
- Product filters - Filter products based on several typical standard fields on the Product and Product Rate Plan objects.
- Quick filters - Filter products based on your selection from all standard and custom fields on the Product and Product Rate Plan objects.
These filters can be used in the product selection window of the Quote Studio page to help users quickly locate products.
Create a product filter
To create a product filter:
- In the navigation bar, navigate to Zuora Config > Quote Studio Settings.
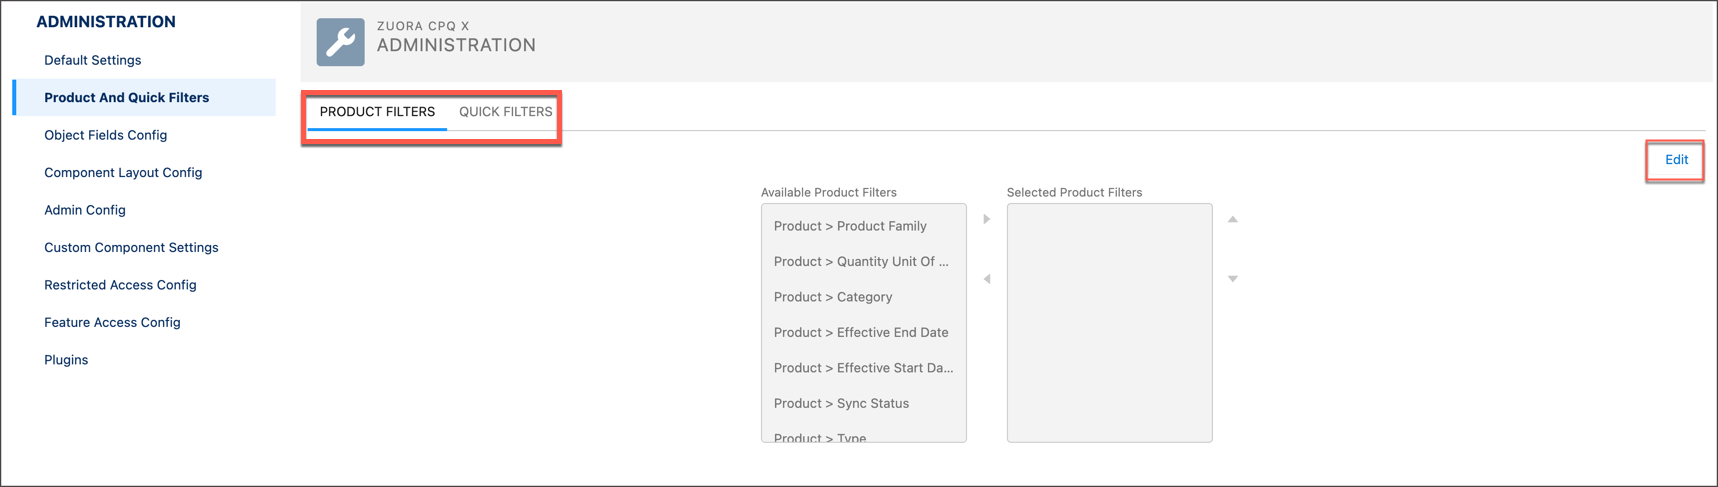
- In the left pane, select Product And Quick Filters. The Product Filters and Quick Filters tabs are then displayed in the main region.
- In the Product Filters tab, click Edit.
- Select a field from Available Product Filters and click
 to add this field to the Selected Product Filters box, or click
  to remove a selected field from the Selected Product Filters box. Repeat this step until the Selected Product Filters box only contains the fields you want to use for the product filter.
 - (Optional) Click
 or
or  to adjust the display order of the selected fields.
 - Click Save to save the configuration of the product filter.
Add Product custom fields to product filters
If you want to add a custom field on the product level to the product filters, take the following steps:
- For the custom field on the Product object in Zuora, create a custom field with the same API name and data type on the Product2 standard object in Salesforce.
For example, you have a Picklist type custom field called Source Type (Source_Type__c) on the Product object in Zuora, and it has the following enum values: Internet (default) and Commercial. Then you can take the following steps to create a counterpart in Salesforce. Note that the steps are documented based on the Salesforce Lightning Experience.
- Navigate to Setup > Object Manager > Product (API Name: Product2) > Fields & Relationships.
- Click New.
- Select the Picklist data type, and click Next.
- Complete the following details:
- Field Label: Enter
Source Type. - Value: Select Enter values, with each value separated by a new line, and enter
InternetandCommercialin the text box below. Note that you need to enterInternetin the first line and select the Use first value as default value check box to ensure that it is the default value. - Complete other optional settings as needed, then click Next.
- Field Label: Enter
- Configure field-level security for this field, then click Next.
- Select only the Visible check box for the profile of users you want to grant edit access to this field.
- Select both the Visible and Read-Only check boxes for the profile of users you want to grant read access to this field.
- Leave both check boxes deselected if you want to hide this field from a user profile.
- Select the Add Field check box for the page layout where you want to add this field.
- Click Save. Then the custom field is created on the Product2 object.
- Add the created custom field to the product filters.
- Navigate to Zuora Config > Quote Studio Settings > Product And Quick Filters.
- Click the Product Filters tab, then click Edit.
- Select the custom field you created then click to add this field to the Selected Product Filters box.
- (Optional) Click or to adjust the display order of the selected fields.
- Click Save.
Subsequently, when users browse product rate plans in Quote Studio, they can see that the custom field is displayed in the Product Filters section on the left.
Create a quick filter
To create a quick filter:
- In the navigation bar, navigate to Zuora Config > Quote Studio Settings.
- In the left pane, select Product And Quick Filters. The Product Filters and Quick Filters tabs are then displayed in the main region.
- In the Quick Filters tab, click Create New Quick Filter.
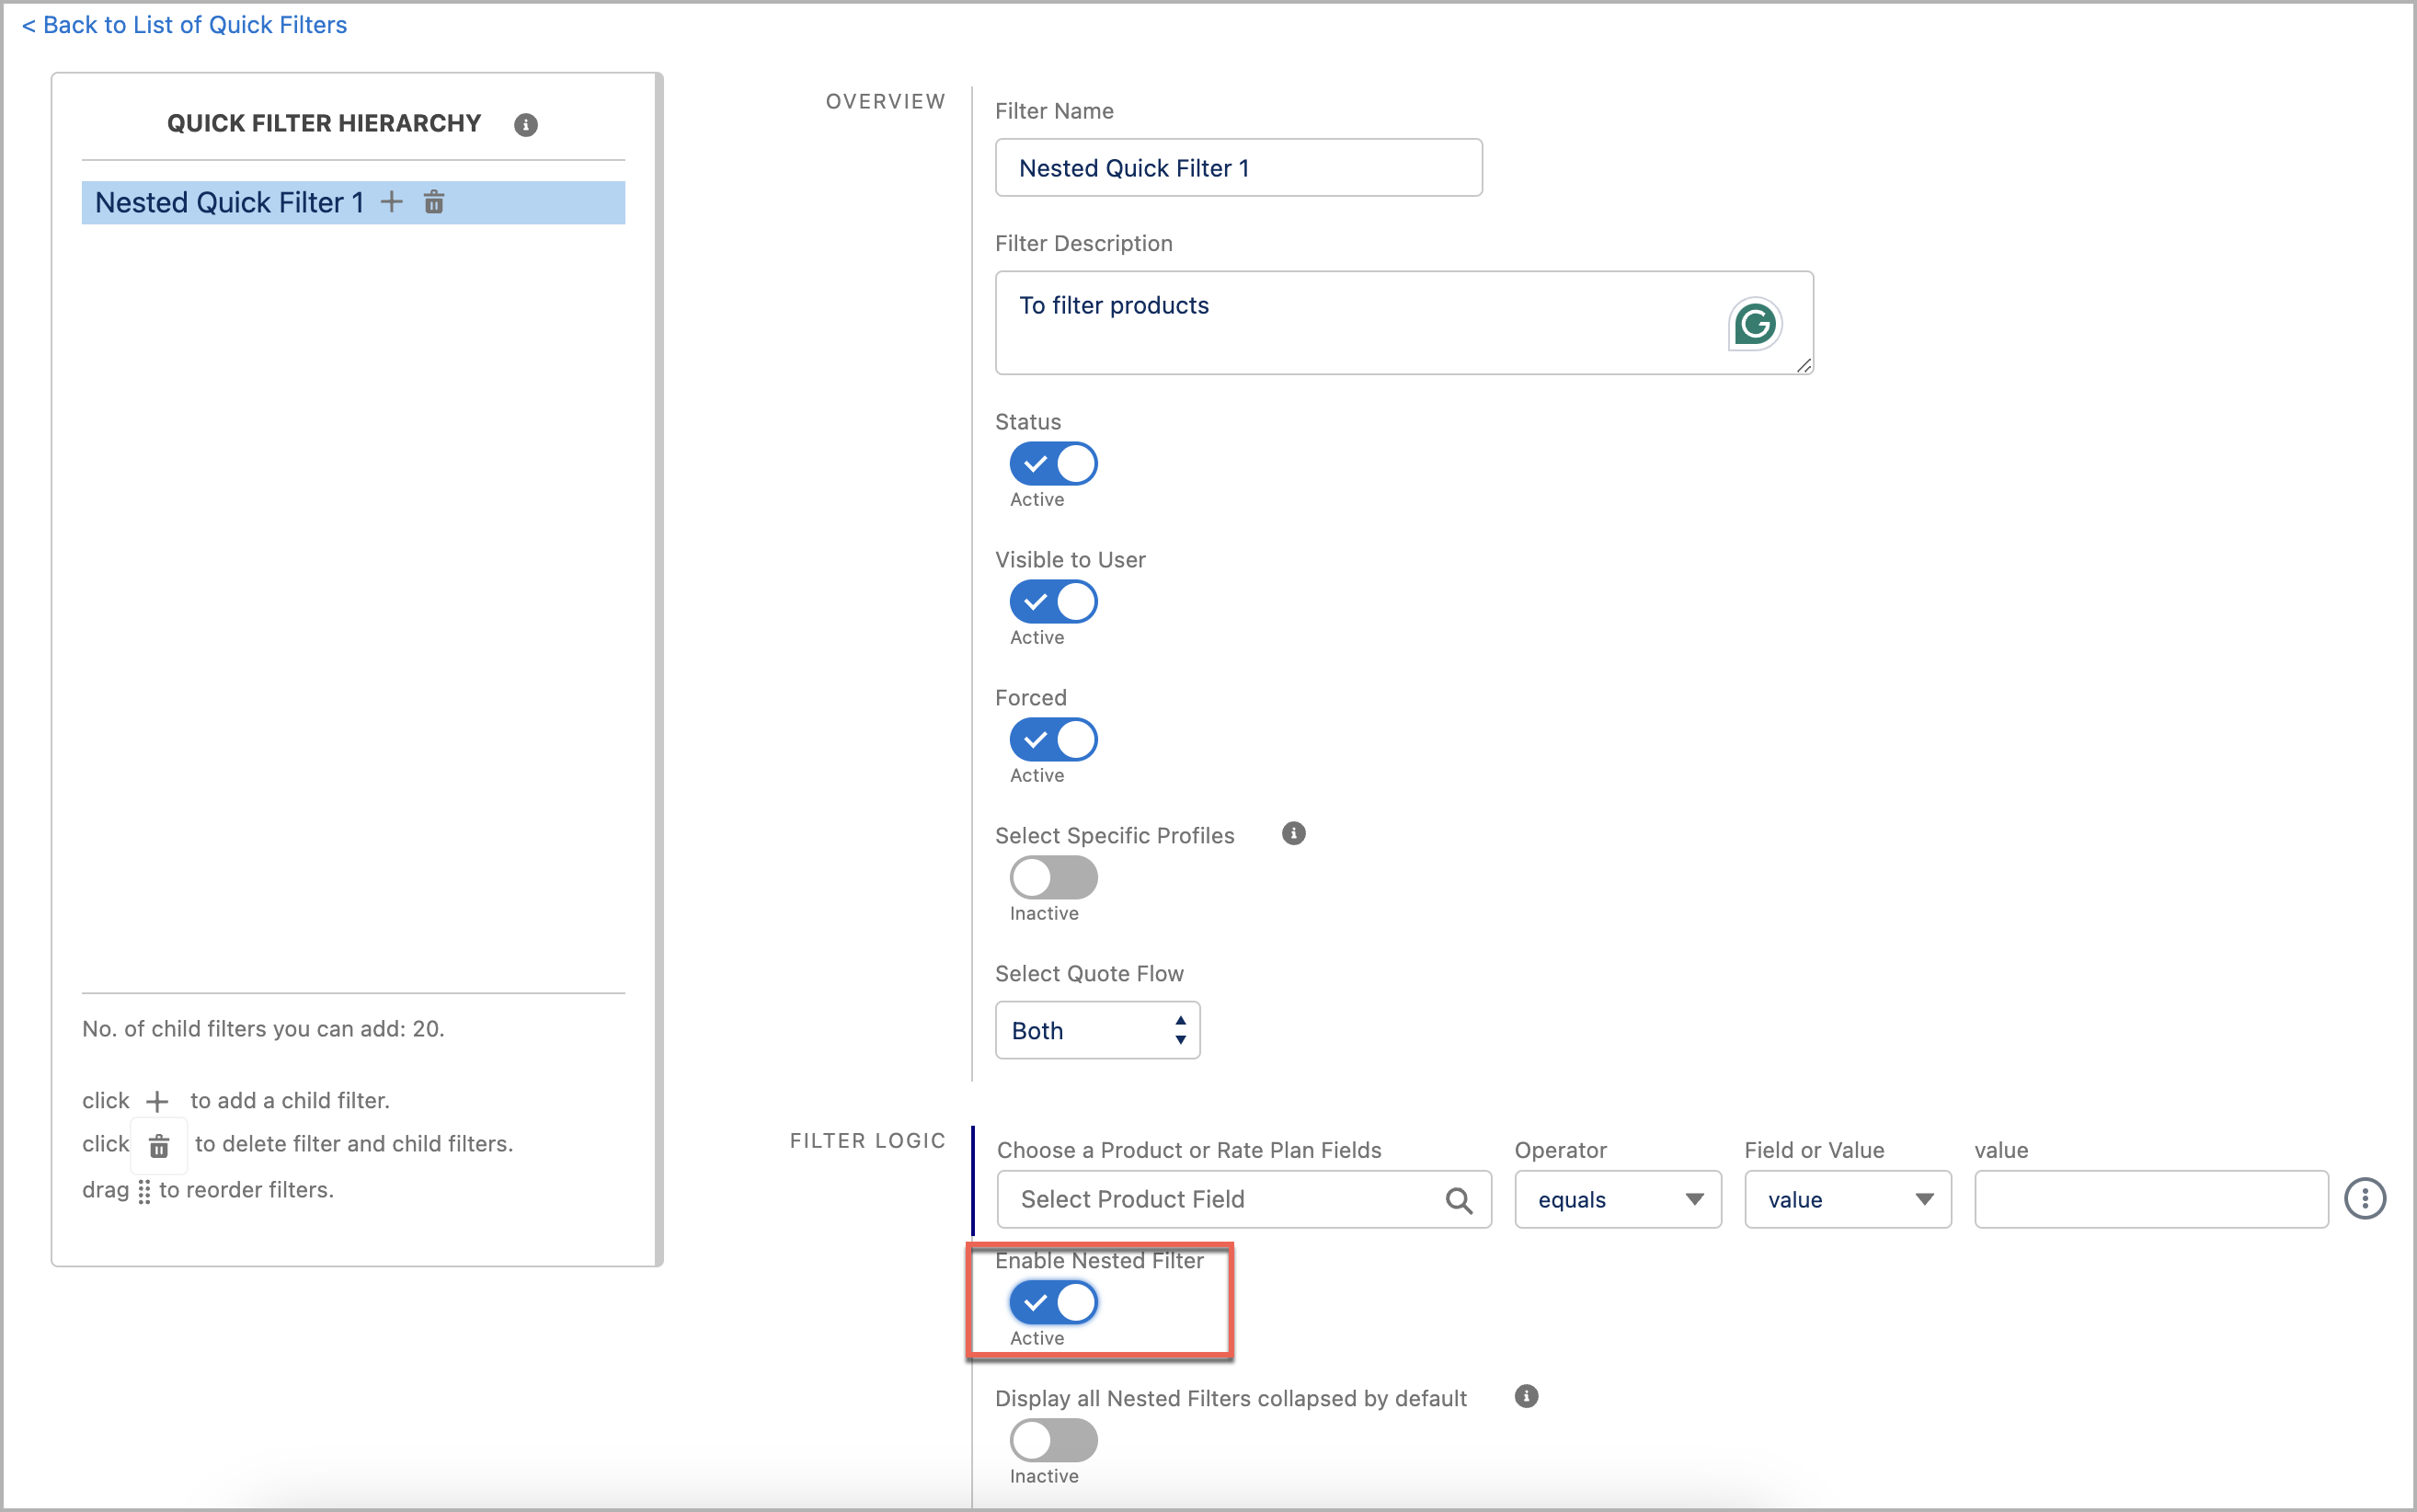
- Configure the following basic settings as appropriate:
- Filter Name - The identifiable name of the filter.
- Filter Description - The description of the filter.
- Status - Set this toggle to Active if you want the quick filter to be effective in Quote Studio. If this toggle is set to Inactive, Quote Studio will not allow the filter to be seen or used.
- Visible to User - Indicates whether the quick filter is visible to all users. Set this toggle to Active if you want users to see it.
- Forced - Set this toggle to Active to force the quick filter to be applied by default whenever the browse pop-up window or search window is opened. Multiple filters can be configured as Forced = Active, in which case each filter will be applied to display only the relevant products.
The Forced filter toggle can be used in conjunction with the Visible to User toggle. If a filter is Forced = Active and Visible to User = Active, then the user will see the filter in the Quick Filter list but will not be able to turn the filter off. If Forced = Active and Visible to User = Inactive, the user will not see the Quick Filter in the list, but it will still filter products as the filter logic prescribes. - Select Specific Profiles - If this toggle is set to active, it will show all the profiles associated with the account. By default, the created quick filter will be visible to all profiles.
After upgrading to 10.9, you may find user profiles. If you had configured Quick Filters before upgrading, the filters would no longer appear in the Product Selector. You can fix this by opening each Quick Filter and saving it without making any changes, and the filters will appear again in the Product Selector.
Currently, when you switch the "Select Specific Profiles" toggle, only 40 associated profiles will be shown. However, we are actively addressing this limitation and plan to show all profiles in the upcoming release.
As a temporary solution, you can try toggling the "Select Specific Profiles" switch off and then on again. This should result in more profiles being displayed.
- Set the condition of the filter in the Filter Logic section. The filter can be set against the fields on the Product Rate Plan or Product objects, including both standard and custom fields. You can also click
 on the right to add new conditions (AND) or groups (OR) to the filter, or remove the existing conditions or groups from the filter. For example, you can set the filter logic Product > Active - equals - value -
 trueto filter all active products. - Click Save to save the configured quick filter.
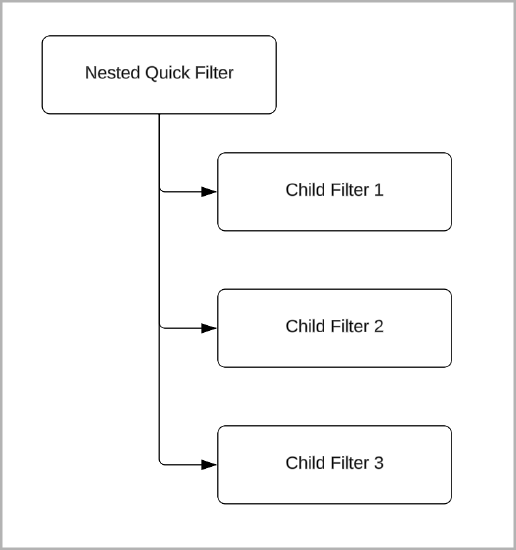
Create nested quick filter
To create a nested quick filter:
- Complete steps 1 - 5 outlined in the "Create Quick Filter" section.
- Enable the "Enable Nested Filter" toggle. Once enabled, the nested quick filter hierarchy section will appear on the left side of the Quick Filter screen.
- Click the Add icon to insert a child filter. Configure the basic settings for the child filter as needed. You can add up to 30 child filters within one nested filter, with the option to create up to 3 levels of child filters.
- To delete a filter, click on the delete icon next to the filter name. Note that deleting a filter containing child filters will also remove its entire hierarchy of child filters.
- Use the drag-and-drop icon to reorder any filter within the nested hierarchy. Filters can only be reordered against their sibling filters.
- Click Save to save the configured quick filter.
Filter logic breakdown
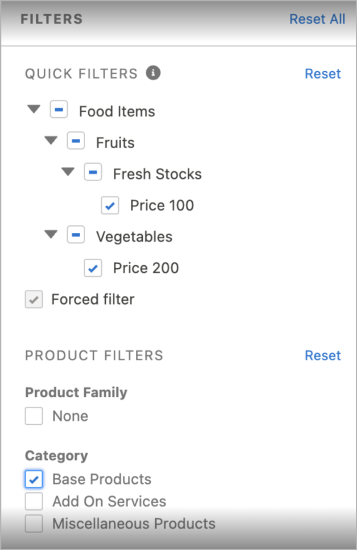
The below example provides the filter logic breakdown:
-
Forced Filter (Non-Nested Filter): This represents a mandatory filter condition applied to the dataset. It ensures that only products meeting specific criteria are included in the filtered results.
-
Base Products: This criterion encompasses the foundational products within the dataset, serving as the starting point for further filtering.
-
Food Items:
-
Fruits: Within the category of food items, this criterion narrows down the selection to specifically include fruits.
-
Fresh Stocks: Another condition within the food items category, ensuring that only products with fresh stocks are included.
-
Price 100: This condition specifies that the products selected must have a price of $100.
-
-
Vegetables:
-
Price 200: Products meeting this criterion must have a price of $200.
-
Example Filter Logic:
The filter logic combines various conditions to refine the dataset effectively:
Forced Filter (AND) Base Products (AND) ( (Food Items (AND) Fruits (AND) Fresh Stocks (AND) Price 100 ) OR (Food Items (AND) Vegetables (AND) Price 200))
This logic ensures that the selected products are either fruits with fresh stocks and a price of $100 or vegetables with a price of $200. By applying this filter logic, users can precisely target and retrieve the desired subset of data from the dataset, tailored to their specific criteria and requirements.
FAQs: Nested quick filter
-
Can I select multiple filters within nested filters?
Yes, you can select multiple filters within nested filter hierarchies. All filters selected within a single nested filter hierarchy are treated as OR conditions between them. However, filters selected outside a particular nested filter are treated as AND conditions between them, whether they are nested or non-nested filters. -
Can I select multiple non-nested filters simultaneously?
Currently, you can only select one nested filter at a time. However, you can select multiple non-nested filters individually. -
How are child filters of nested filters treated?
Selecting a child filter within a nested filter hierarchy considers all the parent filters of that hierarchy. This means that when selecting a child filter, all parent filters within its hierarchy are also applied. -
What is the treatment of Product Filters in relation to other filters?
All Product Filters are treated with AND conditions when combined with other filters. This means that Product Filters act as additional criteria that must be met alongside other selected filters.
- What are the filters I can apply simultaneously?
You can simultaneously use multiple nested filters, one non-nested filter, and multiple product filters. All filters are applied using AND conditions when combined with other filters. -
What happens with forced filters and nested filters?
Forced filters are always selected and take precedence over other filter settings. If any nested filter is forced, you will see the primary nested filter as forced, and its hierarchy will be available for selection. This ensures that forced filters are prioritized in the filtering process.