Configure Sync Preferences
Overview
In the Sync Preferences screen, configure the synchronization options that the NetSuite integration will use.
You must fill in all the required fields before you can go into the Advanced Settings page upon clicking Next. A required field is marked with an asterisk.
General Currency and Tax Settings
- Zuora Default Currency: Enter the "Alphabetic Code" for the Default currency in Zuora to use when syncing map pricing details for the Product Catalog.
- NetSuite Multiple Currencies: Select
Yesif you have enabled multiple currencies in NetSuite. Otherwise, selectNo.- Set this to
Yesif you want the sales order items to be pre-populated with the Netsuite price you specified on the rate plan in Zuora. - If you select
No, all Zuora Accounts will be synced to NetSuite with the default NetSuite currency, regardless of their currencies configured in Zuora.
- Set this to
- NetSuite Advanced Pricing: If Multiple Prices or Quantity Pricing are enabled, select
Yes. Otherwise, selectNo. This is used to map pricing details for the Product Catalog. - NetSuite Default Tax Code: If required in NetSuite, enter the exact name of the Tax Code to use when syncing Zuora transactions to NetSuite. You can view the existing tax codes in NetSuite by navigating to Setup > Accounting > Tax Codes.
- NetSuite Default Tax Schedule: If the Advanced Taxes feature is enabled in your NetSuite tenant, enter the exact name of the Tax Schedule to use for all Zuora Charges created by the integration.
Viewing Multiple Currencies Settings in NetSuite
To view the settings for your company in NetSuite:
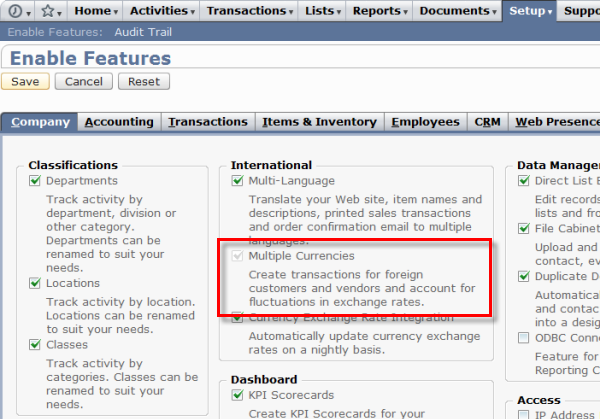
- Select Setup > Company > Enable Features.
- Select the Company tab.
- If Multiple Currencies is enabled, you must configure the General Currency and Tax Settings in Zuora Connector for NetSuite.
Viewing Advanced Pricing Settings in NetSuite
To view the pricing for your company in NetSuite:
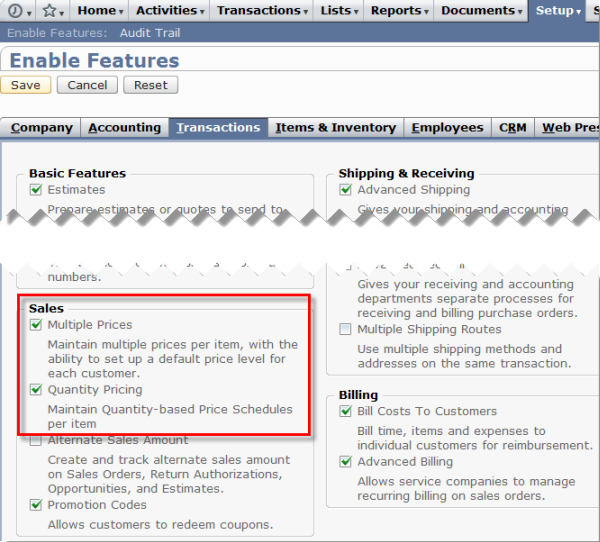
- Select Setup > Company > Enable Features.
- Select the Transactions tab.
- If Multiple Prices or Quantity Pricing is enabled, you must select
Yesfor NetSuite Advanced Pricing in Zuora Connector for NetSuite.
Viewing Tax Settings in NetSuite
To view the currency and tax settings in NetSuite:
- Select Setup > Company > Enable Features.
- Select the Accounting tab.
- If Advanced Taxes is enabled, you must specify a value for NetSuite Default Tax Schedule in the Integrations Manager.

NetSuite Classification Details
These settings are optional. If these classification settings are enabled in your NetSuite account, use this section to configure default values. These default values are used when syncing Customer Accounts, the Product Catalog, and Transactions from Zuora to NetSuite. Some classifications can also be specified per record within Zuora to override these default values.
- Default Department: Enter the full name of the default Department to use when syncing all Transactions and Product Catalog Items. For Charges, you can override this value by specifying the Department on the individual record.
- Default Location: Enter the full name of the default Location to use when syncing all Transactions and Product Catalog Items. This field is required if Multi-Location Inventory is enabled in NetSuite.
- Default Class: Enter the full name of the default Class to use when syncing all Transactions and Product Catalog Items. For Charges, you can override this value by specifying the Class on the individual record.
- Default Subsidiary: Enter the full name of the default Subsidiary to use when syncing all Accounts. This setting applies to NetSuite OneWorld only. You can override this value by specifying the Subsidiary on the individual record.
Viewing Company Settings in NetSuite
To view the settings for your company in NetSuite:
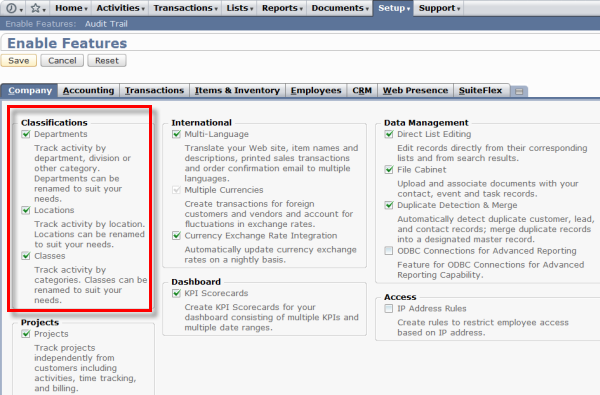
- Select Setup > Company > Enable Features.
- If Departments, Locations, or Classes are enabled, you must configure the NetSuite Classification Details values in Zuora Connector for NetSuite.
Customer Account Sync
Use these settings to configure how customer accounts are synced between Zuora and NetSuite.
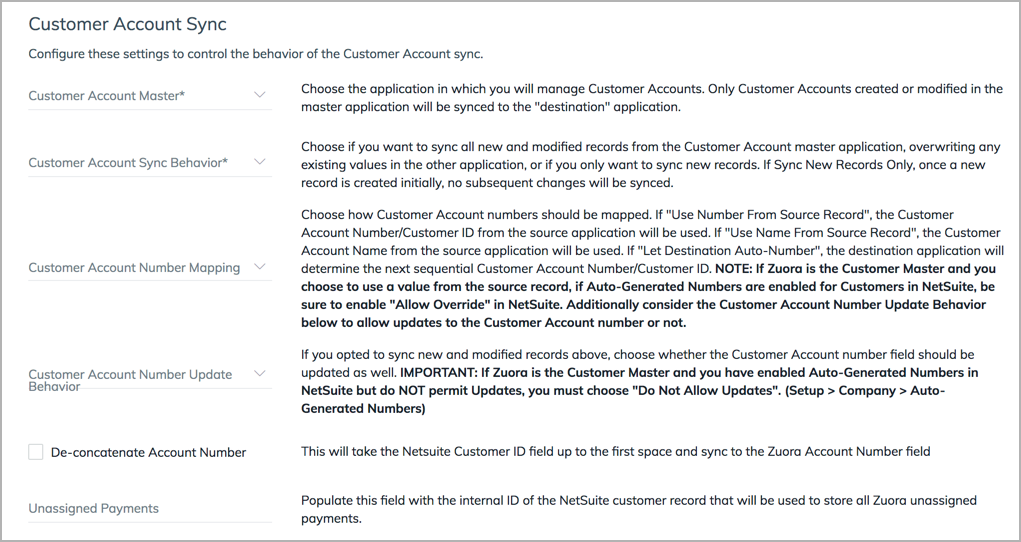
Customer Account Master
Select the application that is the Customer Master, which is where the account will be managed. Only Customer Accounts created or modified in the master application will be synced to the "destination" application.
Customer Account Sync Behavior
Select whether you want to sync all new and modified records from the Customer Account master application (Sync New and Modified Records), overwriting any existing values in the other application, or if you only want to sync new records (Sync New Records Only). If you select Sync New Records Only, no subsequent changes will be synced once a record has been created.
Customer Account Number Mapping
Specify how to map Customer Account numbers.
- Use Number From Source Record: Use the Customer Account Number/Customer ID from the source application.
- Use Name From Source Record: Use the Customer Account Name from the source application.
- Let Destination Auto-Number: The destination application will determine the next sequential Customer Account Number/Customer ID.
If Zuora is the Customer Master and you choose to use a value from the source record, if Auto-Generated Numbers are enabled for customers in NetSuite, you must also enable Allow Override in NetSuite. Additionally, if you want to sync both new and modified records, you must enable Update in NetSuite. In NetSuite, navigate to Setup > Company > Auto-Generated Numbers.
Customer Account Number Update Behavior
If you selected Sync New and Modified Records, you can select whether the sync should also update the Customer Account number field.
If Zuora is the customer master and you have enabled Auto-Generated Numbers in NetSuite, but do not permit updates, you must select Do Not Allow Updates in NetSuite. In NetSuite, navigate to Setup > Company > Auto-Generated Numbers.
Zuora Connector for NetSuite will allow updates by default.
De-concatenate Account Number
If you selected "Yes", the connector will take the value of the Customer Id field from Netsuite up until the first space (" ") and use that value to populate the Zuora Account Number field.
This will only occur when the Zuora account does not have any transactions. For example, Zuora does not allow an account number to be changed when the account contains transactions, the connector checks the Zuora accounts for a Last Invoiced date and will not update an account number if a Last Invoiced date is found.
Unassigned Payments
This feature is currently in development and is subject to change without advance notice. We are actively soliciting feedback from a small set of early adopters.
If you want to sync all unassigned payments from your Zuora tenant that Invoice Settlement is enabled for, you need to enter into this field the Id of the NetSuite customer record that you have created to store all Zuora unassigned payments.
Product Catalog Sync
- Item ID Mapping: Select
Use Zuora Charge IDorUse Zuora Charge Name. This determines the NetSuite Item ID value when syncing new Zuora charges. If you selectUse Zuora Charge ID, a combination of a static Zuora Charge plus a unique ID will be mapped. If you selectUse Zuora Charge Name, the Charge Name will be mapped as-is. However, you must ensure the Charge Name is globally unique. - Product Catalog Sync Behavior: Select whether you want to sync all new and modified records from the Zuora Product Catalog (Sync New and Modified Records), overwriting any existing values in the other application, or if you only want to sync new records (Sync New Records Only). If you select
Sync New Records Only, no subsequent changes will be synced once a record has been created.
Transaction Sync
Transaction Number Mapping: Select how Transaction Numbers should be mapped. If you select Use Number From Source Record, the Transaction number from the source application will be used. If you select Let Destination Auto-Number, the next sequential Transaction number in the destination application will be used to generate new records. You can enable this feature in NetSuite by selecting Setup > Company Auto-Generated Numbers.