Run Revenue Sync jobs
Beginning from version 37.002.02.00, the Revenue Sync job is introduced to replace the previous Data Sync job and Data Transformation job. The Revenue Sync job loads a specified range of Zuora Billing object data and then transforms the data to Zuora Revenue fields in the Line Staging tables. It combines the previous Data Sync and Data Transformation jobs into a single one.
We recommend that you run Revenue Sync jobs on a daily basis. There are multiple ways to run the Revenue Sync job:
- With the Instant On feature, which is delivered as an enhancement delivered in 37.007.00.00, the Revenue Sync job can automatically run based on the system configuration with this feature enabled.
- If you do not enable the Instant On feature, you can manually start the Revenue Sync job whenever needed. Alternatively, you can schedule this job to automatically run on a regular basis.
Prerequisites
Before the Revenue Sync job can be started for the first time, the field mapping definitions and transaction mapping templates must be present in Zuora Revenue. You need to complete the following configurations only once. Then, the Revenue Sync job can be run on a regular basis.
- Define the field mapping to sync Zuora Billing data to Zuora Revenue pre-staging table. For more information, see Manage field mapping between Zuora Billing and Zuora Revenue
- Create transaction templates for supported transaction types so that Zuora Revenue can transform data in pre-staging tables into transaction lines. For more information, see Create transaction templates.
Run Revenue Sync job with Instant On enabled
With the Instant On feature enabled, the Revenue Sync job will automatically run based on the configuration. You do not need to manually start or schedule this job to run. Complete the following steps to enable the Instant On feature to start automated Revenue Sync jobs:
- Navigate to Setups > Applications.
- Click
 to open the side menu and then click Profiles.
 - Locate the AUTO_REVENUESYNC profile and ensure that the value is set to Yes.
- Open the side menu again and click Lookup.
- Locate the AUTO_REVENUE_SYNC lookup and edit the lookup definition to specify the following lookup codes:
Lookup code Description Lookup value example RevenueSync_FromDate The date and time when the Revenue Sync job starts to run automatically. 01-JAN-2021 00:00:00 RevenueSync_Duration The time in seconds between two consecutive Revenue Sync jobs. After the last job completes, the next job will wait for the specified duration and then start. 30 ROLE_ID The ID of the user role who can access the UI to manually start the job and view job history. 1 Auto_Collect Indicates whether the Data Collection job is to be automatically started after the Revenue Sync job completes. When it is set to Y, the Data Collection job is run based on the default RC grouping template. Y - Save your settings and close the page.
Result
After the Instant On feature is enabled, the following things happen in Zuora Revenue:
- The Revenue Sync job starts to run from the specified start date automatically. Whenever a Revenue Sync job completes successfully, the next Revenue Sync job will start after the specified duration.
- If the Auto_Collect lookup code is set to Y, upon successful completion of each Revenue Sync job, the Data Collection job automatically starts to collect transaction lines and group them into revenue contracts based on the default RC grouping template.
- From the specified start date, the UI page that is used to manually run or schedule the Revenue Sync job is hidden for most user roles, except for the role that is specified for the AUTO_REVENUE_SYNC lookup.
What to do next
If the Auto_Collect lookup code is set to N, you need to manually run or schedule the Data Collection job. For more information, see Collect data for Billing - Revenue Integration.
Manually run Revenue Sync job with Instant On disabled
If the Instant On feature is disabled, you must manually run or schedule the Revenue Sync job. You can either run ad hoc Revenue Sync jobs or create scheduled Revenue Sync jobs. Ad hoc Revenue Sync jobs and scheduled Revenue Sync jobs are independent of each other, which means that ad hoc jobs and scheduled jobs can be run simultaneously.
Currently, the following limitations are applicable to Revenue Sync jobs:
- Canceling ad hoc Revenue Sync jobs is not supported.
- Transaction-level re-sync is not supported.
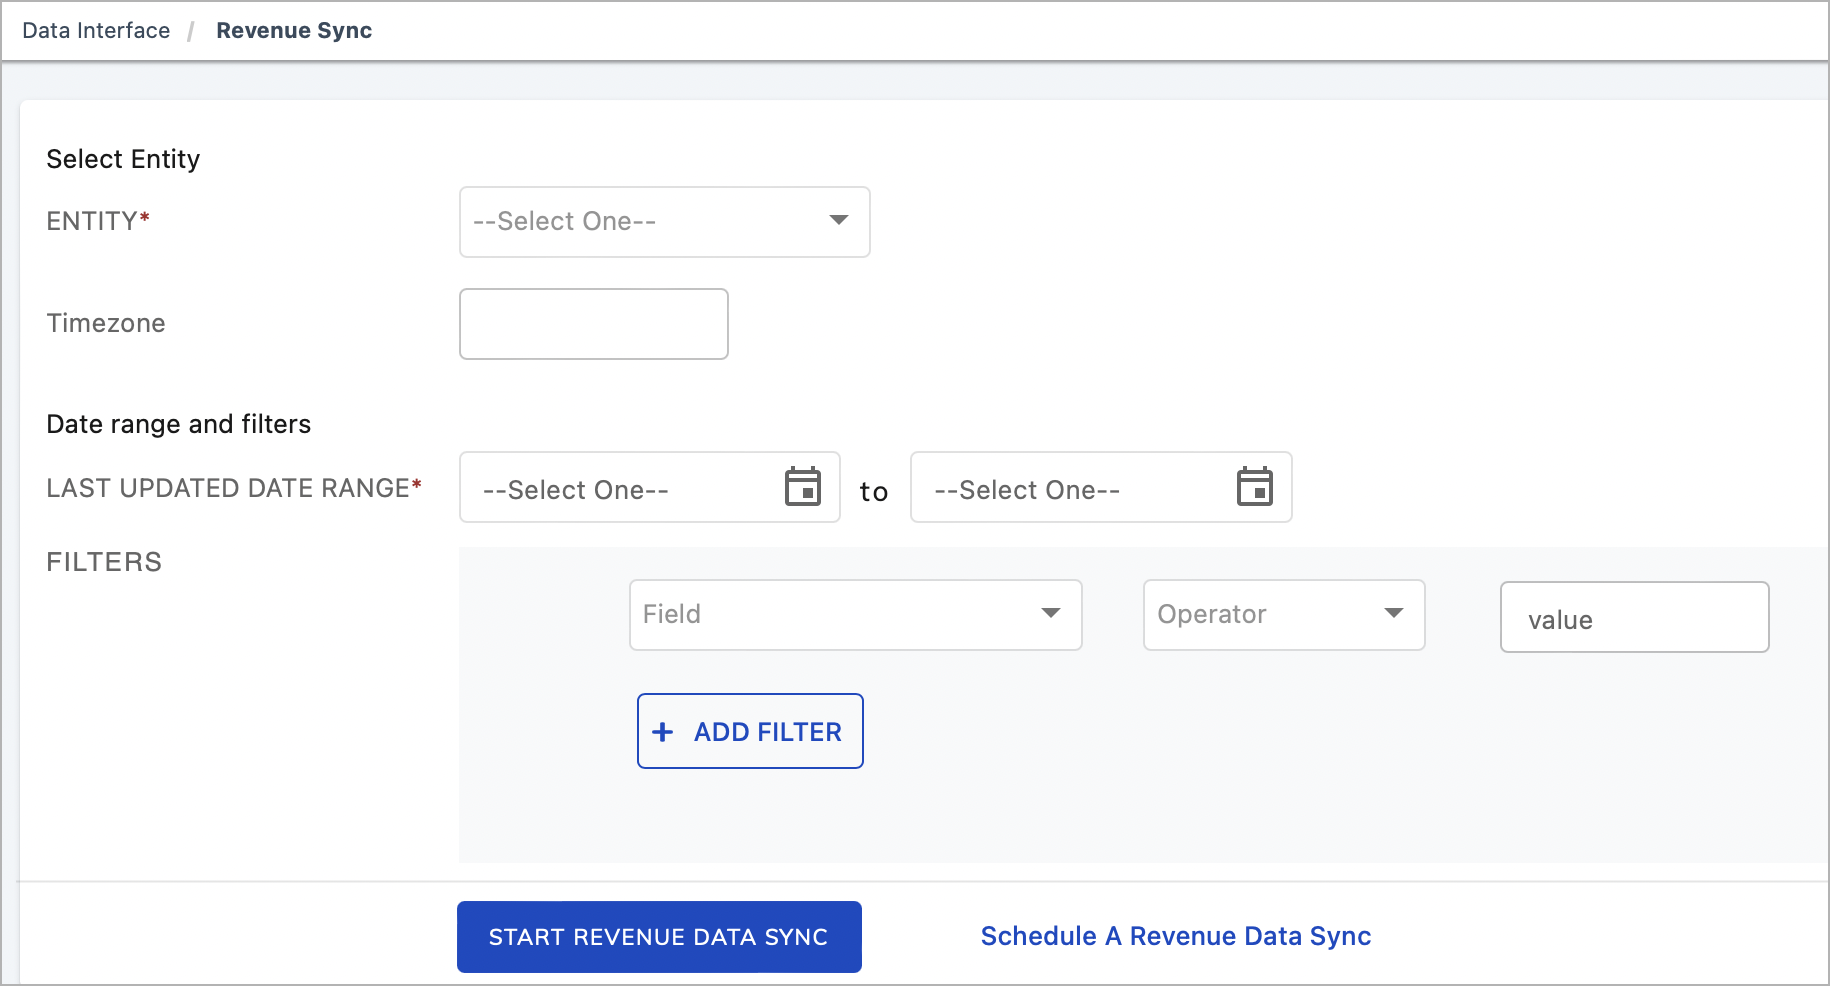
The following graphic shows the UI where to run or schedule a Revenue Sync job. With the Instant On feature enabled, this page will be accessible only by the user whose role is specified in the AUTO_REVENUE_SYNC lookup definition.
Run ad hoc Revenue Sync jobs
Take the following steps to configure and start a Revenue Sync job:
- Navigate to Data Interface > Revenue Sync. The Revenue Sync page is displayed.
- If you have multiple Zuora Billing entities, select an entity from the Entity dropdown list. If not, the entity name is automatically populated. The timezone for the selected entity is displayed as well.
- In the Last Updated Date Range section, select an end date for the date range where the data is synced. All Zuora Billing data that falls into the specified time range will be synced to Zuora Revenue. You can specify the start date when you run a Revenue Sync job for the first time in this org, and the default time for the start date is 12:00 am. Subsequently, the start date defaults from the last run end date and becomes unavailable for editing.
- In the Filters section, specify one or more filter conditions. The filter conditions are used to identify the synced data that is to be transformed into the Line Staging tables.
- In the Field dropdown list, select the field to be used in the filter condition. The populated fields include both standard fields and custom fields.
- In the Operator dropdown list, select the operator for the filter. For example,
=. - Enter the field value in the value field.
- If multiple filter conditions are required, click + Add Filter to add more filter conditions. You can specify up to 5 filters.
- Click Start Revenue Data Sync. If the Revenue Sync job is successfully submitted, the corresponding item is displayed in the Revenue Data Sync History table.
Schedule Revenue Sync jobs
Take the following steps to schedule a Revenue Sync job:
- If you have the legacy scheduled RevPro3.0 Zuora Data Transformation programs running, terminate the existing programs.
- Navigate to Data Interface > Revenue Sync. The Revenue Sync page is displayed.
- Click Schedule a revenue data sync. The Schedule Revenue Sync Job dialog is then displayed.
- In the Schedule Program tab, complete the scheduler settings based on your needs. See Schedule jobs to understand what each configuration field means. If you just terminated a Data Transformation job scheduler, you can configure the fields based on the legacy job configuration.
- In the Program Parameters tab, specify the following information:
- If you have multiple Zuora Billing entities, select an entity from the Entity dropdown list. If not, the entity name is automatically populated.
- In the Last Updated Date Range section, select an end date for the date range where the data is synced. You can specify the start date when you run a Revenue Sync job for the first time in this org. Subsequently, the start date defaults from the last run end date and becomes unavailable for editing.
- In the Filters section, specify one or more filter conditions.
- In the Field dropdown list, select the field to be used in the filter condition. The populated fields include both standard fields and custom fields.
- In the Operator dropdown list, select the operator for the filter. For example,
=. - Enter the field value in the Value field.
- If multiple filter conditions are required, click + Add Filter to add more filter conditions. You can specify up to 5 filters.
- Click Submit Job. If the scheduled Revenue Sync job is successfully submitted, the corresponding item is displayed in the Revenue Data Sync History table.
If you want to change the start date or filter condition after a Revenue Sync job is already scheduled, you must first cancel this job. To cancel a scheduled Revenue Sync job, hover over the job listed on the Schedule Jobs page and click ![]() .
.
Result
- The Revenue Sync job is available since Zuora Revenue 37.002.02.00, and deprecates the previous Data Sync and Data Transformation jobs for Billing - Revenue Integration.
- Data from the legacy program can also be displayed in the Revenue Data Sync History table. So if you scheduled or run the previous Data Transformation jobs, the historical data of the job will be listed in the Revenue Data Sync History table.
All data in the specified date range that meets the filter conditions are synced and transformed into the Line Staging tables. You can view all Line Staging data by navigating to Data Interface > Inbound. Note that duplicate records might exist in the Line Staging tables. The Data Collection job will remove duplicate lines during the collection process.
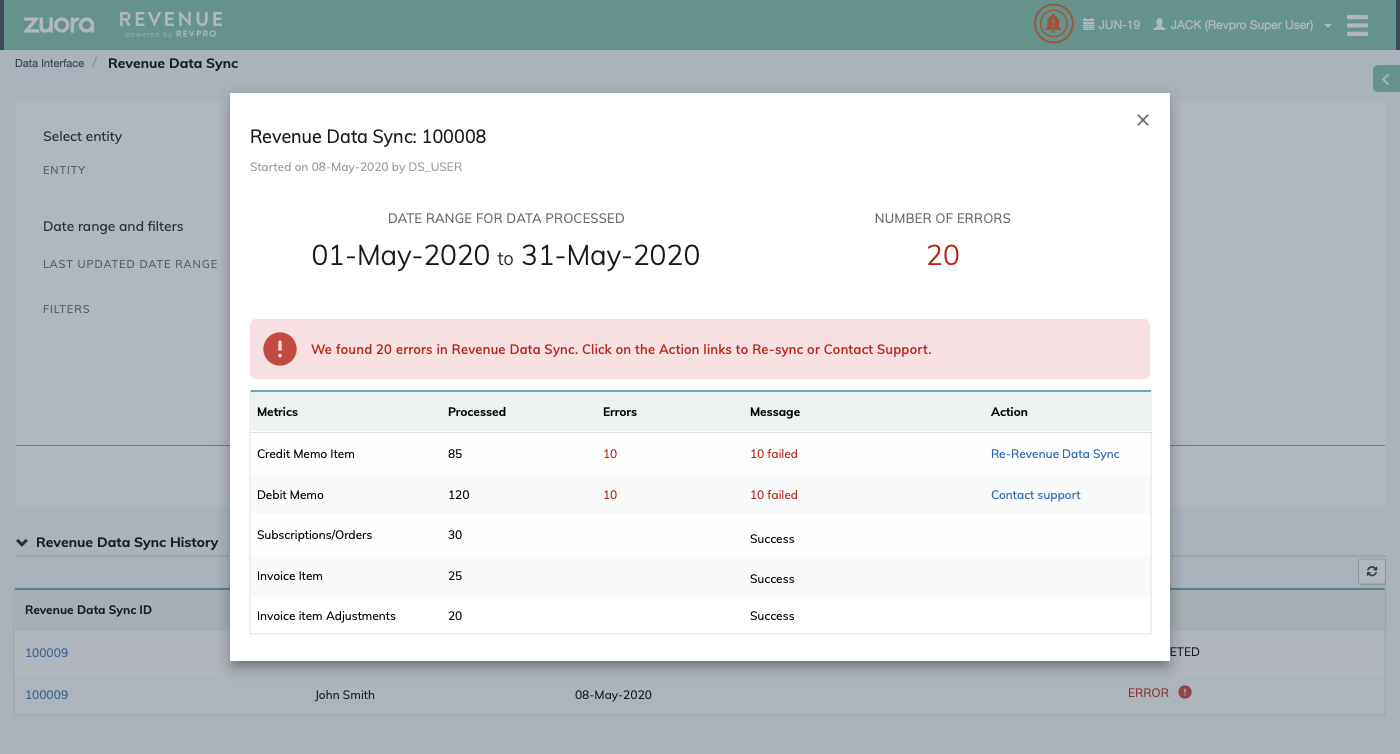
If the job encounters an error or completes with warnings, hover over the job item in the Revenue Data Sync History table and click ![]() to check the error details. The sub-jobs are categorized into different objects. To resolve errors, you can take measures based on the suggested action in the corresponding Action column.
to check the error details. The sub-jobs are categorized into different objects. To resolve errors, you can take measures based on the suggested action in the corresponding Action column.
To check the filter used for the job, hover over the job item in the Revenue Data Sync History table and click ![]() . Note that the filter format for configured Revenue Sync jobs is different from the filter format for migrated Data Sync jobs:
. Note that the filter format for configured Revenue Sync jobs is different from the filter format for migrated Data Sync jobs:
- For configured Revenue Sync jobs, the filter format is the filter condition you specified in the Filters field. For example,
Account.AccountNumber = 'A-S00000142'. - For migrated Data Sync and Data Transformation jobs, apart from the specified filter condition, it also includes the transaction type and the template name. For example,
ORDER~Booking Template~Subscription.Name in (''''A-S00000144'''', ''''A-S00000145'''')~~.
What to do next
After you manually run or schedule the Revenue Sync job, you can start collecting data into Zuora Revenue. For more information, see Collect data for Billing - Revenue Integration.