Design Payment Pages CSS
This article contains a Payment Pages 2.0 CSS pack that you can download and use to design look and formatting of your Payment Pages 2.0 form.
Zuora recommends using web safe fonts or web fonts. Zuora supports Google Fonts (web fonts) with over 680 families.
Web safe fonts are typically pre-installed with operating systems and allow a more consistent cross-browser user experience. Web fonts are downloaded by your browser when rendering a page and applied to text.
Design Payment Pages 2.0 CSS
The CSS pack includes the following folders and files:
css: This folder contains two types of CSS files. You use one of these CSS files to customize the visual style of your Payment Pages 2.0 form.hpm2.css: Responsive CSS that delivers the Payment Pages form in various screen sizes on devices, such as mobile, tablet, or desktop. By default, this CSS is included inhpm2.html.hpm2_nonresponsive.css: The CSS file designed to render the Payment Pages form in desktop screen size. If you want to use this CSS file, edithpm2.htmland replacehpm2.csswithhpm2_nonreponsive.css.
img: This folder contains local copies of the image files used in Payment Pages 2.0.js: This folder contains local copies of the JavaScript files used in the Payment Pages form.hpm2.html: This is a copy of a Payment Pages form. You use this file as a working canvas while designing the look and formatting of your Payment Pages form.
To design the Payment Pages 2.0 style using the attached package:
- Create a sandbox folder for this exercise.
- Download the zip file, hpm2_style.zip.
- Unzip the file in the sandbox folder you created in the first step, and the folder structure will be created as described above.
- Start up your web server.
- Edit the
hpm2.cssfile under thecssfolder to update the style and format of the Payment Pages 2.0 form. Savehpm2.css. If you are using the non-responsive CSS, update and savehpm2_nonresponsive.cssinstead ofhpm2.css. - In a browser, open
hpm2.htmlto see how the Payment Pages 2.0 form looks with the changes you made in Step #5. This file is in the top folder of the sandbox folder. - Repeat Step #5 and #6 as necessary to customize the look and format of the Payment Pages 2.0 form.
- After you finalize the style of your Payment Pages 2.0 form, replace the default CSS elements with your updated CSS elements. Copy the CSS elements in
hpm2.cssfile and paste them to the CSS field on the Payment Pages configuration page.
Note that implementing customized JavaScript is not allowed for security reasons.
Custom Images in Payment Pages 2.0
If you want to replace or add different background images to the elements in your Payment Pages form, you have the following options:
- It is recommended that you use Bitmap images in the CSS.
- If you need external images, you can only include the URLs to external images in the CSS, and the image URL should use the HTTPS protocol.
Use Google Fonts
If you use Google Fonts in Payment Pages 2.0, do not import multiple fonts in one import statement like below:
@import url('https://fonts.googleapis.com/css2?family=PT+Sans:ital,wght@0,400;0,700;1,400;1,700&display=swap');
Instead, you should import the fonts one by one. For example:
@import url('https://fonts.googleapis.com/css2?family=PT+Sans:ital@1&display=swap');
@import url('https://fonts.googleapis.com/css2?family=PT+Sans:wght@700&display=swap');
@import url('https://fonts.googleapis.com/css2?family=PT+Sans:ital,wght@1,700&display=swap');
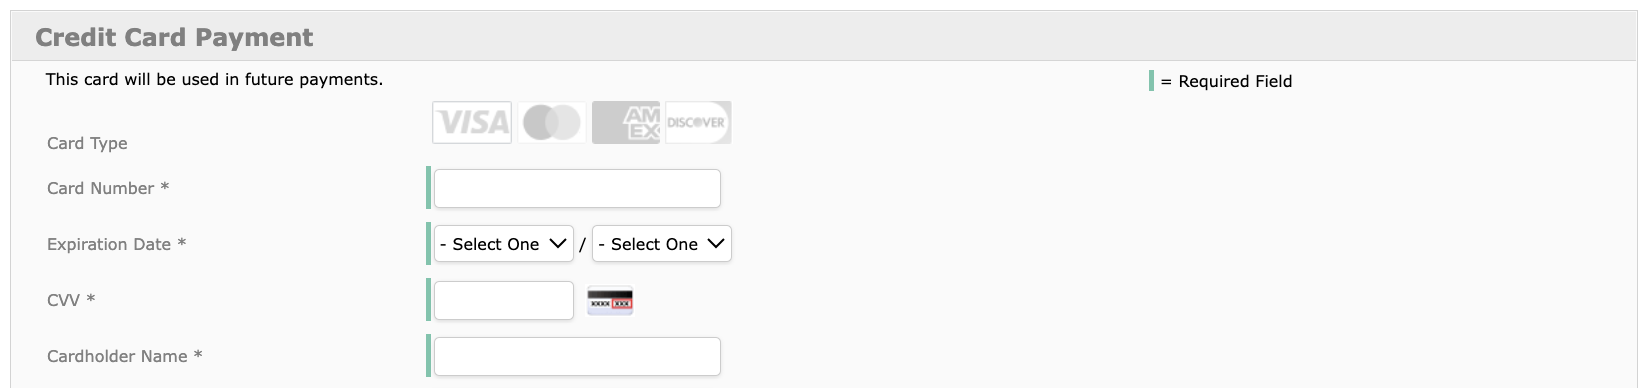
Credit Card Expiration Date Fieldset
For the credit card type payment pages, the card expiration date month and year are grouped with a HTML fieldset tag.
The following CSS segment controls the credit card expiration date fields:
.form-element.required { height:auto !important; }
.form-element{ min-width:inherit !important; }
#form-label-creditCardExpirationMonth{ display: none; }
.field-set{ border: 1px solid #808080 !important;
            margin: 1px; padding:1px; width: auto; color:#808080; }
.field-set-legend{ display: inline-block !important; color:#808080; }
.form-label-month{ display: block; }
.form-label-year{ display: block; }
Edit the above CSS to customize the display of the expiration date fields. For example, if you want to display the default expiration date label, comment out the declaration for the form-label-creditCardExpirationMonth id selection as below:
#form-label-creditCardExpirationMonth{ /* display: none; */ }
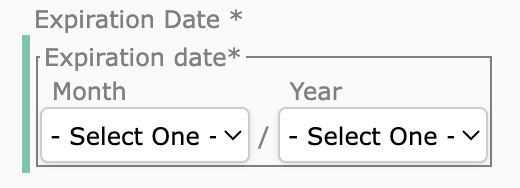
If you do hide the original expiration date label, you will see the expiration date fieldset not aligned in the preview mode. However, this problem does not exist when you actually renders the Payment Page. The expiration date fields correctly aligns with the rest of the fields on the Payment Page.
If you do not use the provided CSS pack but customize the CSS code based on the default CSS, to customize the width of the expiration date fields, use the following CSS code. This method is helpful for interaction issues where the expiration year and month dropdown lists cannot be properly clicked and displayed.
#input-creditCardExpirationYear {
  width: XXXpx;
}

#input-creditCardExpirationMonth {
  width: XXXpx;
}
Payment Pages 2.0 CSS Examples
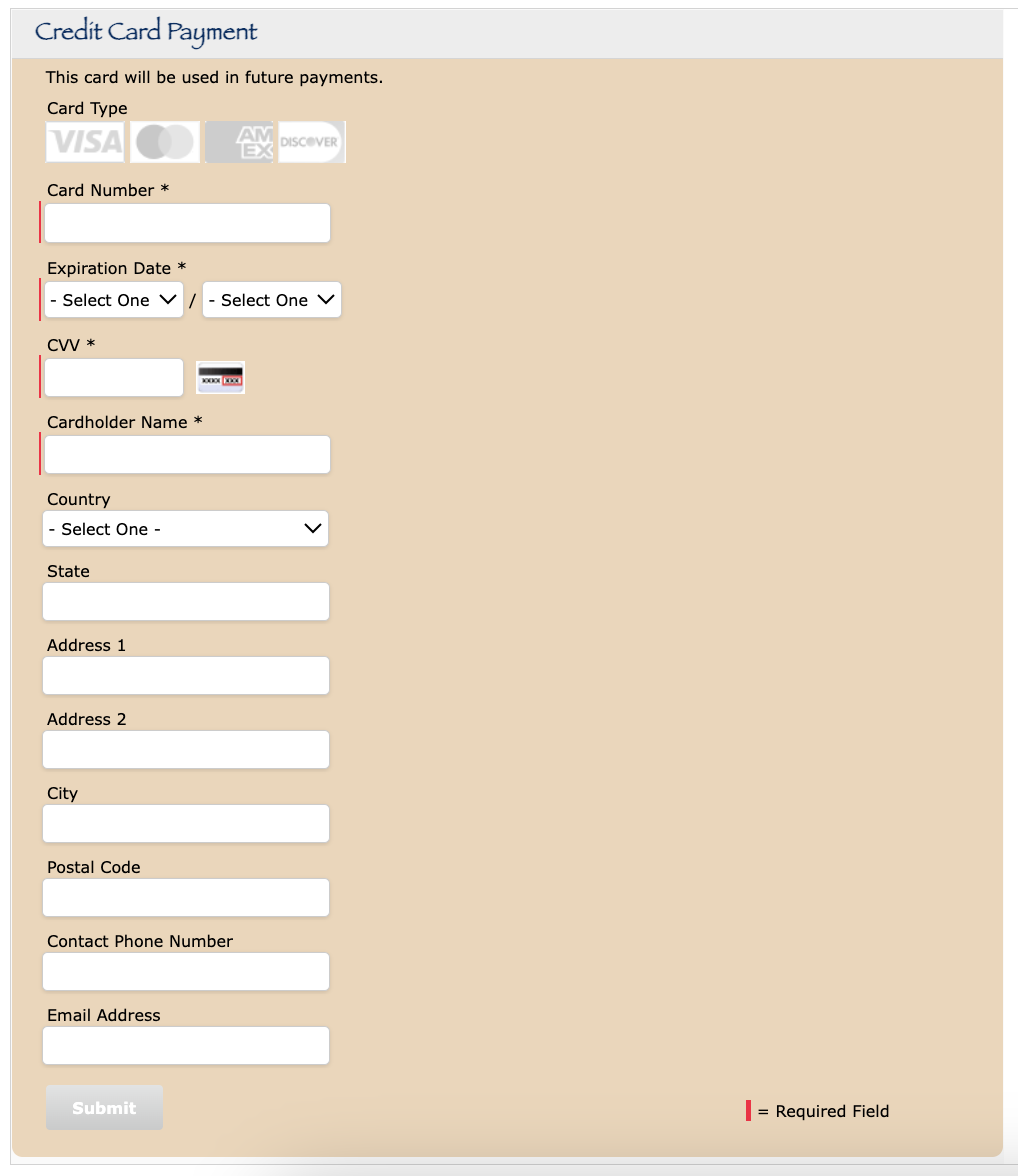
Example 1
The following example CSS changes the background color of the Payment Pages form, the font and the color of the title, and the required field marks on the form:
h2
{
   font-family:fantasy;
   color:#002e63
}
.form {
   padding: 20px 16px;
   margin: 0 auto;
   background-color:#eed5b7;
}
.form-element.required {
   border-left: 2px  solid #ff033e;
   vertical-align: middle;
   height:28px;
   padding:2px;
}
.required-desc {
   width: 24%;
   float: right;
   margin-top: 11px;
   border-left: 4px solid #ff033e;
   vertical-align: middle;
   min-width:120px;
}
Example 2
The following example CSS moves the required field legend from its default location to the top right-hand corner of the Payment Page and displays the legend in upper case:
.required-desc
{ text-transform:Uppercase !important;
  position:absolute !important;
  top:5% !important; left: 70% !important; }
The above CSS change renders the following Payment Page form: