Part 1: Load Accounts
Overview
Zuora Internal Documentation. This article is intended for Zuora only. Do not share or distribute publicly.

In this step, you will populate the Account upload template and load this file into Zuora to create your Accounts.
Exercise
You can download the latest template at any time from the Zuora UI, by going to the Customer Accounts area in Z-Billing. You'll want to click the Download a Template link in the Action area of that page.
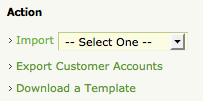
This will download a zip file with three CSV (comma-separated value) templates inside. For this part, you'll just use the file prefixed with "CustomerAccount," but please save the other templates for the next two parts of this milestone.
Filling out the Account Upload Template
You'll now fill out the CustomerAccount template. Once filled out, you'll be able to create billing Accounts in Zuora, but they will be left in "Draft" status, until Contacts and Payment Methods are loaded as well.
Please open the CustomerAccount template now and take a look at the columns. Column names in bold are required.
Callstack:
    at (ZZZ_Zuora_Internal/Self_Implementation_Portal/Phase_3:_Iterate/Milestone_08:_Migrate_Your_Existing_Customers_to_Zuora/Part_1:_Load_Accounts), /content/body/div[2]/div[1]/pre, line 2, column 1
| Column Name | Description/Definition | Comments/Instructions |
|---|---|---|
| Id | Internal Zuora customer ID | Leave blank for a new account. If a Zuora Account ID is specified, that account will be updated instead. |
| Customer Name | Billing name of customer | Case sensitive. For companies, this would be the company name (for example, "ACME Co."). For a person, this would be their name. For example, "John Smith". The names do not need to be unique in Zuora, but should be for ease of maintenance. |
| Account Number | Customer Account number | Enter user defined number from legacy billing system. This number cannot start with the Zuora prefix. If blank, system generate one for you using the prefix set up in the Z-Billing settings. The numbers need to be unique. |
| Sold To | Sold to customer name | Leave blank for now. Must be in ‘Last name, First name’ format with data from the Contact record. Will be populated with Contact Load. |
| Bill To | Bill To customer name | Leave blank for now. Must be in ‘Last name, First name’ format with data from the Contact record. Will be populated with Contact Load |
| CRM Account ID | CRM Account ID | Account Id from CRM system. If using Z-Force, this should be the Salesforce.com Account Id. |
| Autopay |
| Enter FALSE. After payment methods are loaded, this will be updated. |
| Default Payment Method |
| Leave blank for now, unless the Payment Method for this account will not be Electronic. Example: Check, Cash, Credit Card, etc. |
| Payment Term | Payment Term | From list of predefined active payment terms (for example, Net 30). This value is case-sensitive. |
| PO Number | PO Number | Optional. Does not impact billing, but can be displayed on the invoice. |
| Allow invoice Editing | Indicates whether an invoice can be edited once it is generated | Set to FALSE. |
| Batch | Invoice batch number into which the customer will be assigned | From list of pre-defined batches (for example, Batch1, Batch2, through Batch20) This value is case-sensitive. |
| Bill Cycle Day | Day on which billing will be triggered | From list of active billing cycle days. For example, 1st of the month, 22nd of the month, EOM (End of Month), Auto-Set. This value is case-sensitive. |
| Invoice Delivery By Email | Flag to enable mass e-mailing invoices | TRUE or FALSE. TRUE to enable e-mailing of invoices for this account. |
| Invoice Delivery By Print | Flag to enable mass printing of invoices | TRUE or FALSE. TRUE to enable mass print for this account. This currently has no further impact in Zuora. |
| Account Balance | Outstanding customer balance | Leave blank. This will be populated by Zuora. |
| Currency | Billing Currency | From list of active billing currencies (for example, USD or AUD). |
| Status | Account Status | Set to Draft for initial data upload. |
| Description | Description | Leave blank |
| Created By | Who created the record | Leave blank, system generated. |
| Updated By | Who updated the record the last time | Leave blank, system generated. |
| Created On | Date and time of record creation | Leave blank, system generated. |
| Updated On | Date and time when the record was last updated | Leave blank, system generated. |
| Sales Rep | Sales Representative | Optional |
| CSR | Customer Service Rep | Optional |
| Last Invoiced | Date account was last invoiced | Leave blank, system generated. |
| Notes | Customer Account notes field (free text) | Optional |
Your file should look similar to the example screenshot below:

Once the upload template is filled out, you can import it in the Customer Accounts area of Z-Billing.
Account Upload Template Tips
- When saving the file, make sure it is saved as a Windows
.csvfile (comma delimited). Mac CSV format will be rejected. - If you see additional fields in the upload template, these may be your custom fields or you may have additional Zuora functionality enabled, which allows for additional fields to be set. Please contact us if you see fields that you do not know how to populate.
Uploading the Account Upload Template
Importing the upload template is easy. Just navigate to the Customer Accounts area of Z-Billing and in the Action area you'll find an Import option with a dropdown menu. Select Customer Accounts from this dropdown, and you'll now be able to upload your file.
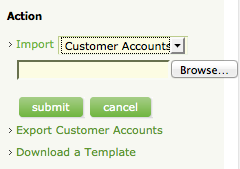
When you click submit, Zuora will upload the file, validate it, and attempt to load as many accounts as it can. All errors and warnings will be displayed in a status screen like the one shown below:

At this point, you should have all your Accounts loaded into Zuora.
What's Next
Proceed to Part 2: Loading Contacts.