Create a Legacy Trial
Zephr offers the ability to create legacy trials.
A legacy trial gives an end user limited access to a feature, on a one-off or recurring basis. For example, you may offer users three free views of article content when they register. This would be managed as a legacy trial.
The Legacy Trials node can be used to create the following types of trial:
- Fixed trial
Fixed Trials apply for a fixed period of time, such as ten views each calendar month.
- Rolling trial
Rolling Trials apply to an ongoing period, such as ten views in the last 35 days from the start of the session.
We provide examples that take you through using the Legacy Trials decision node as follows:
- Create a Fixed Trial
- Create a Rolling Trial
Create a Fixed Trial
Fixed trials grant access for a specific period.
To define a fixed trial, complete the following steps:
- Select Product from the main menu
- Select Features from the menu options
The Features screen displays.
- Select the feature for which you want to create a trial, or add a feature as described in the Add a Feature topic
- If you selected an existing feature, select the version for which you want to create a trial
- Select the user type to which you want to apply the rule
- In the Rules Builder, select the Advanced segment title
- Drag the Legacy Trials node to your canvas
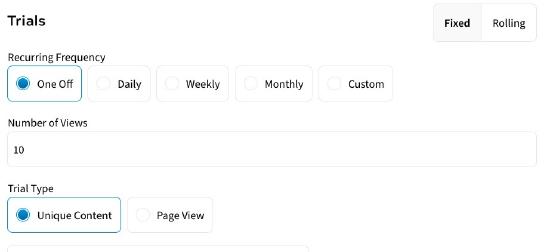
The Trial dialog box displays, as illustrated below:
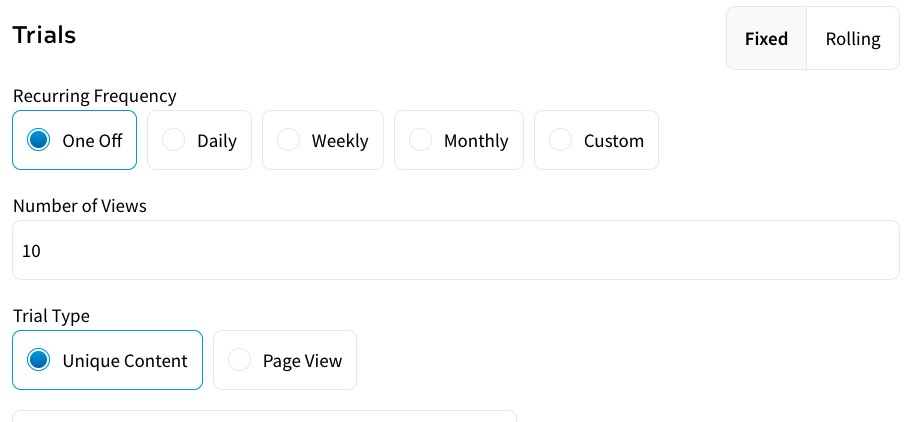
The fixed trial options display be default.
- Select the fixed period for which you want to grant the trial from the Recurring Frequency radio buttons. The options are as follows:
- One Off
This is the default. The end user only encounters the trial once.
- Daily
Select the Daily radio button if you want to allow the end user to encounter the trial once a day.
- Weekly
Select the Weekly radio button if you want to allow the end user to encounter the trial once a week.
- Monthly
Select the Monthly radio button if you want to allow the end user to encounter the trial once a month.
- Custom
Select the Custom radio button if you want to define a custom period.
If you select the Custom radio button, the following fields display:
- Period
Enter the length of time for which to run the trial in the Period text box
- Unit
Select the unit in which to measure the period from the Unit drop-down menu.
- Period
- One Off
- Enter the number of views to allow in the Number of Views text box
Note: After saving the rule, and accessing the decision point again, the meters display above the Number of Views text box.
- If you selected any Recurring Frequency option except One Off, optionally enter the maximum number of views in the Up to a Maximum Number of Views (Optional) text box and select the period in which to count the maximum views from the drop-down menu. The options in the drop-down menu are as follows:
- Week
- Month
This is the default.
- Lifetime
- Select how to measure the number of views from the Trial Type radio buttons. The options are as follows:
- Unique Content
Select this option to measure views of unique content only. This means that only a single view is counted if an end user views the same content more than once.
- Page View
Select this option to measure views of any page, whether it has been previously viewed by the end user or not.
Note: After saving the rule, and accessing the decision point again, the meters display above the Up to a Maximum Number of Views text box.
- Unique Content
- If you want to count pages with different query parameters as different views, select the Count pages with different query parameters separately checkbox
- If you want to use a different output for each remaining view, select the Add a Remaining View button from the Number of Views remaining section
A further field displays, enter the count for which the node output applies in the Remaining Count text box.
- If you want to report the use of the trial in the Data Layer:
- Select the Report trial usage in Data Layer toggle
- Define the information that you want to report by selecting the Report trial credits used and/or Report trial credits remaining toggles
- Enter the data layer key for the credits used in the Trial credits used data layer key text box, and/or the credits remaining in the Trial credits remaining data layer key text box
Create a Rolling Trial
Rolling trials grant access on an ongoing basis.
To define a rolling trial, complete the following steps:
-
- Select Product from the main menu
- Select Features from the menu options
The Features screen displays.
- Select the feature for which you want to create a trial, or add a feature as described in the Add a Feature topic
- If you selected an existing feature, select the version for which you want to create a trial
- Select the user type to which you want to apply the rule
- In the Rules Builder, select the Advanced segment title
- Drag the Legacy Trials node to your canvas
The Trial dialog box displays, as illustrated below:
The fixed trial options display be default.
- Select the Rolling tab in the top right of the Trials dialog box
The options for defining a rolling trial display.
- Enter the number of views to allow in the Number of Views text box
Note: After saving the rule, and accessing the decision point again, the meters display above the Number of Views text box.
- Enter the period in days for which to count the views in the In the Last text box; or use the arrows to increment/decrement the number of days
- If required, enter the maximum number of views to allow in a period in the Up to a Maximum Number of Views (Optional) text box, and select the period for which to count the views from the Per drop-down menu
Note: After saving the rule, and accessing the decision point again, the meters display above the Up to a Maximum Number of Views text box.
- Select whether the number of views is measured in unique content or page views from the Trial Type radio buttons
- If you want to count pages with different query parameters as different views, select the Count pages with different query parameters separately checkbox
- If you want to use a different output for each remaining view, select the Add a Remaining View button and enter the count for which the node output applies in the Remaining Count text box
- If you want to report the use of the trial in the Data Layer:
- Select the Report trial usage in Data Layer toggle
- Define the information that you want to report by selecting the Report trial credits used and/or Report trial credits remaining toggles
- Enter the data layer key for the credits used in the Trial credits used data layer key text box, and/or the credits remaining in the Trial credits remaining data layer key text box
- If you want to report the maximum views in the data layer:
- Select the Report max views usage in Data Layer toggle
- Define the information that you want to report by selecting the Report max views credits used and/or the Report max views credits remaining toggles