Configure data tables in HTML templates
In HTML templates, you can configure complex data tables based on your business demands, for example, charge details tables, tax summary tables, and other tables.
-
If you want to start from scratch, choose the Data Table component to add a blank data table, and then customize it.
-
If you want to start from a sample template, choose a predefined table component to add an example data table, and then make adjustments as needed.
The online HTML template editor provides certain components in the Content tab with predefined table configurations and common merge fields for billing documents, including invoices, credit memos, and debit memos. For more information, see Predefined data tables for billing documents.
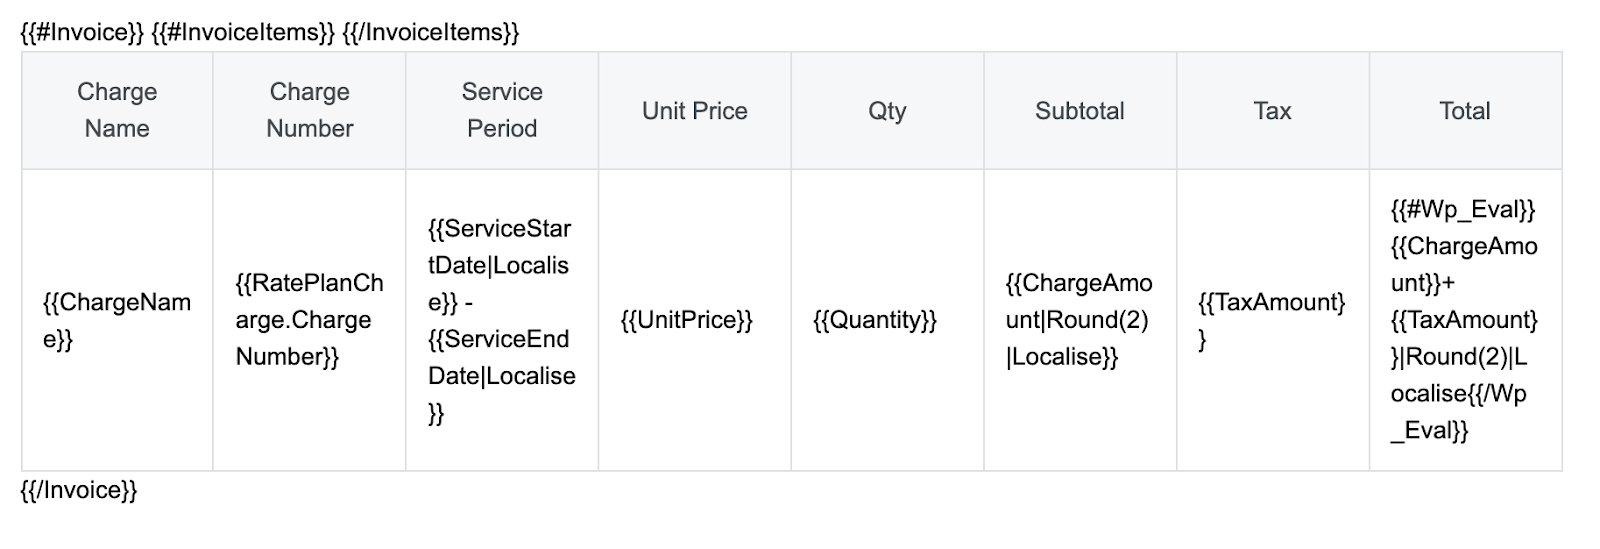
The following tutorial demonstrates how to configure a charge details table. This tutorial takes invoices as an example; the configuration procedure is similar for credit memos and debit memos.
To configure a data table in an HTML template through the Zuora UI, perform the following steps.
-
In the HTML template, click one Rows block, and then click Add Content in the Rows block.
The Content tab is displayed in the right panel. -
In the Content tab, drag the Data Table component into the HTML template.
-
Click the Data Table block in the HTML template.
The Content panel is displayed on the right of the template editor. -
In the Data Table section, configure the following table information by adding different columns:
-
From the Table Object list, select a table object, for example, InvoiceItems: list of InvoiceItem.
-
In the Columns subsection, click Add in the Header column to add a column to the data table.
-
In the Add Column dialog that is displayed, configure the following column information:
- From the Field list, select a field that belongs to the InvoiceItems object, for example, ChargeName.
- In the Header field, enter a header name for the header to display in the data table, for example, Charge Name.
- Click Add to save the column information.
A column with the Charge Name header is added to the data table.
-
In the Columns subsection, click Add in the Header column, and configure the following information in the Add Column dialog that is displayed:
- From the Field list, select a joined object of the InvoiceItems object, for example, RatePlanCharge: RatePlanCharge, and then select a field that belongs to the RatePlanCharge object from the displayed drop-down list, for example, ChargeNumber.
- In the Header field, enter a header name for the selected field to display in the data table, for example, Charge Number.
- Click Add to save the column information.
A column with the Charge Number header is added to the data table.
-
In the Columns subsection, click Add in the Header column, and configure the following information in the Add Column dialog that is displayed:
- Enable Advanced Options next to the Field field.
- In the Field field, enter merge fields
{{ServiceStartDate|Localise}} - {{ServiceEndDate|Localise}}.
Both theServiceStartDateandServiceEndDatefields belong to the InvoiceItems object. - In the Header field, enter a header name for the selected field to display in the data table, for example, Service Period.
- Click Add to save the column information.
A column with the Service Period header is added to the data table.
-
In the Columns subsection, click Add in the Header column, and configure the following information in the Add Column dialog that is displayed:
- From the Field list, select a field that belongs to the InvoiceItems object, for example, UnitPrice.
- In the Function field, enter Localise as the function to format the value of the
UnitPricefield with the default locale. - In the Header field, enter a header name for the selected field to display in the data table, for example, Unit Price.
- Click Add to save the column information.
A column with the Unit Price header is added to the data table.
-
In the Columns subsection, click Add in the Header column, and configure the following information in the Add Column dialog that is displayed:
- From the Field list, select a field that belongs to the InvoiceItems object, for example, Quantity.
- In the Function field, enter Localise as the function to format the value of the
Quantityfield with the default locale. - In the Header field, enter a header name for the selected field to display in the data table, for example, Qty.
- Click Add to save the column information.
A column with the Qty header is added to the data table.
-
In the Columns subsection, click Add in the Header column, and configure the following information in the Add Column dialog that is displayed:
- From the Field list, select a field that belongs to the InvoiceItems object, for example, ChargeAmount.
- In the Function field, enter Round(2)|Localise as the function to round the value of the
ChargeAmountfield in 2 decimals and format the value with the default locale. - In the Header field, enter a header name for the selected field to display in the data table, for example, Subtotal.
- Click Add to save the column information.
A column with the Subtotal header is added to the data table.
-
In the Columns subsection, click Add in the Header column, and configure the following information in the Add Column dialog that is displayed:
- From the Field list, select a field that belongs to the InvoiceItems object, for example, TaxAmount. In the Function field, enter Round(2)|Localise as the function to round the value of the
TaxAmountfield in 2 decimals and format the value with the default locale. - In the Header field, enter a header name for the selected field to display in the data table, for example, Tax.
- Click Add to save the column information.
A column with the Tax header is added to the data table.
- From the Field list, select a field that belongs to the InvoiceItems object, for example, TaxAmount. In the Function field, enter Round(2)|Localise as the function to round the value of the
-
In the Columns subsection, click Add in the Header column, and configure the following information in the Add Column dialog that is displayed:
- Enable Advanced Options next to the Field field.
- In the Field field, enter merge fields
{{#Wp_Eval}}{{ChargeAmount}}+{{TaxAmount}}|Round(2)|Localise{{/Wp_Eval}}.
The value of the merge fields is the sum of the subtotal amount and tax amount. - In the Header field, enter a header name for the configured field to display in the data table, for example, Total.
- Click Add to save the column information.
A column with the Total header is added to the data table.
-
Optional: In the Columns subsection, configure the width and alignment of each column that is added to the data table.
-
In the Sort By subsection, click Add in the Field column, and configure the following sorting information in the Add Sort By dialog that is displayed to add a field to sort the records to display in the data table.
- From the Field list, select a joined object of the InvoiceItems object, for example, RatePlanCharge: RatePlanCharge, and then select a field that belongs to the RatePlanCharge object from the displayed drop-down list, for example, ChargeNumber.
- From the Order list, select ASC or DSC as the sorting order.
- Selecting ASC can sort records in the data table by charge number in ascending order.
-
In the Group By subsection, click Add in the Field column, and configure the following sorting information in the Add Group By dialog that is displayed:
- From the Field list, select a field that is used to group the records in the data table.
- In the Group Alias field, enter a name to display for the group.
- Click Add to save the grouping configuration.
-
In the Filters subsection, click Add in the Field column, and configure the following sorting information in the Add Filter By dialog that is displayed:
- From the Field list, select a field that is used to filter the records in the data table.
- From the Operator list, select an operator that is used in the filter.
- In the Value field, enter a value that is used in the filter.
- Click Add to save the filtering configuration.
-
-
In the Header section, configure styles to apply to the table headers, such as the font, font size, formatting, align, text color, and background color.
-
In the Body section, configure styles to apply to the table body, such as the font, font size, formatting, alignment, text color, and background color.
-
In the HTML template editor, click Save to save the HTML template.
The following image shows the data table that is displayed in the HTML template.