Salesforce CPQ connector configuration guide
Configuration in Zuora
This guide provides detailed steps for configuring the Zuora Connector for Salesforce CPQ. Follow the steps below to set up and authenticate the connector.
Connector Setup
- Access the Configure tab in Marketplace > Integration Hub > Salesforce CPQ to initiate the connector setup. If you cannot access the CPQ connector, initiate a support ticket for installation.
- Authenticate to Salesforce CPQ by following the on-screen prompts and entering your Lightning Salesforce CPQ customer instance credentials. Set the Salesforce instance type based on your Salesforce environment.
- Authenticate to Zuora using the provided Client ID and Client Secret. Set the environment to the REST Zuora endpoint. (e.g., rest.apisandbox.zuora.com). Generate Zuora credentials by following the steps outlined in the Zuora Knowledge Center guide.
- Configure the connector configuration fields listed below. Refer to the Custom Field Mapping Format for detailed steps on configuring custom field mappings.
|
Field Name |
Description |
|
SFDC Host |
The SFDC environment. For example: zuora-18f-dev-ed.develop.lightning.force.com. The SFDC domain is the unique endpoint for SFDC without the https |
|
zuora REST endpoint |
The Zuora environment (For example, rest.apisandbox.zuora.com) |
|
Zuora tenant ID |
Tenant ID in Zuora |
|
zuora_customer_name |
Preferred Zuora customer name |
|
Sync opportunity fields |
When set to true, the opportunity custom fields can be synced between SFDC CPQ and Zuora Order |
|
sfdc_use_list_price_base |
Refer to Billing SFDC Connector |
|
use_subscription_start_date |
When enabled, the connector will map the subscription start date in Zuora subscription to the subscription start date in Salesforce. If not enabled, the subscription start date in Zuora will default to the contract start date in Salesforce CPQ |
|
amend_subscriptions |
Enabling "amend_subscriptions" is recommended to support common use cases of syncing orders from Salesforce CPQ |
|
customer_alert_email |
Receive email alerts for synchronization failures |
| Increment tier upper bound for decimal point |
Impacts the way usage-based tiered and volume charges are calculated. For more information, see Order synchronization impact. |
- Click Next and Finish. You can modify the connector configuration at any point in time.
Custom Fields Setup in Zuora
To enable data sync, create the following custom fields under each object in Zuora:
Contact
- crmId (API name: crmId__c, Type: Text): Stores the ID of the SFDC account from which the contact was created.
- crmOrderId (API name: crmOrderId__c, Type: Text): Stores the ID of the SFDC order for which the contact was created.
Subscription
-
Contract ID (API Name: SFDC_Contract_c, Type: Text)
Configuration in Salesforce
At this stage, the connector exclusively facilitates on-demand synchronization. To transfer data from SFDC CPQ to Zuora, please set up the buttons below in Salesforce.
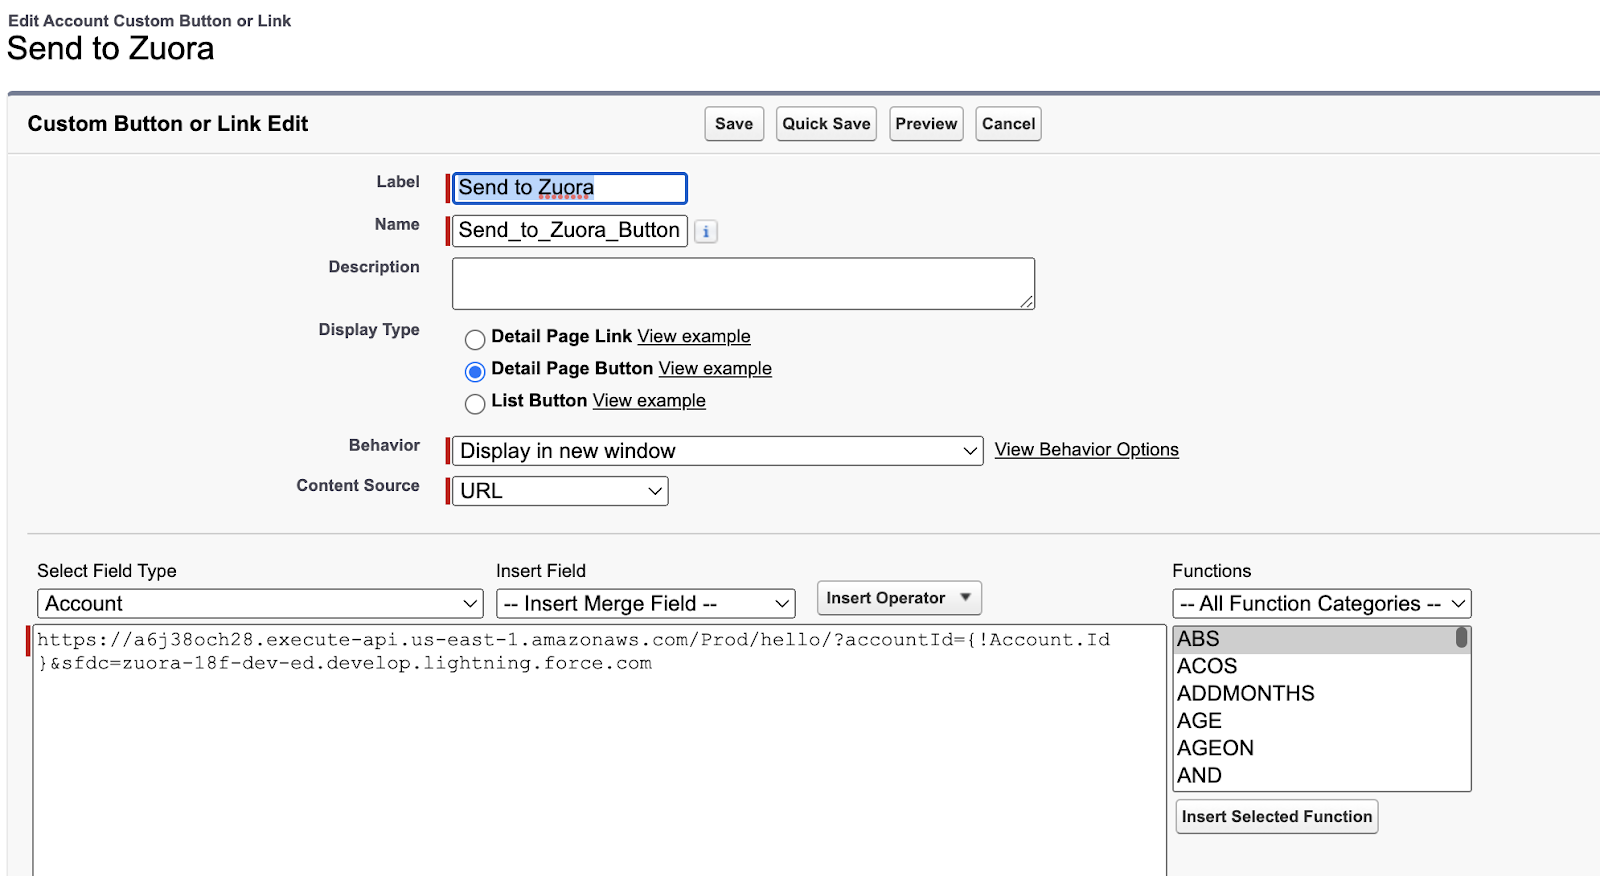
Account Sync Button
To sync all your supported accounts, perform the following,
- For Salesforce Setup, Go to Platform Tools > Objects and Fields > Object Manager > Account > Buttons, Links, and Actions > New Button or Link.
- Configure the following details on the actions page.
- Label: Send to Zuora
- Name: send_to_zuora_account
- Display Type: Detail Page Button
- Behavior: Display in a new window
- Content Source: URL
- URL: https://r7eq6a62d4.execute-api.us-west-2.amazonaws.com/default/sfdccpq?sfdc=<Salesforce CPQ domain name>&accountId={!Account.Id}. The Salesforce CPQ domain name is the unique endpoint for SFDC without the https.
- SFDC URL Example: zuora-18f-dev-ed.develop.lightning.force.com
Order Sync Button
To sync order between multiple sessions, perform the following,
- For Salesforce Setup, go to Platform Tools > Objects and Fields > Object Manager > Order > Buttons, Links, and Actions > New Button or Link.
- Configure the following details on the actions page.:
- Label: Send to Zuora
- Name: send_to_zuora_order
- Display Type: Detail Page Button
- Behavior: Display in a new window
- Content Source: URL
- URL: https://r7eq6a62d4.execute-api.us-west-2.amazonaws.com/default/sfdccpq?sfdc=<Salesforce CPQ domain name>&orderId={!Order.Id}. The Salesforce CPQ domain name is the unique endpoint for SFDC without the https.
- SFDC URL Example: zuora-18f-dev-ed.develop.lightning.force.com.
Once the buttons are configured in Salesforce CPQ, submit a support ticket in Zuora with the URL endpoints for button routing.