Edit a CRM Account ID
To change CRM IDs for a large number of CRM accounts, such as when you redirect your Zuora tenant to a different Salesforce org, we do recommend that you first perform a Sync Cleanup of Accounts and Related Objects before changing CRM IDs. The Sync Cleanup removes all Zuora Billing and Payment data previously synchronized over to Salesforce. Simultaneously, the Sync Cleanup resets your Salesforce associations so that you can now edit your CRM Account IDs.
To change CRM IDs for one or a few CRM accounts from Zuora UI, we do not recommend a Sync Cleanup followed by a full sync operation as it is a time consuming operation that could cause an extended interruption of business operations.
After updating the CRM Account IDs, perform a Zuora 360+ Sync to re-synchronize your data back into Salesforce. If you performed a Sync Cleanup before the update, the next sync, manual or scheduled, will be automatically a full sync.
Change One CRM Account ID
To change the CRM Account ID in the customer account:
- In Zuora, navigate to Zuora > Customer Accounts.
- Click the customer account you want to edit.
- Click edit.
- Update the CRM Account ID for the applicable customer account.
See Find the Salesforce Account IDs for retrieving the CRM Account ID. - Click save.
- Re-synchronize the Accounts & Related Objects data as described in Synchronize Data from Zuora.
Change CRM IDs for Multiple Accounts Using the Zuora API
To change CRM Account IDs using the Zuora API, you must:
- Grant the required user permissions
- Enable the History Tracking setting for the Account field on the Billing Account object.
We recommend that you perform a Sync Cleanup of the Accounts & Related Objects before you change CRM IDs using the API.
Required Permissions
To view the CRM Account ID change results, the Salesforce Sync User's user profile must have the following permissions:
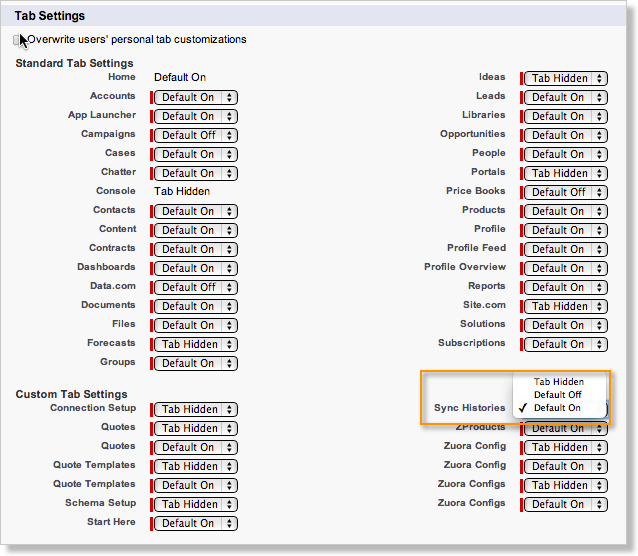
- Custom Tab Settings
- Sync Histories: Default On
- Custom Object Permissions
- Sync History: View All, Modify All
To grant the Custom Object permissions to a profile:
- Navigate to Setup > Administer > Manage Users > Profiles.
- Click the profile to whom you want to grant permissions.
- Click Edit.
- In the Custom Tab Setting section on the Profile Edit page, click and select Default On for Sync Histories.
- In the Custom Object Permissions section, select View All and Modify All for the Sync History object.
- Click Save.
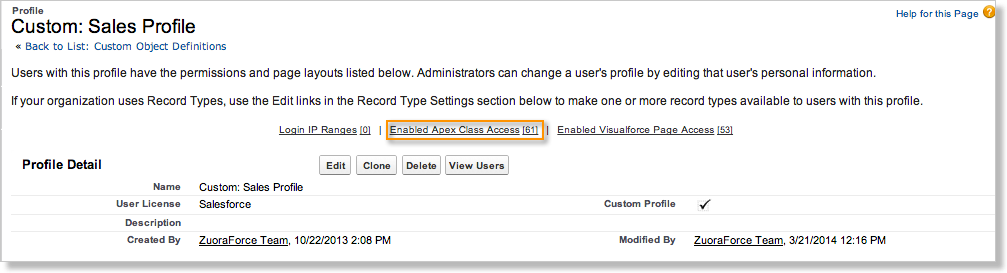
To grant a profile access to the Apex classes:
-
Navigate to Setup > Administer > Manage Users > Profiles.
- Click the profile to whom you want to grant permissions.
- Click Enable Apex Class Access.
- In the Enabled Apex Class Access section, click Edit.
- Click the following classes in the Available Apex Classes list and click the Add arrow to move them to the Enabled Apex Classes list:
- Zuora.PaymentCrmIdChangeBatchable
- Zuora.RefundCrmIdChangeBatchable
- Zuora.SubObjectBatchableForCrmId
- Zuora.SubProdChargeCrmIdChangeBatchable
- Zuora.SubscriptionCrmIdChangeBatchable
- Zuora.ZInvoiceCrmIdChangeBatchable
- Zuora.SyncHistoryController
- Click Save.
To grant a profile a access to the Visualforce pages:
- Navigate to Setup > Administer > Manage Users > Profiles.
- Click the profile to whom you want to grant permissions.
- Click Enabled Visualforce Page Access.
- In the Enabled Visualforce Page Access section, click Edit.
- Click the following Visualforce pages in the Available Visualforce Pages list and click the Add arrow to move them to the Enabled Visualforce Pages list:
- Zuora.CrmIdChangeResult
- Zuora.SyncResult
- Click Save.
Enable History Tracking for the Account Field
Enable History Tracking for the Account field of the Billing Account object (Zuora__CustomerAccount__c.Account__c). This setting supports the ability to change CRM Account IDs in bulk.
To enable History Tracking for the Account field of the Billing Account object:
- Navigate to Setup > Build > Create > Objects.
- Click Billing Account.
- In the Custom Fields and Relationships section, click Set History Tracking.
- On the Billing Account Field History page, select Account.
- Click Save.