Setup Zuora Connector for AWS Redshift
The setup process of Zuora Connector for AWS Redshift includes the following steps:
- Configure your Redshift destination
- Verification and Data Transfer
Prerequisites
As a first step towards setting up Zuora Connector for AWS Redshift, you must complete the following steps:
- If your Redshift security posture requires IP whitelisting, have Zuora data syncing service's static IP available. For more information on how to find the Zuora IP addresses to whitelist, see Inbound and Outbound IP Addresses.
- By default, Redshift authentication uses role-based access. You must have the trust policy pre-populated with the data-syncing service's identifier to grant access. It should look similar to the following JSON object with a proper service account identifier:
{
    "Version": "2012-10-17",
    "Statement": [
        {
            "Effect": "Allow",
            "Principal" : {
                "AWS": "arn:aws:iam:123456789012:sample_role"
            },
            "Action": "sts:AssumeRole",
        }
    ]
}
Step 1 - Create a limited user in Redshift
Complete the following steps to create a user in Redshift:
- Connect to Redshift using the SQL client.
- Execute the following query to create a user to write the data.
CREATE USER <username> PASSWORD '<password>';
In the above query, (replace <password> with your preferred password).
Create a user without a password
Alternatively, you can create a user in Redshift without a password. Role-based auth does not require a password to create a user in Redshift
Use CREATE USER <username> PASSWORD DISABLE; to create the user.
-
Grant the following database privileges to the user:
-
create- Allows the service to create new schemas -
temporary- Allows the service to create temporary tables.
-
GRANT CREATE, TEMPORARY ON DATABASE <database> TO <username>;
The schema will be created during the first sync. The schema name provided in Step 4 (Add your destination) will be created during the first connection. You do not need to create this manually in the destination ahead of time.
Step 2 - Whitelist connection
Complete the following steps to whitelist a connection:
- In the Redshift console, click Clusters.
- From the list of cluster names, select the cluster you want to connect to.
- In the General information pane, gather the Endpoint details
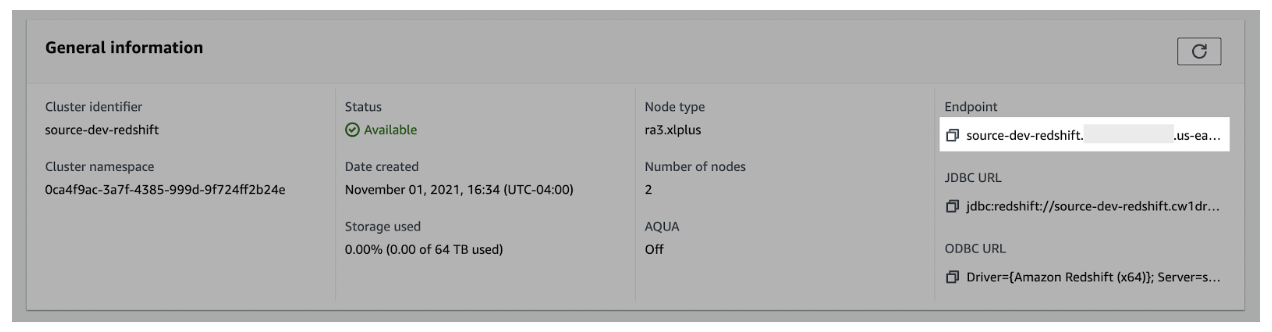
- Use the copy icon to copy the complete details of the endpoint and port number.
- Navigate to the Properties tab > scroll to the Network and security settings section.
- In the VPC security group field, select a security group to open it.
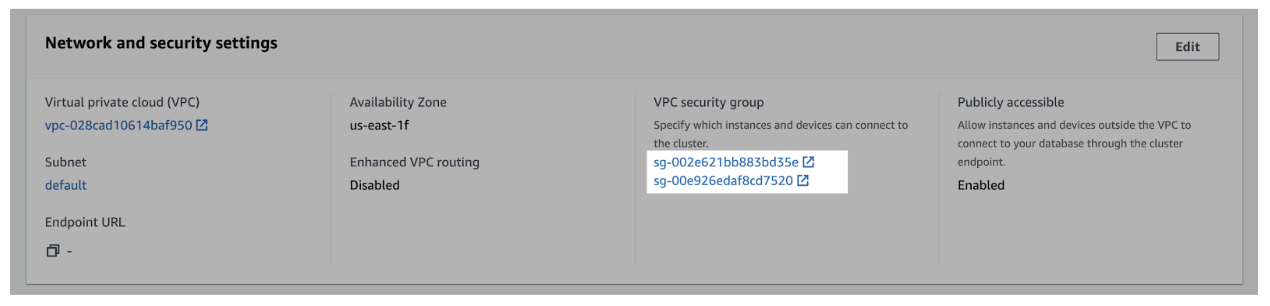
- In the Security Groups window, click Inbound rules.
- Click Edit inbound rules.
- In the Edit the Inbound rules window, complete the following steps to create custom TCP rules for the static IP:
- Select Custom TCP from the drop-down menu
- Enter your Redshift port number. (For example, `5439`)
- Add all the IP addresses listed for that environment as per the article. To find the corresponding environment's IP addresses, see Inbound and Outbound IP Addresses.
- Click Add rule.
Step 3 - Create a staging bucket
Complete the following three substeps to create a staging bucket:
Create a staging bucket
- Navigate to the S3 service page > click Create bucket.
- Enter a Bucket name and modify any of the default settings as required.
Object Ownership can be set to "ACLs disabled" and Block Public Access settings for this bucket can be set to "Block all public access" as recommended by AWS. Make a note of the Bucket name and AWS Region.
-
Click Create bucket.
Create policy
- Navigate to the IAM service page, click on the Policies navigation tab, and click Create policy.
- Click the JSON tab. Paste the following policy and replace
BUCKET_NAMEwith the name of the bucket chosen in Step 2 while creating a bucket andREGION_NAME,ACCOUNT_ID,CLUSTER_NAME,USERNAME, andDATABASE_NAMEwith the proper Redshift values.{ “Version”: “2012-10-17”, “Statement”: [ { “Effect”: “Allow”, “Action”: “s3:ListBucket”, “Resource”: “arn:aws:s3:::BUCKET_NAME” }, { “Effect”: “Allow”, “Action”: [ “s3:PutObject”, “s3:GetObject”, “s3:DeleteObject” ], “Resource”: “arn:aws:s3:::BUCKET_NAME/*” }, { “Effect”: “Allow”, “Action”: “redshift:GetClusterCredentials”, “Resource”: [ “arn:aws:redshift:REGION_NAME:ACCOUNT_ID:dbuser:CLUSTER/USERNAME”, “arn:aws:redshift:REGION_NAME:ACCOUNT_ID:dbname:CLUSTER/DATABASE_NAME” ] } ] } - Click through to the Review step. Choose a name for the policy, for example, transfer-service-policy (this will be referenced in the next step while creating role), add a description, and click Create policy.
The first bucket permission in the list applies to BUCKET_NAME whereas the second permission applies only to the bucket's contents BUCKET_NAME/*.
Create role
- Navigate to the IAM service page > Roles navigation tab, and click Create role.
- Select the Custom trust policy and paste the provided trust policy to allow
AssumeRoleaccess to this role. (Refer to the 2nd bullet point in Prerequisites). Click Next. - Add the permissions policy created above, and click Next.
- Enter a Role name, for example, transfer-role, and click Create role.
- Once successfully created, search for the created role in the Roles list, click the role name, and make a note of the ARN value.
Alternative authentication method
AWS User with Hash-Based Message Authentication Code (HMAC) Access Key ID & Secret Access Key
Based on AWS recommendations, role-based authentication is the preferred authentication mode for Redshift. However, you can use the HMAC Access Key ID and Secret Access Key as alternative authentication methods.
- Navigate to the IAM service page.
- Navigate to the Users navigation tab, and click Add users.
- Enter a User name for the service, for example, transfer-service and click Next.
- Under Select AWS access type, select the Access key - Programmatic access option.
- Click Next > Permissions.
- Click the Attach existing policies directly option, and search for the name of the policy created in the Create Policy step. Select the policy.
- Click Next > Tags.
- Click Next > Review and click Create user.
- In the Success screen, record the Access key ID and the Secret access key.
Step 4: Add Your Destination
- After completing the initial setup, share your Redshift host address with a Zuora representative who will create a connection link for you.
- Using the connection link shared with you by Zuora, you can securely input your Redshift database details, including the cluster, schema, IAM role ARN, and staging bucket information, finalizing the setup for the connection.
Sharing your Redshift host address is crucial for generating a secure link that permits only your specified host to access it, ensuring a high level of security.
Although this approach is complex, it is designed to safeguard your data. By embedding the host address into the link and making it unchangeable, we prevent any unauthorized attempts to redirect your data even if the link is intercepted.
- After you fill in all the required Redshift details through the provided link and test the connection, saving the destination will kickstart the onboarding process and begin transferring data.
Verification and Data Transfer
For AWS Redshift clusters, your data will be loaded into the specified database schema and tables that you have configured during the setup process. You can access and query this data directly within your Redshift cluster using SQL queries or through integrated analytics tools.
Format of Transferred Data
- Data transferred to AWS Redshift clusters are loaded as properly typed tables within the specified schema. Each table corresponds to a distinct dataset or entity from your Zuora data.
- In addition to the primary tables, a
special_transfer_statustable is created within the designated schema to capture transfer metadata. This table includes atransfer_last_updated_attimestamp for each dataset, providing insights into the timing of data updates. - The exact structure and organization of your transferred data within Redshift will be determined by the configurations that you have specified during the setup process. This ensures that your data is seamlessly integrated into your existing Redshift environment and ready for analysis and reporting.