Quickstart guide for configuring the Zuora Fraud Protection service in Microsoft
Use the instructions and best practices in this quickstart guide to configure the Zuora Fraud Protection service in the Microsoft DFP portal.
Prerequisites
- You have completed the following tasks. For more information, see Enable and configure Zuora Fraud Protection.
- Contact Zuora Global Support to set up Zuora Fraud Protection.
- Configure the fraud protection service in Zuora.
- You have reviewed the fraud protection language reference guide.
Add users
In the Microsoft DFP portal, users with either the AllAreas_Admin or Product Admin role can grant other users access to the Microsoft portal and assign them roles to dictate their level of access.
From the left navigation pane, navigate to Settings > User Access, and then click Assign Role(s). In the drawer panel displayed, enter the name or email address of the user, as well as the role. Upon submission, an email will be sent to the user with instructions for accessing the Microsoft portal.
For more information, see Configure user access.
Define rules
In the Microsoft DFP portal, you can define rules by using a variety of inputs, including lists, the risk score generated by the AI model, and additional parameters from the request payload. Rules are applied to each data screening and the fraud protection service converts an assessment into a decision based on the rules.
The following sections provide quick references and best practices for defining rules in the Microsoft DFP portal. For more detailed information, see Manage rules in Microsoft documentation.
Configure rule settings
Navigate to Rules configuration > Rules, and the page shows a list of the rules that are configured for an assessment type. You can configure rule settings by clicking Rules settings. You can change the rule evaluation behavior to update how your rules are evaluated. It is recommended to select Run all matching rules until a decision is made. By selecting this, multiple rules can be evaluated for a single transaction. If the first rule that is evaluated does not return a decision, each subsequent matching rule is evaluated until a decision is returned.

Define rules
Navigate to Rules configuration > Rules, and then you can create custom rules and manage existing rules on the page. For a quick start guide for defining a rule, see Manage rules in Microsoft documentation.
Here are some best practices for defining rules:
|
Get started |
|
|
Construct rules and clauses |
|
|
Manage rules and clauses |
|
Test rules
Before switching rules into Decision mode, you can use the following functions or tools in Microsoft Dynamics 365 Fraud Protection to test the rules, enabling you to make informed decisions about rule adjustments and troubleshoot any potential issues.
Observe mode
Observe mode allows you to test rules without affecting the customer experience. By using Observe mode, you can gather data on how rules would perform if they were decisioning. You can develop your rules in Observe mode by using OBSERVE statements and functions such as OBSERVE Output(). For details about how to write OBSERVE statements and functions, see Language reference guide in Microsoft documentation. For sample Observe rules, see Examples of Observe rule.
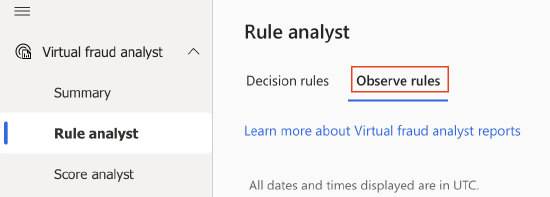
To analyze and evaluate your Observe rules, navigate to Virtual fraud analyst > Rule analyst, and then click the Observe rules tab.
To analyze specific transactions that match your Observe rules, use the Search events tool to filter by Observed Clauses attribute and the name of your clause. The JSON payload of the transaction also contains all rule matches. For more information about the Search events tool, see Search events.
When you are ready to move rules to Decision mode, replace the OBSERVE statement with a RETURN statement such as RETURN Reject() within the rules editor.
Virtual Fraud Analyst (VFA)
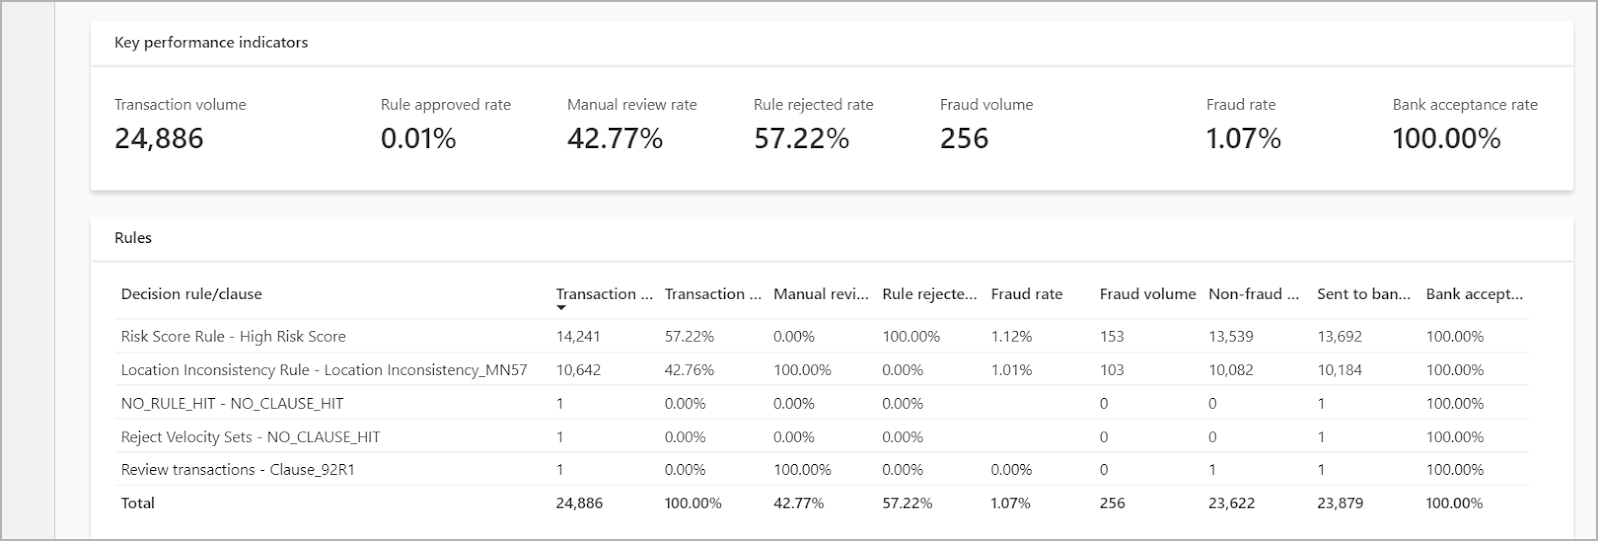
Dynamics 365 Fraud Protection includes a suite of fraud analysis tools named Virtual Fraud Analyst (VFA). When accessing these reporting tools, ensure that the filter in the upper right is set to Purchase. Among these tools, Rule analyst reports can be used to track the impact of rules. The reports help you understand the transaction volume, distribution, and potential fraud trends by rule and clause. You can also use them to analyze decisions and performance by rule segment, and to compare the impact of Observe rules and Decision rules.
In the following example, you can see the distribution of transactions and which rules were hit. The NO_RULE_HIT - NO_CLAUSE_HIT record indicates the transaction did not meet the conditions or clauses for any rule in the system, so it was approved. If only the NO_CLAUSE_HIT record is populated, the transaction met the rule condition but not any clause, so it was approved.
For more information, see Rule analyst reports.
Evaluate a rule
Use the Evaluate a Rule function to test the rule logic and ensure it behaves as expected. On the Rules page, click Expand in the Rule evaluation section at the bottom of the page, the Rule evaluation pane is shown. You can watch your rule being evaluated against the current payload sample and score sample. As you make changes to the sample, or to the rule itself, the content in the evaluation pane is updated. For details about how to use this function, see Evaluate a Rule.
Create lists
Lists describe the information that you consider risky or safe. For example, you can create a list to track payment instruments that you consider risky or user email addresses that you consider safe. The lists are used as part of fraud protection rules to determine how to manage the traffic on your merchant site.
In Dynamics 365 Fraud Protection, you can create two types of lists:
- Support lists: the predefined lists to help you get started.
- Custom Lists: the lists created and defined by you.
The following sections highlight some key concepts and tips about Lists. For details about how to define lists, see Microsoft documentation.
Support lists
You have several predefined lists for objects listed in Manage support lists. You can add entities to Support lists in either of the following ways:
- The Lists tab: Click the list, select Update, and then add the entity.
- The Search tab: Click into a purchase ID detail page, and then click the pencil icon next to any hyperlinked entity to add it.
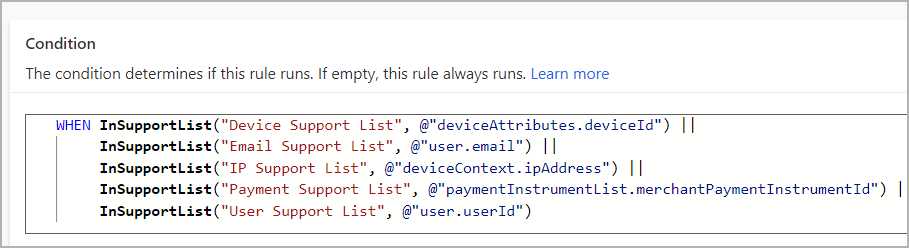
The Default Support Rules, available in your list of rules, act on the Support lists. The condition is only running the rule against your lists.
Note that if you add anyone to a block list, the system will automatically reject them. You may want to test the Lists functionality with the Watch lists first, which will send them to a review instead.
For sample rules that act on Support lists, see Rule examples of Lists.
Custom lists
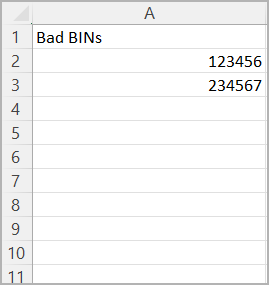
For other objects that are not supported by the Support lists, such as BINs, you can create Custom lists.
- Create a csv file in the correct format with your desired list.
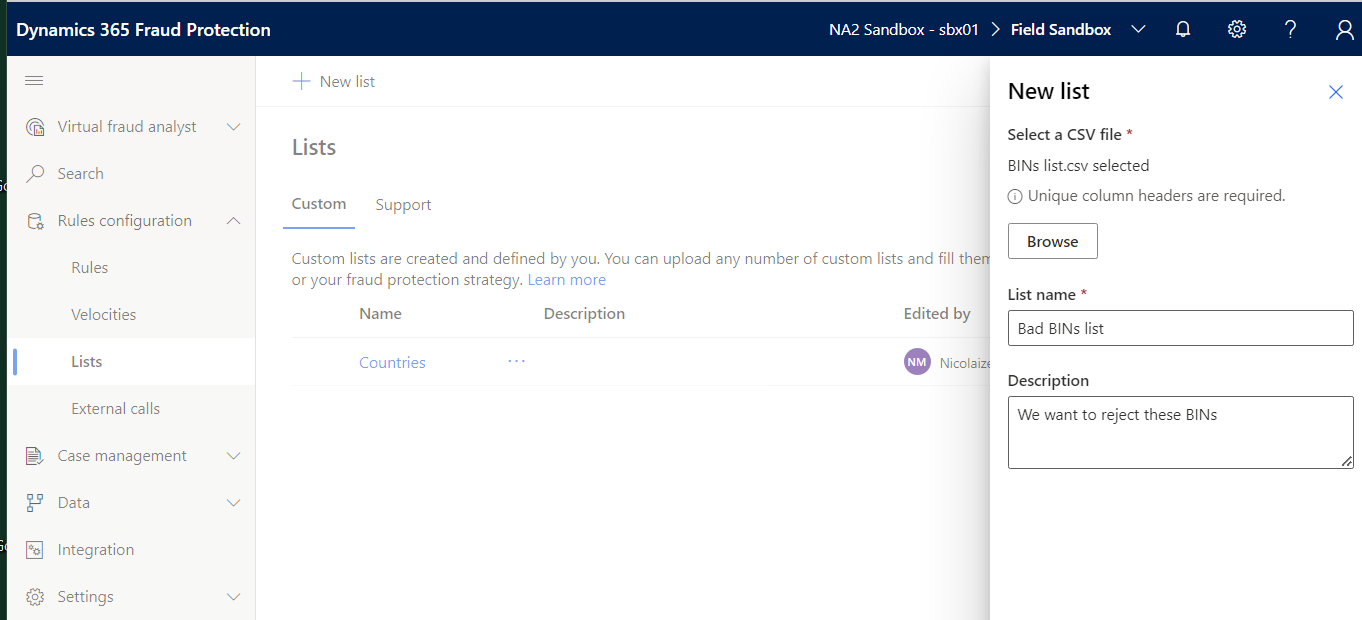
- Upload the csv file as a new list. The list will be ready to use in rules.
- Create rules to act on your Custom lists. The following sample rule observes the Bad BINs list:

The names of the list and the column must match what you defined when you created the Custom list.
For sample rules that act on Custom lists, see Rule examples of Lists.
Define velocities
A velocity check restricts the frequency of events that can occur. This security check is important in identifying the patterns of activities, such as the rapid submission of the same credit card or IP address during bot attacks.
Zuora provides built-in rate limiting measures that precede the fraud protection service on the Hosted Payment Method page. For details about Zuora's security settings, see Zuora Fraud Protection and security measures for HPM. Zuora Fraud Protection's velocity checks are performed after these built-in security measures.
To define velocities, navigate to Rules configuration > Velocities and the page shows a list of several predefined velocities available by default. You can add more velocities by cloning the default ones or creating custom velocities. The name that you specify when creating a velocity, such as the highlighted part in the following example, is what you need to reference in your rule.
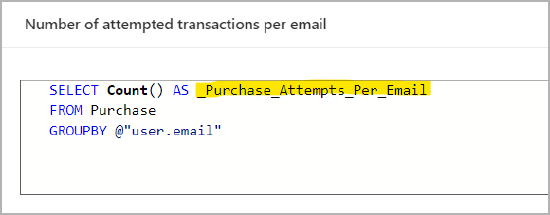
The time window that you want to observe the velocity is not specified in the velocity definition itself. Instead, you need to specify it when you reference the velocity in a rule.
For details about how to define and perform velocity checks, see Microsoft documentation.
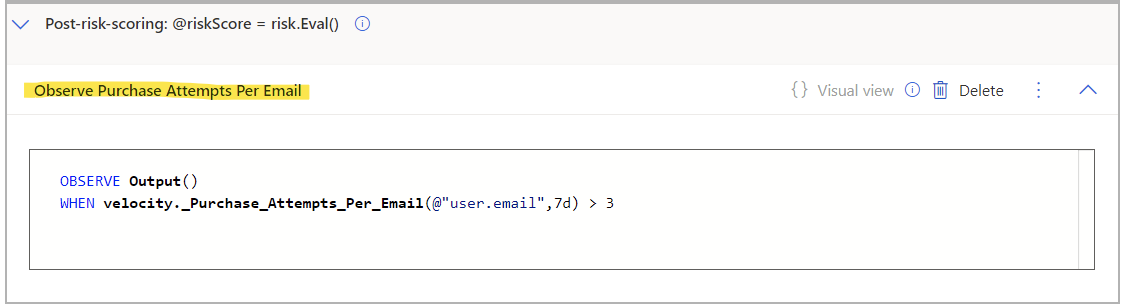
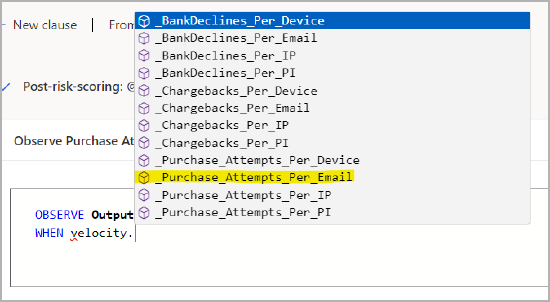
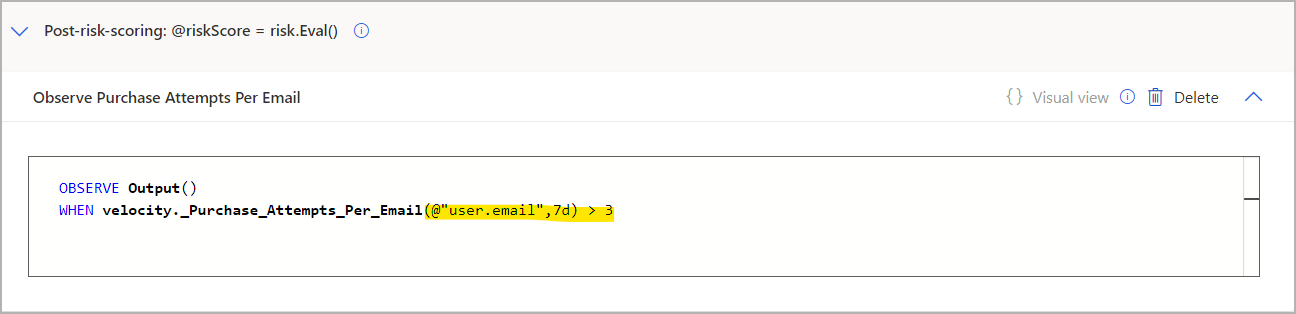
Once a velocity is published and activated, you can use it in a rule. When you create your rule, leverage the type ahead capabilities.
Lastly, finish the rule by specifying the time window and the threshold you want to use. In the following example, it is more than 3 times over 7 days.
For more details, see Use a Velocity in Rules. For more examples, see Rule examples of Velocities.
Search events
Click Search in the left navigation pane, and then use the attribute to filter and search for events. The Column Options are configurable to provide the view you desire, and results can be Exported. Clicking the Purchase ID link for an event will show you the Event page where you can find and view all the data connected to the transaction.
Here are a few examples of common Search filtering:
| Use case | Attribute | Operator | Value |
|---|---|---|---|
|
View all your transactions |
Risk score |
Greater than or equal to |
0 |
|
View transactions submitted from hosted payment pages |
Order type |
Equals |
AddPI |
|
View transactions submitted from recurring charges (for example: MIT from a payment run) |
Order type |
Does not equal |
AddPI |
|
Search for transactions from a specific IP |
IP address |
Equals |
A specific IP |
|
Search for specific clauses within your Observe rules |
Observed clauses |
Contains or Equals |
Name of the clause |
Here are some other tips to discover details on the Event page:
- To understand the full details of the transaction and how rules are triggered, click JSON view in the upper right corner of the page to display the JSON API requests and responses associated with the transaction.
- Expand Reason Codes to see why the transaction was assigned this risk score.
- You can add entities to Support lists by clicking the pencil icon next to any hyperlinked identifiers.
- Use Link analysis to see commonalities between identifiers on this event compared to other screening events. This is helpful in finding patterns in bad actors.
- Add notes to track your analysis.
For more information, see Search in Microsoft documentation.
Manage cases
Any transaction that meets the conditions for a rule with a RETURN Review() decision will become a Case in your General Queue. To view the case, select Case Management > Queues in the left navigation pane.
Make sure that you have an appropriate role to complete a manual review so that you can Approve, Reject, or Dismiss cases in the Queue. Note that currently, purchases sent to a Queue are still automatically Approved instead of going into a Pending state. If you want to reject a transaction you see in a Queue, you will need to manually cancel the subscription in Zuora.
You can further organize your Case Management by creating additional Queues and defining Routing Rules to send Cases into specific Queues instead of the General Queue. For example, you may want to create a queue for reviewing transactions where the Device Fingerprinting is missing as shown in the following image.
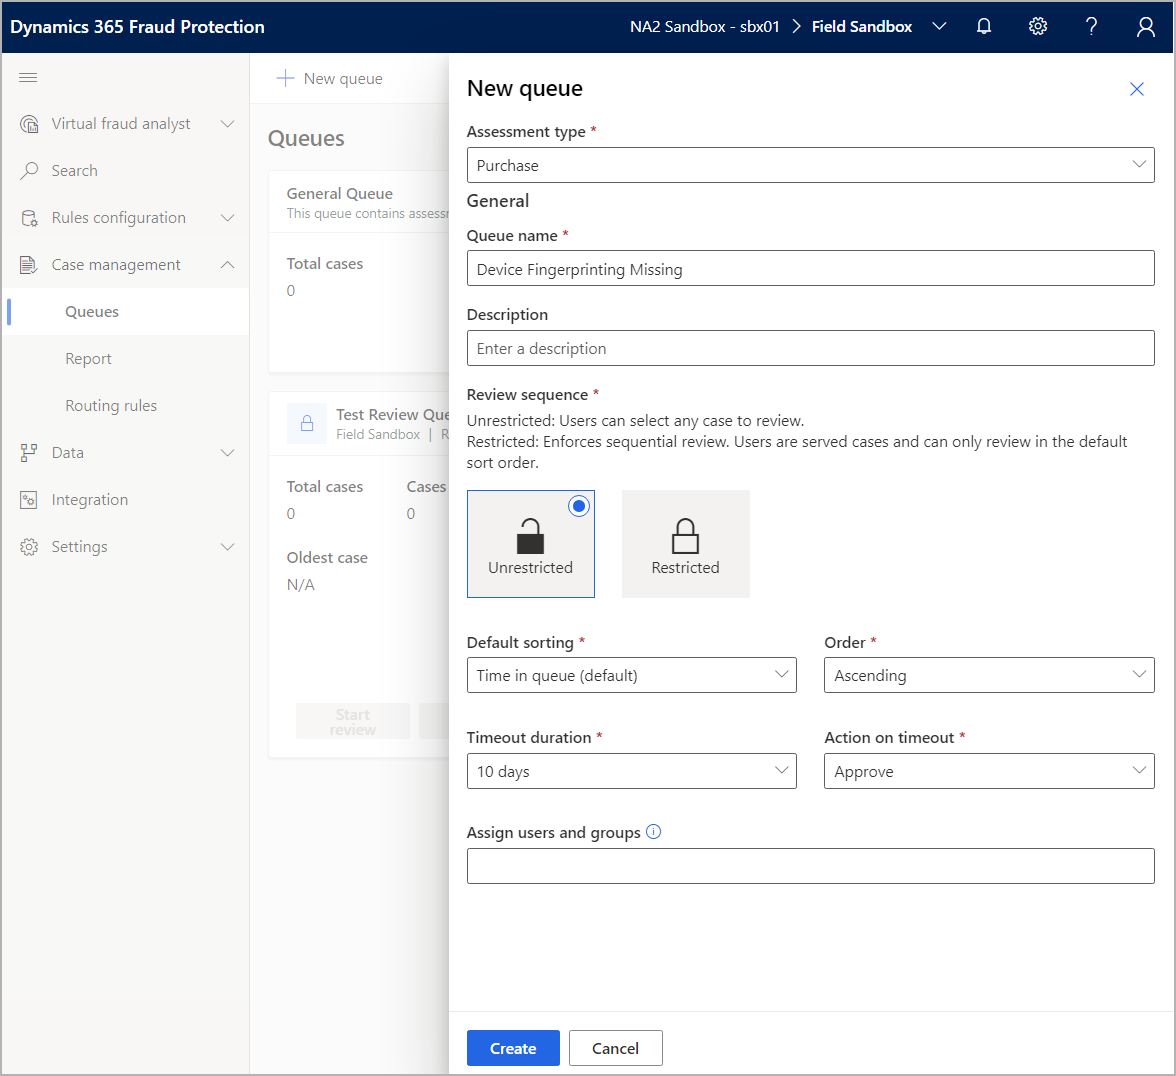
Adding a routing rule would send only specific Review Transactions to this queue.
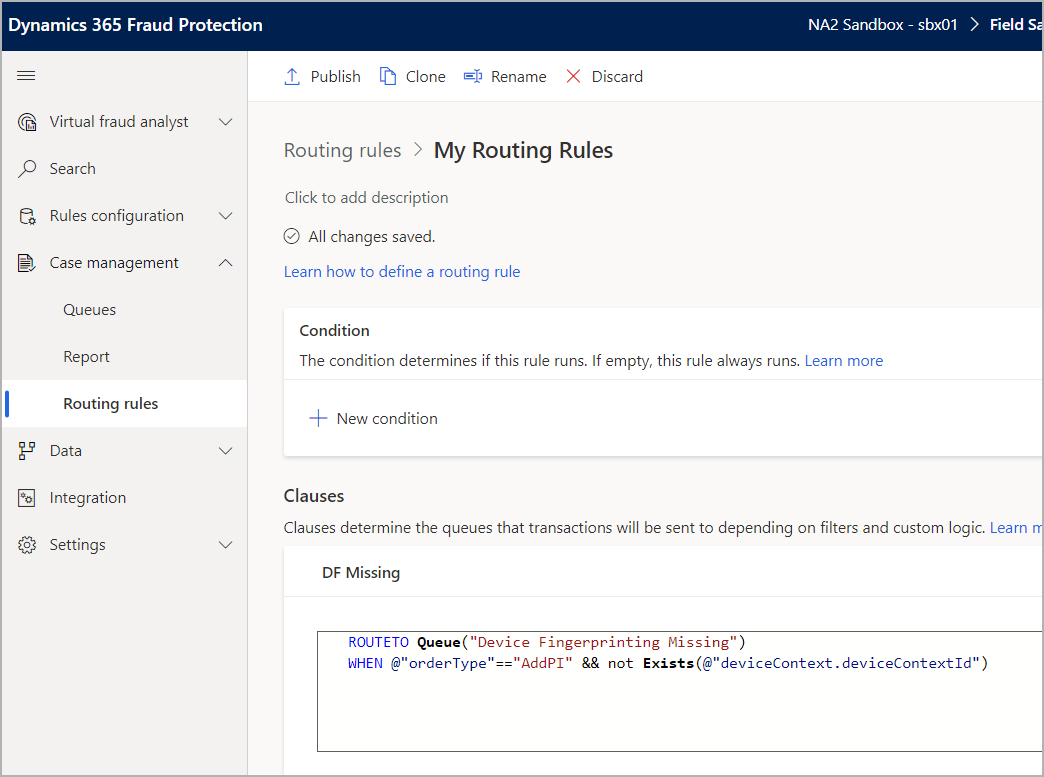
It is assumed that you would already have a Rule set up to identify your Review Transactions. It might look like the following sample rule:
RETURN Review("Missing DF")
WHEN @"orderType"=="AddPI" && not Exists(@"deviceContext.deviceContextId")
To view KPIs and analyze your Case Management processes, select Case Management > Report.
For more information about Case Management, see Case Management in Microsoft documentation.
Enable Transaction Acceptance Booster
Transaction Acceptance Booster (TAB) helps you benefit from higher acceptance rates by sharing information with banking institutions. TAB is not turned on by default. To enable it, select Settings > Transaction Acceptance Booster in the left navigation pane, and then select the checkboxes for the services you want to subscribe to. TAB will send additional trust knowledge on the transaction that provides more context to the issuer.
TAB is subject to issuer adoption rates and market availability. The coverage list is constantly growing.
For details about Transaction Acceptance Booster, see Microsoft documentation.
Handle customer escalations
Risk support in Microsoft Dynamics 365 Fraud Protection lets your support agents evaluate customer escalations and unblock customers by putting their payment instrument or IP address on a safe list if they call your customer support. For more information, see Support your customers in Microsoft documentation.
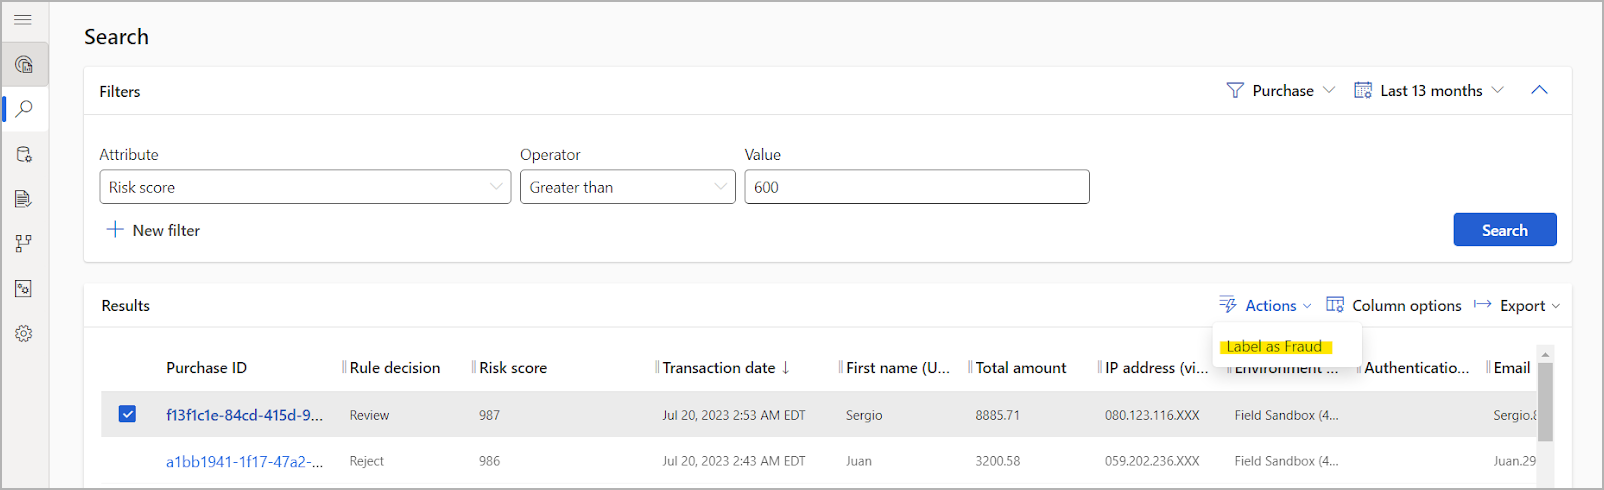
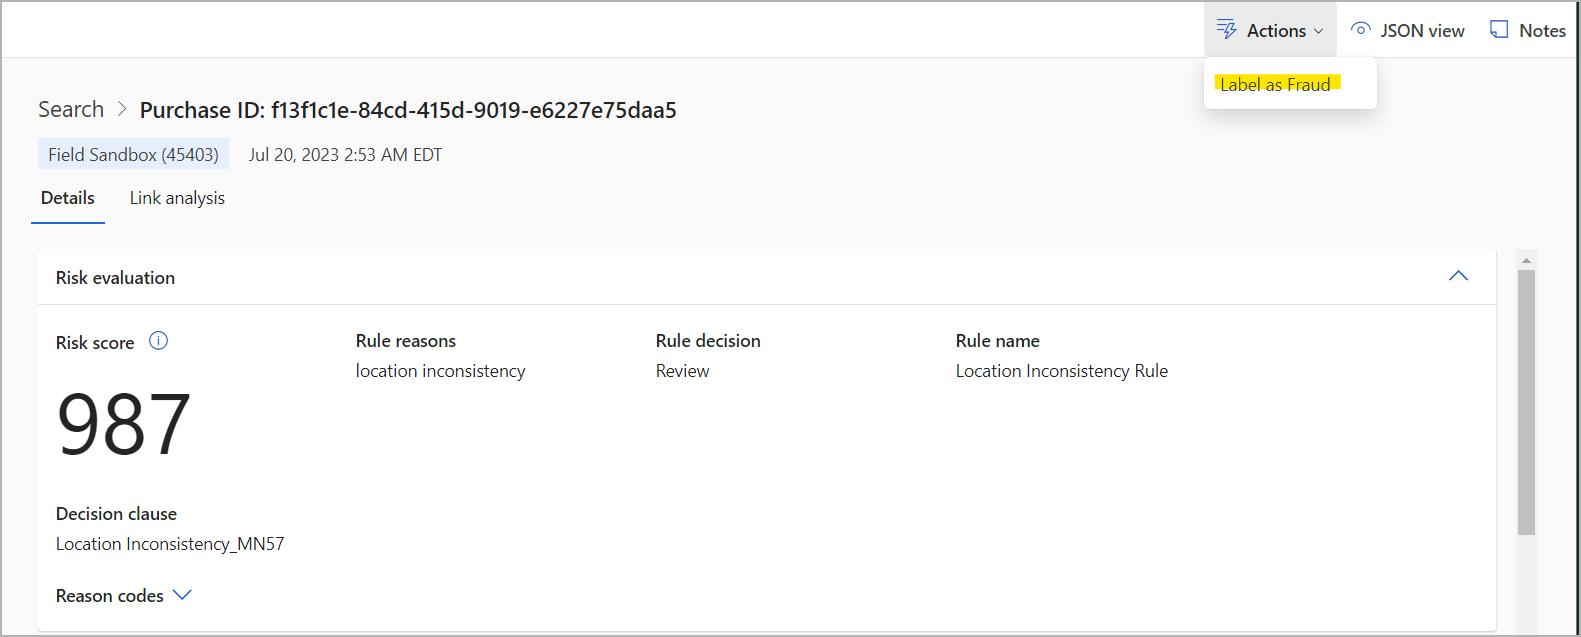
Label transactions as Fraud
Fraudulent transactions should be labeled to train the risk score machine learning model on your customer traffic. This is available through Actions on the Search page, an Event page, or a Review page, as shown in the following images. All roles with read or write access to event details are able to label transactions.