Workflow best practices
Zuora recommends that you follow the best practices in this article when designing or using workflows.
Fully test your workflows in Sandbox before deploying them to Production
Workflow runs and the related data changes cannot be reverted. To protect production data from unintended changes, always design and fully test your workflows in the Sandbox before deploying them to the Production environment.
Visualize your business flow before creating a workflow
Before creating a workflow, you need to understand the business scenario and how data flows in different systems. You can create a diagram to visualize the flow across different parts or systems. Such a diagram will guide you through the overall process of designing and implementing a workflow.
Minimize task usage
Production usage is counted towards utilization. You can view the limit on the Metrics tab from the workflow home page. For the yearly allowance of workflow tasks for different Zuora editions, see Zuora Editions.
Try to leverage some of the Platform capabilities. For example, you can do complex data manipulation and transformation using SQL queries in Data Query or JSONata for JSON documents. Data Query supports at most 5 queries being processed simultaneously, and at most 10 queries in the queue. Do not submit more than 15 queries at one time. To minimize task usage and ensure the number of queries stays within the limits, Zuora recommends that you include a batch of SQL statements in a single Data Query task.
If you are going to create or update a large amount of Zuora objects after an Iterate type of task, consider using a batched Action POST or PUT operations where you can affect up to 50 objects in a single call. You'll have to chunk your iterated data. For example, you can create Usage records and update custom fields for multiple records of the same object at a time (Account, Subscription, Invoice, etc.).
You can use Liquid variables to minimize task usage. For example, you can define a Liquid variable and then add a Case task to create branches based on the value of the variable. Unnecessary retries could increase task count considerably. Always design exits for your retry loops. For details, see Workflow best practices.
Fill out the description field for your workflows
Your workflow can be used and reused by a lot of people. Including a bit more information about your workflow can help people identify workflows and reduce improper uses. You can include information such as the purpose of the workflow and things people should be aware of when using this workflow.
Use clear and self-explanatory names for variables and parameters
This is a general guideline. Following the same set of naming conventions would help everyone understand and use the code. We like the Naming Conventions from Uncle Bob's Clean Code Philosophy.
Avoid hard-coded values in emails, credentials, object IDs, and workflow run IDs
If a workflow will be deployed to multiple tenants or environments, avoid using hard-coded values in the parameters.
- Emails: Set the email as a default input parameter for your workflow, so that you can enter the correct email when you run the workflow.
If you foresee that the same email will be used in more workflows, set the email as a global constant. To learn about how to create global constants, see Global constants of Workflow. - Credentials: Set FTP hostnames, usernames, passwords, tokens as global constants.
- Object IDs and run IDs: Set them as default input parameters for your workflow.
- Other parameters that you can set as default input parameters:
- Date or time periods
- Interval values such as 30 days or 12 hours
- Tier minimum and maximum values
- Other quantities
Enable email notifications upon workflow failures
When your workflows fail, someone such as the DevOps team, the IT team, or a dedicated administrator should know about it. You can enable email notifications upon workflow failures for all workflow instances in the tenant or for a specific workflow. See Enable alert notifications for workflow failures for more information.
Use system Liquid expressions when possible
Familiarize yourself with the common Liquid expressions in Workflow, and use the system Liquid expressions when possible.
Use the system Liquid variables to refer to your password or base URLs of REST endpoints. When you copy a workflow from Sandbox to Production, these Liquid variables will ensure the retrieved values are valid.
For endpoints that contain '/v1/', use the following expression:
{{ Credentials.zuora.rest_endpoint }}
Here are two examples:
-
{{ Credentials.zuora.rest_endpoint }}orders?returnIds=true -
{{ Credentials.zuora.rest_endpoint }}accounts/{{Data.Invoice[0].AccountId}}
For endpoints that do not contain 'v1', use the following expression:
{{Credentials.zuora.rest_endpoint | remove: '/v1'}}
Here is an example.
{{ Credentials.zuora.rest_endpoint | remove: '/v1' }}objects/records/default/WorkflowJournal/
For date manipulation, you can use the date_manip Liquid extension. Here is an example.
{{ Data.Account.LastInvoiceDate | date_manip: '+', 1, 'month' | date: "%Y-%m-%d" }}
Skip validation if you want to use a custom Liquid variable
If you want to use a Liquid variable that is defined in an upstream task (such as Liquid, Export, Object Query, or Data Query), you must select Skip Validation in the task settings. Otherwise, the variable cannot be parsed and you will get an error.
Validate the actual response of an API call
For Zuora API operations, the response code '200' indicates the HTTP request is received and accepted. It does not mean that the operation is successful. To learn about whether an operation is successful, you can validate the value of a response data field. To do so, in the Response tab of your Callout task, complete the settings indicated in the following screenshot.
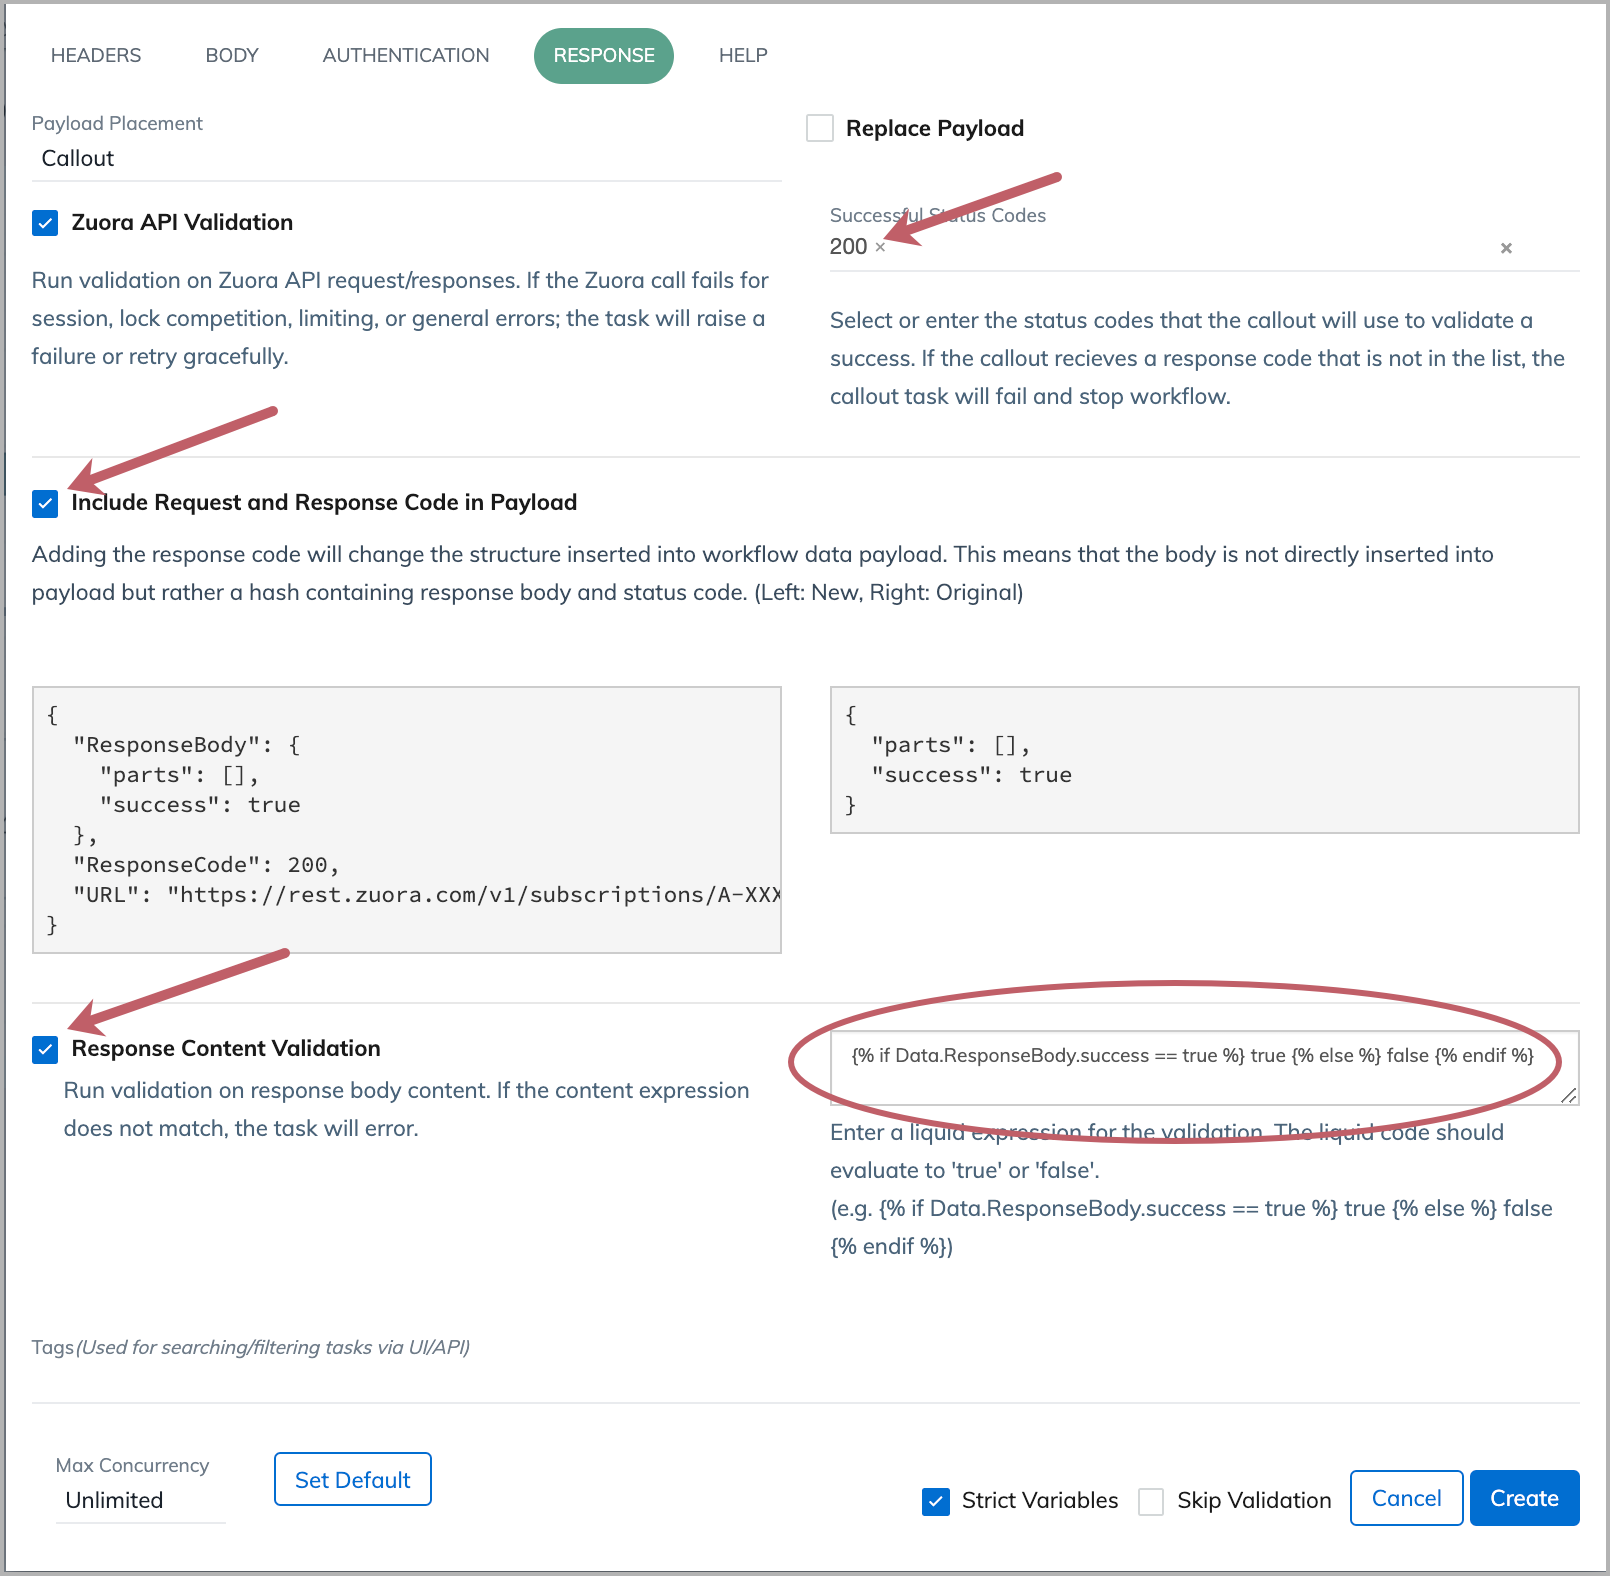
The Liquid expression entered in the response content validation field is as follows:
{% if Data.ResponseBody.success == true %} true {% else %} false {% endif %}
This code block is also included in the description below the text field as an example.
The 'Data' container for response validation is separate from the general 'Data' container for Workflow. The 'Data' container for response validation has access to the following JSON keys:
- URL
- RequestBody (if one was used)
- ResponseBody
- ResponseCode (see a list of possible HTTP response codes)
- RequestHeaders
- ResponseHeaders
You can use the 'assign' Liquid tag to create Liquid variables that can be used in downstream tasks.
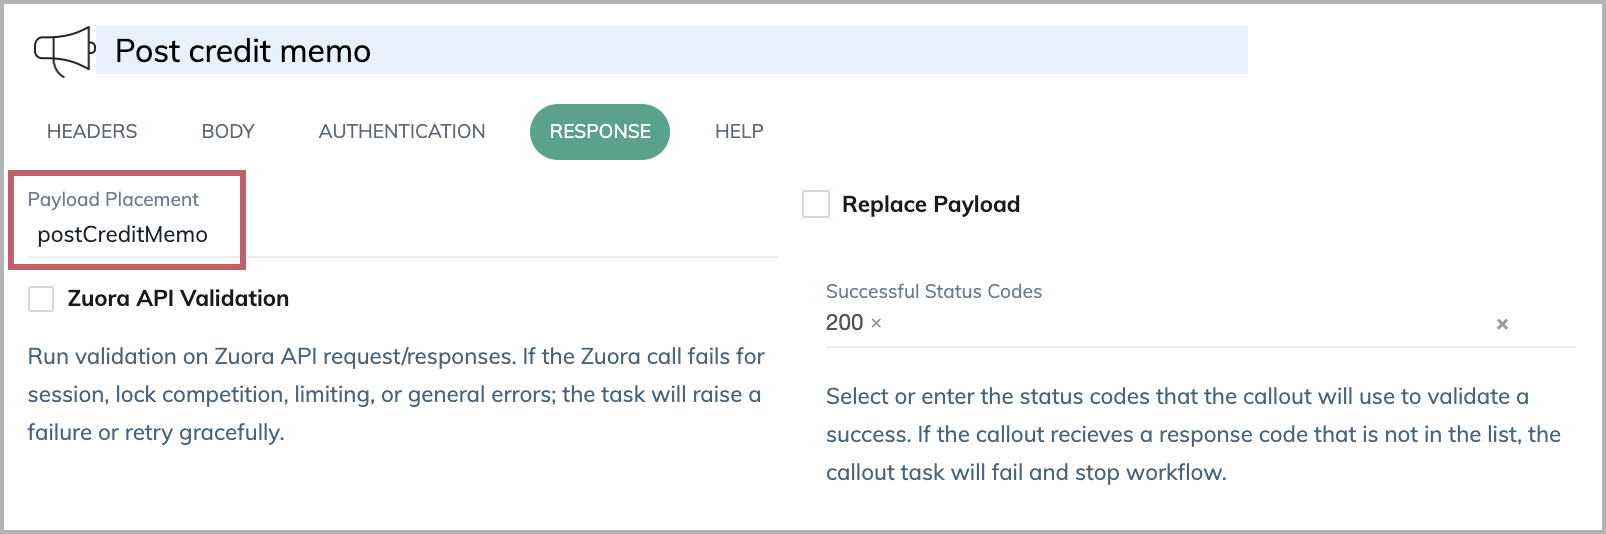
Uniquely name the response payload placement for Callout tasks
By default, data retrieved from Callout tasks are stored in a data container named 'Callout'. If you have multiple Callout tasks in your workflow, the data for each Callout task will be indexed and placed under the 'Callout' container. You need to reference the data by specifying the index (for example, 'Callout[0]'). It is error-prone and makes it difficult to debug an error.
It is a best practice to rename the payload placement variables from the default 'Callout' to something more descriptive like "postCreditMemo", "getAccount", or "createSubscriptionOrder". If you use the 'Replace Payload' option, then this best practice does not apply.
It is helpful to follow certain naming conventions (using camelcase or including underscore between words) when naming payload placement variables.
Design exits for retry loops
Some tasks are not designed to be retriable, but they could fail because of timeout or other connectivity issues. These are basically external-facing tasks such as FTP or SFTP. Asynchronous tasks such as Data Query or Export could time out.
It is important to design exits for your retry loop. Retrying too frequently or too many times is unnecessary and a waste of resources. It is a best practice to have your workflow retry the external-facing task a reasonable number of times, each time waiting just a bit longer. This best practice is based on the assumption that the problem is temporary and in one of the retries, the task will be successful.
The following example is based on the exponential backoff algorithm. The SFTP task for getting bank files can fail. We design a retry loop that does more than simply repeating the SFTP task. It first determines whether the pre-defined number of retries is reached. If not, it waits for an amount of time, and then retries the SFTP task.
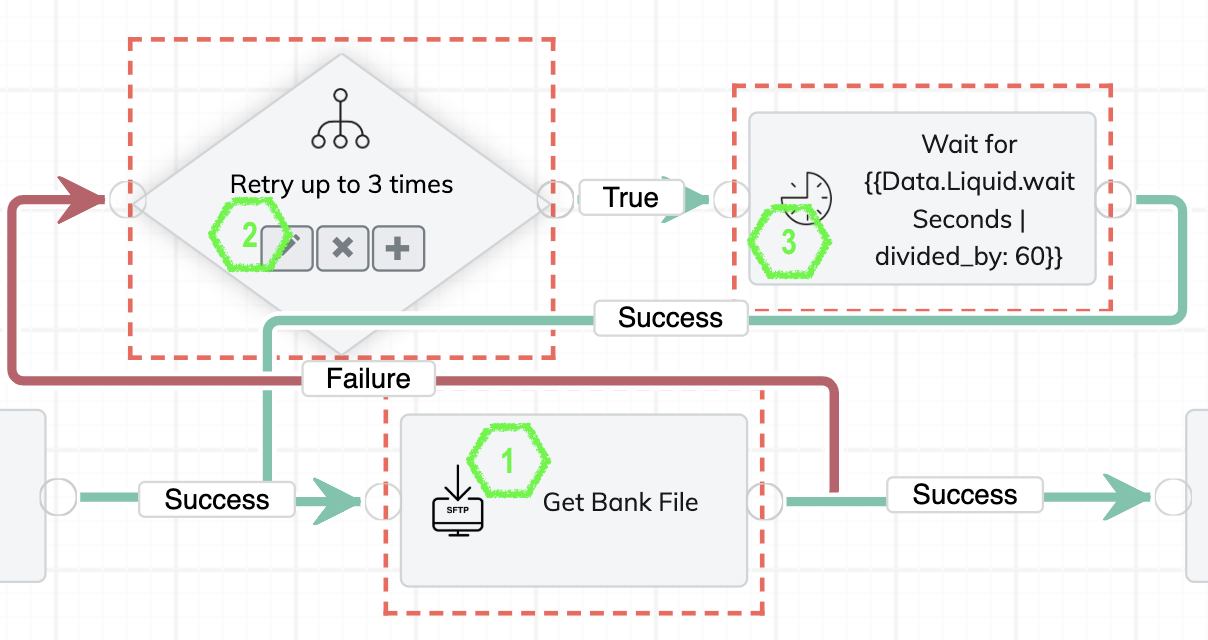
For the example retry loop to work, we need to create two global constants first.
- backOffMultiplier: Values > 1 would be used to increase the interval time between retries. Values < 1 would shrink the interval between retries. Example: 1.5.
- retryMinutes: The initial number of the interval minutes between retries. For each new retry, the wait time will be changed based on the value of backOffMultiplier. Example: 5.
Here is how we configure the retry loop.
- For the task that you want to retry (SFTP task in this example), create a Failure branch, and add an If task.
- For the If task, specify the logic to determine whether the predefined number of retries is reached and, if not, calculate the next wait time.
The following code block increments the retry count by one and calculates the wait time (waitSeconds). For each new retry, the backOff variable will have a new value.{%- if Data.Liquid.retryCount == nil -%} {%- assign retryCount = 1 -%} {%- assign backOff = GlobalConstants.backOffMultiplier | plus: 0.00 -%} {%- else -%} {%- assign retryCount = Data.Liquid.retryCount | plus: 1 -%} {%- assign backOff = Data.Liquid.backOff | times: GlobalConstants.backOffMultiplier -%} {%- endif -%} {% if retryCount <= 3 %} {%- assign waitSeconds = GlobalConstants.retryMinutes | times: 60.0 | times: backOff -%} True {% else %} False {% endif %} - Add a Delay task after the If task, and connect the Success branch of the Delay task to the start of the SFTP task to complete the loop. The Delay task performs a time delay that is equal to the wait time (waitSeconds) calculated in the If task (step 2).
Set the delay time of the task with the following Liquid expression:{{Data.Liquid.waitSeconds}}
For the name of the task, you can also include this Liquid expression, so that the actual number of minutes for each retry will be recorded in the task run.Wait for {{Data.Liquid.waitSeconds | divided_by: 60}} mins
Test every applicable business scenario and document the workflow execution id
It is important to make sure your workflow is covering all the designed scenarios before it gets deployed for end-user testing.
Each of the business scenarios/flows covered by your workflow must run successfully at least once.
You can use a simple table to track and back up the results for each scenario. Here is an example.
| Scenario | Workflow Run URL link showing successful run |
|---|---|
|
Successful payment with payment date is less than the date of the workflow run |
WF-744-00000001 |
|
Successful WT payment |
WF-744-00000005 |
|
Successful Check payment |
WF-744-00000006 |
|
Ghost account payment for WT |
WF-744-00000003 |
|
Ghost account payment for Check |
WF-744-00000004 |
|
Failed payment because the payment date is the date of the workflow run |
WF-744-00000002 |
Test date-based billing conditions by using a simulated 'today'
Some billing conditions are tied to specific dates. It is hard to test workflows that have such billing conditions by using today's actual date. In this case, you can create a simulated 'today' as an input parameter. When you run the workflow, you can enter the date that you want to use to test the billing conditions. The date you enter can be used across the workflow.
Here is how we set up and use this parameter.
- In the Settings tab of your workflow, add an input date parameter
simulatedToday. If you are testing your workflow in Production, set a default value, or make the parameter required and leave the default value blank so that you can enter a value at runtime. Before deploying the workflow in Production, ensure that this parameter is not required and the default value is blank.

- In the first task that supports Liquid (like Export, Data Query, Object Query), enter the following Liquid expression to define a variable. This expression creates a Liquid variable that can be referenced with Data.Liquid.todayDate in downstream tasks. It uses the date that you enter at runtime. If no date is entered, it uses the current date from the system.
{%- assign todayDate = Data.Workflow.simulatedToday | default: "today" | date: "%Y-%m-%d" %} - Use this variable for date-related conditions.
- In the same task that defines this variable, you can reference this variable by
todayDate. For example:Invoice.DueDate <= '{{todayDate | date_manip: '-', 30, 'day' | date: "%Y-%m-%d"}}' - In downstream tasks, you can reference this variable by
Data.Liquid.todayDate. For example:Invoice.DueDate <= '{{Data.Liquid.todayDate | date_manip: '-', 30, 'day' | date: "%Y-%m-%d"}}'
- In the same task that defines this variable, you can reference this variable by
Include Liquid expressions in task names or tags to make your task runs searchable
If a task in your workflow needs to be run a lot of times, it is hard to find a particular task run for debugging. In this case, you can include Liquid variables in the task name or tag. After the workflow completes, you can search for the task run in the Tasks tab of the workflow.
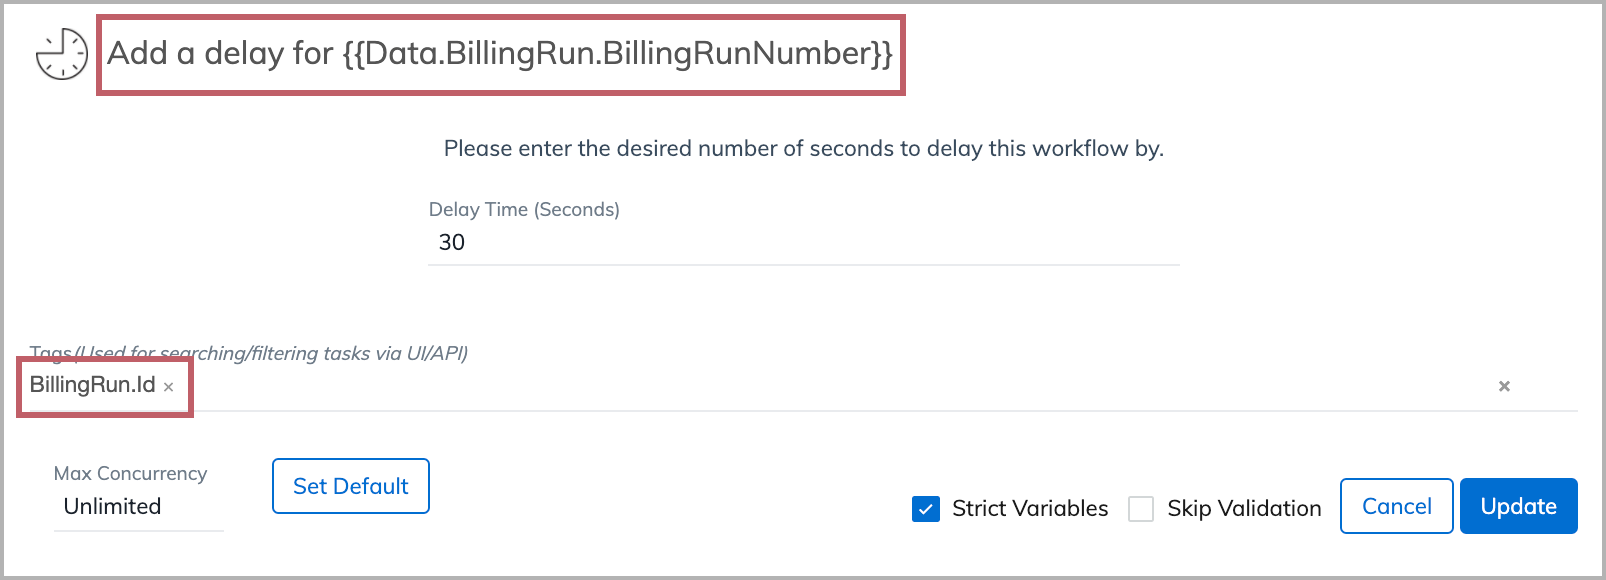
For example, we create a workflow to get some bill runs first, and then we iterate on the bill runs and perform some additional task.
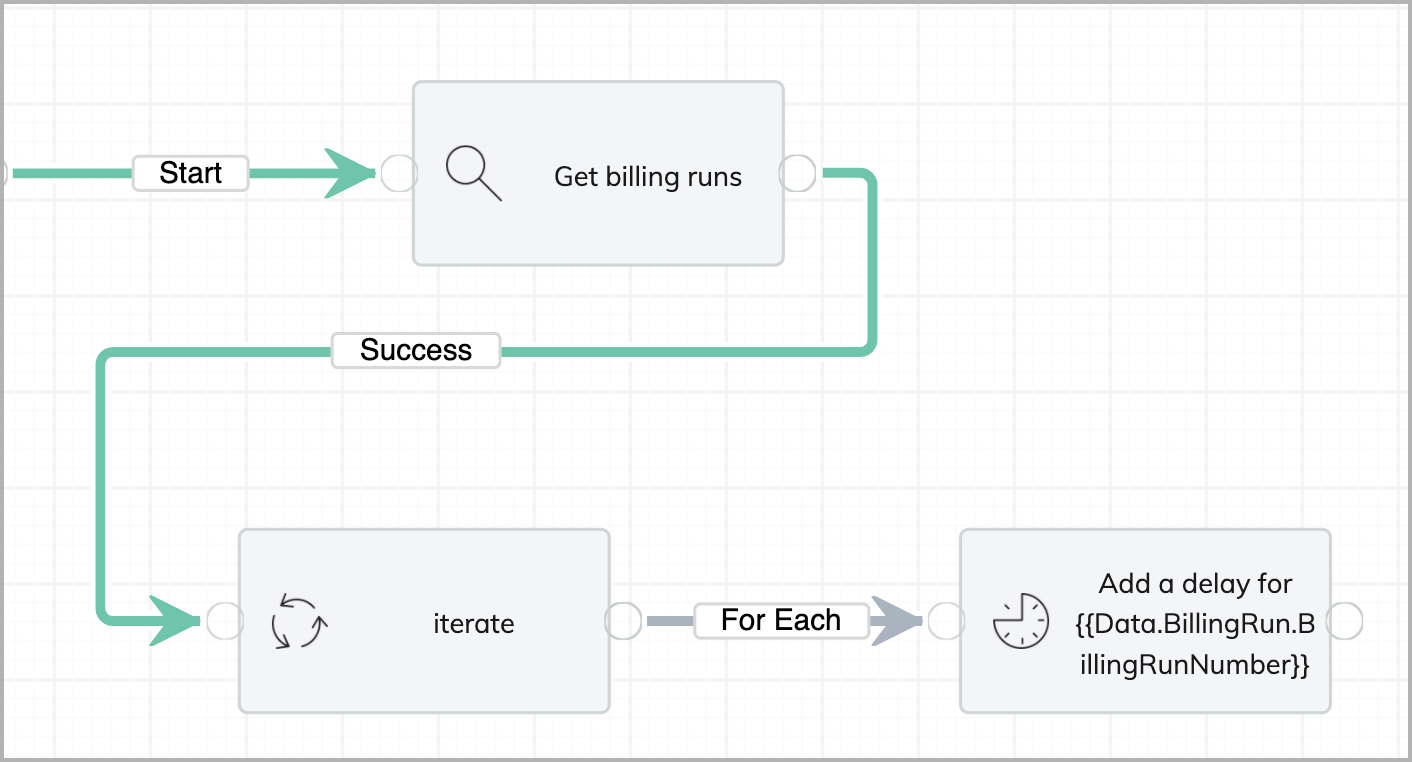
We include a Liquid variable (Data.BillingRun.BillingRunNumber) in the name of the task, and another Liquid variable (BillingRun.Id) in the tag.
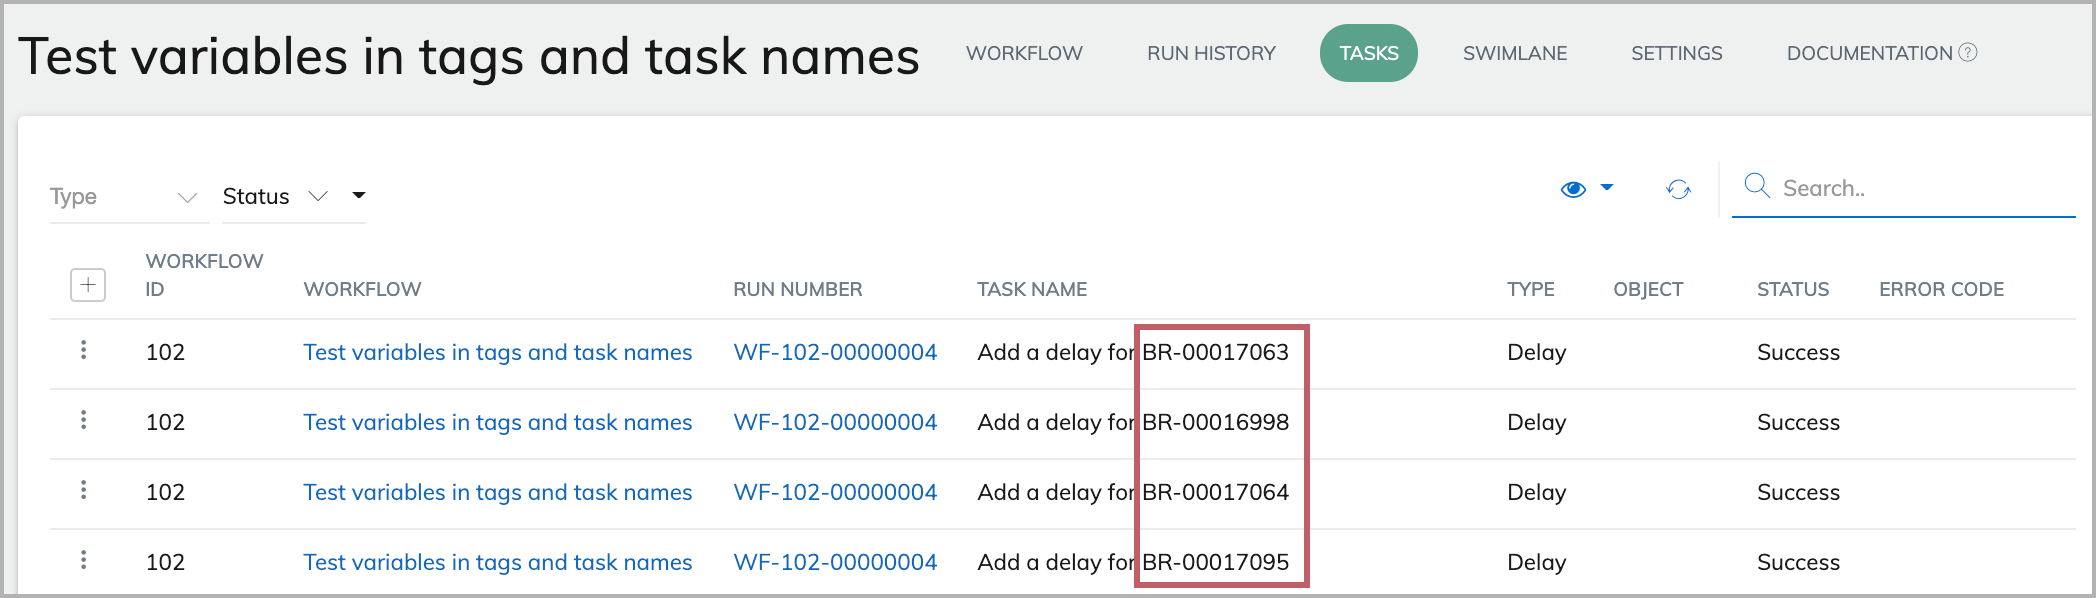
After the workflow completes, we can see the Liquid variable in task names are now replaced with actual values.
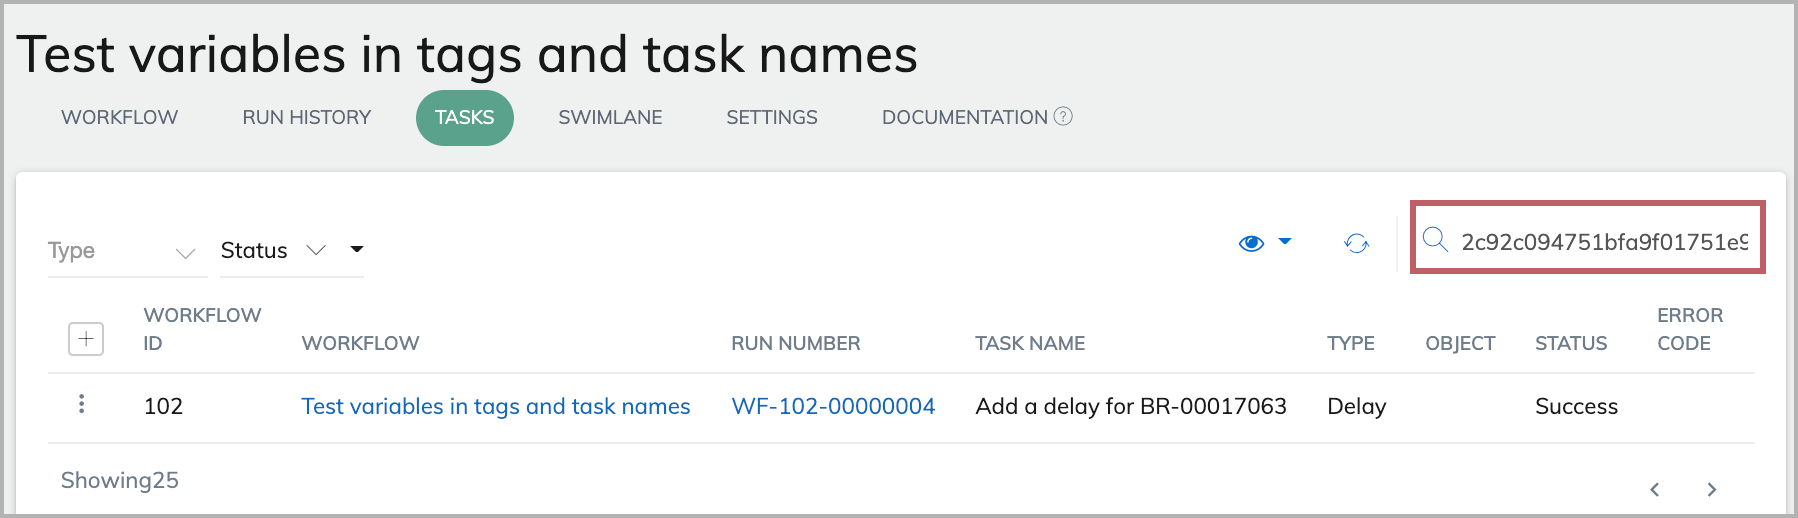
Because we include BillingRun.Id as a tag for the task, we can now search for the task run with a particular BilllingRun.Id (for example, 2c92c094751bfa9f01751e9cecbc0eb1) using the Search bar in the Tasks tab. The task run for the bill run id (2c92c094751bfa9f01751e9cecbc0eb1) is displayed in the results.
Use On Complete route after an Iterate task if you need to know the task status
If your main On Start branch contains an Iterate task, you may want to include subsequent tasks in an On Complete or On Finish route. In most cases, we recommend that you use an On Complete route, because you can know whether tasks in the Iterate route succeed or fail by using an On Complete route. It is not possible to know preceding task statuses with an On Finish route.
The On Finish route is triggered whenever the workflow status moves from processing to finish. That does not mean all tasks have completed. Even if a task is in Pending status, the workflow status can be Finished.
If you use an On Complete route after an Iterate task, the On Complete route will be triggered after all tasks being iterated have either succeeded or failed.
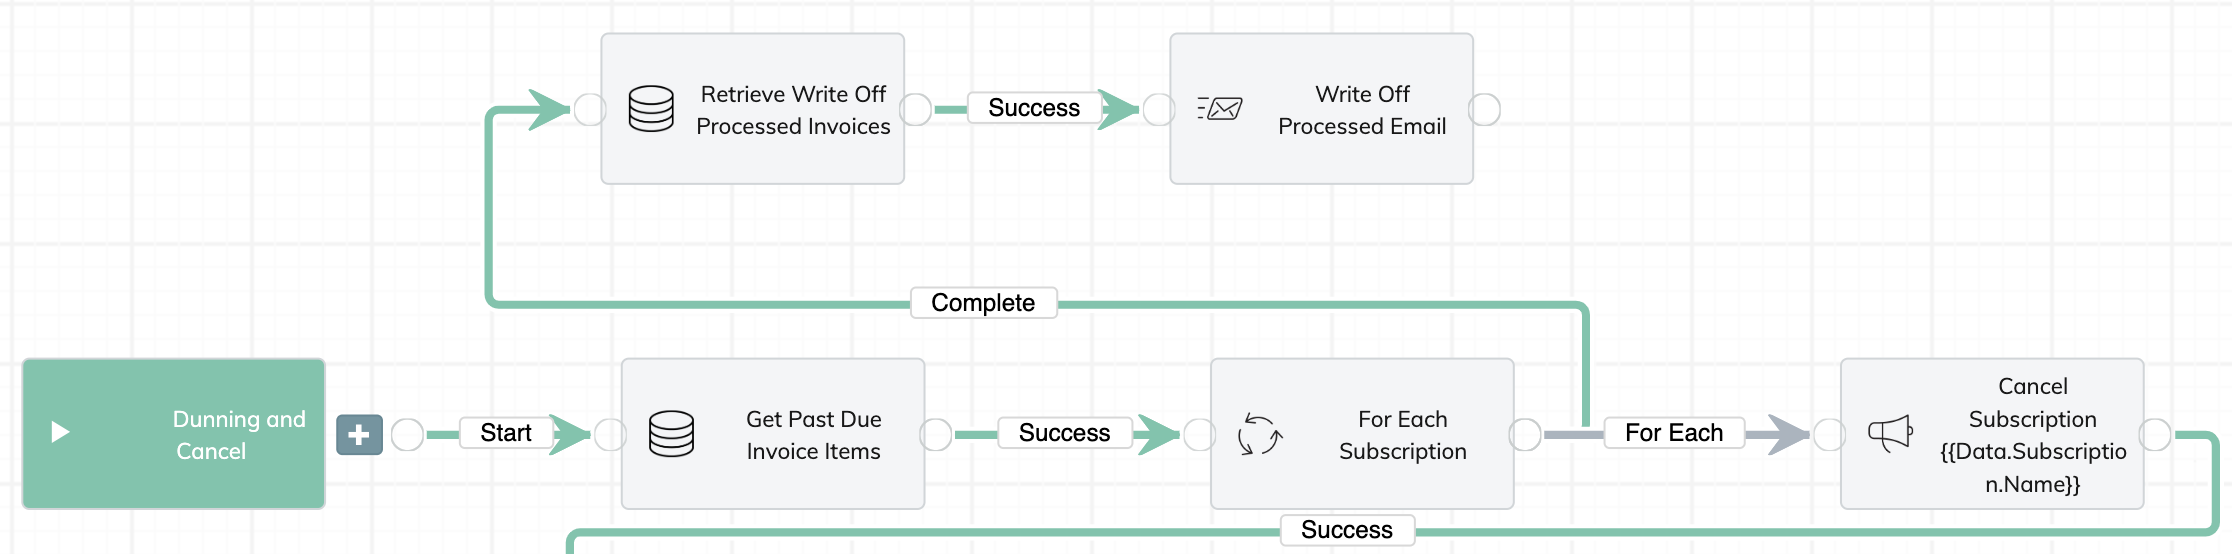
In the On Complete route after the Iterate task, you can use an If task to determine whether there are errors in the iterated tasks, and only proceed to the next task if there are no errors.
Here is an example of the Liquid code in the If task.
{% if Data.Iterate.Tasks.Error == 0 %}
True
{% else %}
False
{% endif %}