Server-side Integration Guide using Zephr JavaScript SDK
This document describes how to use the Zephr JavaScript SDK to add basic Identity and Access Management (IAM) to a CMS, CDN, etc. The pattern integrates server-side/edge-side into the Zephr Public APIs.
Note: it is also possible to do the same integration against the Zephr Admin APIs.
Registering a user
In order to register a new user, they will need to provide you with an identifier, a validator and, potentially, some attributes (depending on the configuration of the user schema in Zephr). Usually, and with the default setup, the identifier will be an email address and the validator a password.
const BlaizeSDK = require('./blaize-sdk.js');
const PublicApiClient = BlaizeSDK.public;

// Get a client for the website mysite.com
let client = PublicApiClient.build("mysite");

let sessionId = await client.register({
    identifiers: {
       'email_address': 'helen@blaize.io'
    },
    validators: {
       'password': 'sup3r_s3cr3t'
    },
    attributes: {
       'foo': 'bar'
    }
});
This SDK call will return a session ID. It is essential that the session ID is stored against the client of the user who registered. For web-based systems this is usually stored as a cookie.
Logging a user in
A user can, after registration, provide an identifier and validator to re-authenticate.
const BlaizeSDK = require('./blaize-sdk.js');
const PublicApiClient = BlaizeSDK.public;

// Get a client for the website mysite.com
let client = PublicApiClient.build("mysite");

let sessionId = await client.login({
    identifiers: {
       'email_address': 'helen@blaize.io'
    },
    validators: {
       'password': 'sup3r_s3cr3t'
    }
});
As with the register method, a session is returned which should be stored against the client.
Checking for entitlements
The simplest form of authorization check is carried out using an entitlement challenge. For an overview of the basic constructs for entitlements and access see the Introduction to the Entitlement Model in the Classic User Guide.
The essence of this check is that the server is aware of the content the client is requesting and the entitlements required to be given access; the server can then issue a challenge for those entitlements to which Zephr will return an answer, true or false.
const BlaizeSDK = require('./blaize-sdk.js');
const PublicApiClient = BlaizeSDK.public;

// Get a client for the website mysite.com
let client = PublicApiClient.build("mysite");

let dataTableEntitlementId =
    '5341dc17-f91b-4311-b9ee-6906024c87a2';
let videoEntitlementId =
    '2b7fa1f5-795d-459e-84eb-8e0c62fb018f';

let client = PublicApiClient.build(tenant);

let results = await client.challenge(getSessionId(),
    [dataTableEntitlementId , videoEntitlementId]);

if (! results[dataTableEntitlementId ]) {
    console.log("You cannot data tables");
} if (! results[videoEntitlementId ]) {
    console.log("You cannot view videos");
}
Under the hood, Zephr may grant access based upon one of many possible channels: the user may have subscribed, bought credits, be in a metered trial or be a member of an account that has access. Meters and credits, in particular, need to be considered as Zephr will decrement their counts as part of the challenge request, should they be used. For this reason, entitlement challenges should only be used if the content can be shown or hidden in a granular way.
Imagine, for example, a page includes a video and a data-table – with corresponding “video” and “data-table” entitlements. Consider the case where the server issues a challenge for both and Zephr returns true for the video, using up a credit, and false for the data-table. Then, if the server redirects the visitor to a shop page (or otherwise blocks both the data-table and the video) the visitor will have still spent a credit which they cannot get back for the video view. The appropriate alternative is to display the page, including the video, but hide only the data-table.
Using the Decision Engine to evaluate a Request Rule
An alternative approach for authorization is to use Zephr’s Request Rules to create an authorization API. Request rules will execute even if Zephr is not being used as a reverse proxy and they can be configured to return HTTP status codes, set bodies, change headers, etc.
The following rule is a simple example which returns a 401 for unauthenticated users and a 200 for registered:
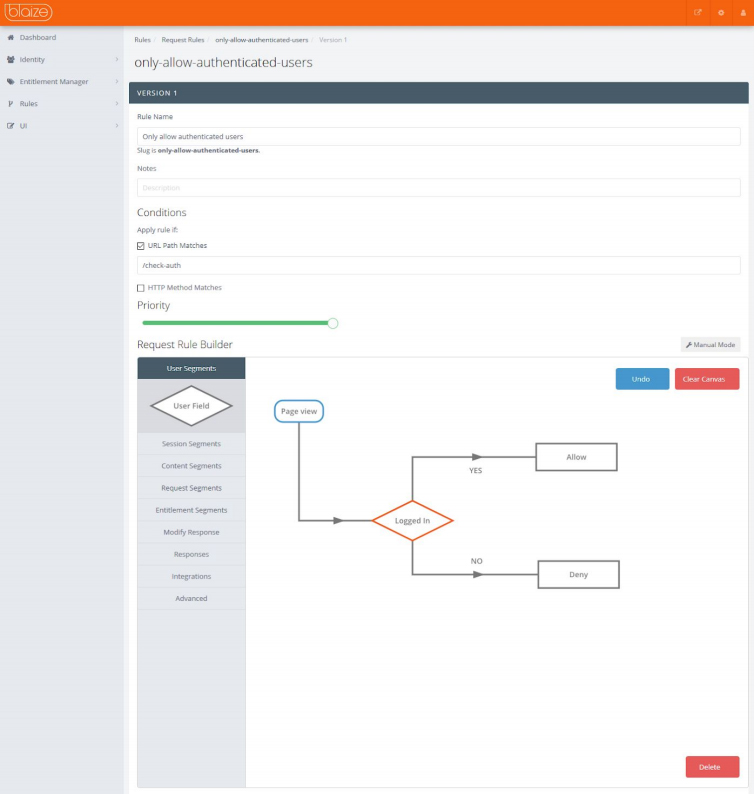
Note that the path has been set as a condition for the rule (to /auth-check) and the priority is set to the highest. For a detailed explanation of why these settings are used and how Request Rules work, see Request Rules in the Classic User Guide.
Now, a decision engine call can be made using the SDK:
const BlaizeSDK = require('./blaize-sdk.js');
const PublicApiClient = BlaizeSDK.public;

// Get a client for the website mysite.com
let client = PublicApiClient.build("mysite");


let tenant = 'mysite';


let client = PublicApiClient.build(tenant);

let decision = await client.accessDecision(
    getSessionId(),
    '/some/content',
    'GET',
    {
        referrer: 'https://www.facebook.com'
    });

console.log(decision.status);
console.log(decision.body);
The response will include the HTTP status. The action that the server needs to take to enforce this decision is not defined; using the response code for the response to the client is one option, as is interpreting the results in a specific, designed way (i.e. because the result was a 401, render a registration form).