User
The decision nodes that are available under the User segment title are as follows:
- Segment
- Add to Segment
- Journey State
For registered and customer user types, the following decision nodes are also available:
- User Attribute
- Partial Registration
- Email Verified
- Registered Date
Segment
Use this decision node to define a decision based on the defined user segments.
Select the user segment to apply from the drop-down menu. The menu options are populated based on the configuration of your user segments.
Note: You must define the user segments as described in the User Segments topic.
Add to Segment
Use this decision point to add users to user segments.
Select the user segment to apply from the drop-down menu. The menu options are populated based on the configuration of your user segments.
Note: You must define the user segments as described in the User Segments topic.
Journey State
Use this decision node to define a decision based on the states and journeys taken by end users throughout the customer lifecycle.
Select the state or journey to apply from the drop-down menu. The menu options are populated based on the configuration of the User State Map.
User Attribute
This decision point can only be used for registered and customer user types.
Use this decision node to define a decision based on your defined user attributes.
Select the attribute you want to use in the decision node from the User Attribute drop-down menu.
The fields relating to the user attribute display, depending on the type of user attribute selected. All types include an Is Empty condition, which can be used to determine whether the end user has complete the field. If this option is selected, you cannot enter a value.
The types are as follows:
- Text
To complete the dialog box for text user attributes, select the condition to apply to the text from the Condition drop-down menu, and enter the value to test against the condition in the Value text box.
Notes:- Equals requires an exact match. Matches uses simple pattern matching and can include partial and case insensitive matches and wildcards
- If you have existing rules that include legacy User Attributes, the dialog box for all types is the same as the Text type.
- Date
Select the condition to apply from the Condition radio buttons.If you select Before or After, enter the date in the Date text box.
If you select Between, enter the start date in the From text box and the end date in the To text box
Note: You can also select a date using the calendar. To do this, select the calendar icon at the end of the text box. - Number
Select the condition to apply to the text from the Condition drop-down menu, and enter the number to test against the condition in the Value text box. - Date & Time
Select the condition to apply from the Condition radio buttons.If you select Before or After, enter the date in the Date text box, select the hour from the Hour drop-down menu and the minute from the Minute drop-down menu.
If you select Between, enter the start date in the From text box and the end date in the To text box and select the start and end times in the Hour and Minute drop-down menus beneath the date fields.
By default, the Use Local Time checkbox is unselected. This means that the dates and/or times are taken from the system time. To use the end user’s local time, select the checkbox.
- Checkbox
Select the condition to apply from the radio buttons. Select the Checked radio button to base the decision on whether the checkbox is selected. Select the Unchecked radio button to base the decision on whether the checkbox is unselected.
Note: For checkboxes, the Is Empty option means that the checkbox has not been encountered by the end user. If the end user encounters the checkbox but does not select it, Zephr records the checkbox as Unchecked. - Radio Buttons
Select the condition to apply from the radio buttons. The radio buttons are populated based on the Labels you assigned in the relevant user attribute. Select the label on which you want to base the decision.
Note: For radio buttons, the Is Empty option means that the radio buttons have not been encountered by the end user. If the end user encounters the radio buttons, Zephr records the selection. - Select Lists
Select the condition to apply from the drop-down menu. The menu options are populated based on the Labels you assigned in the relevant user attribute. Select the label on which you want to base the decision.
Partially Registered
This decision point can only be used for registered user types.
Use this decision point to check whether the end user is partially registered.
No further configuration is required for this decision node.
For further information on setting up and using partial registration, see the Allow Partial Registration topic.
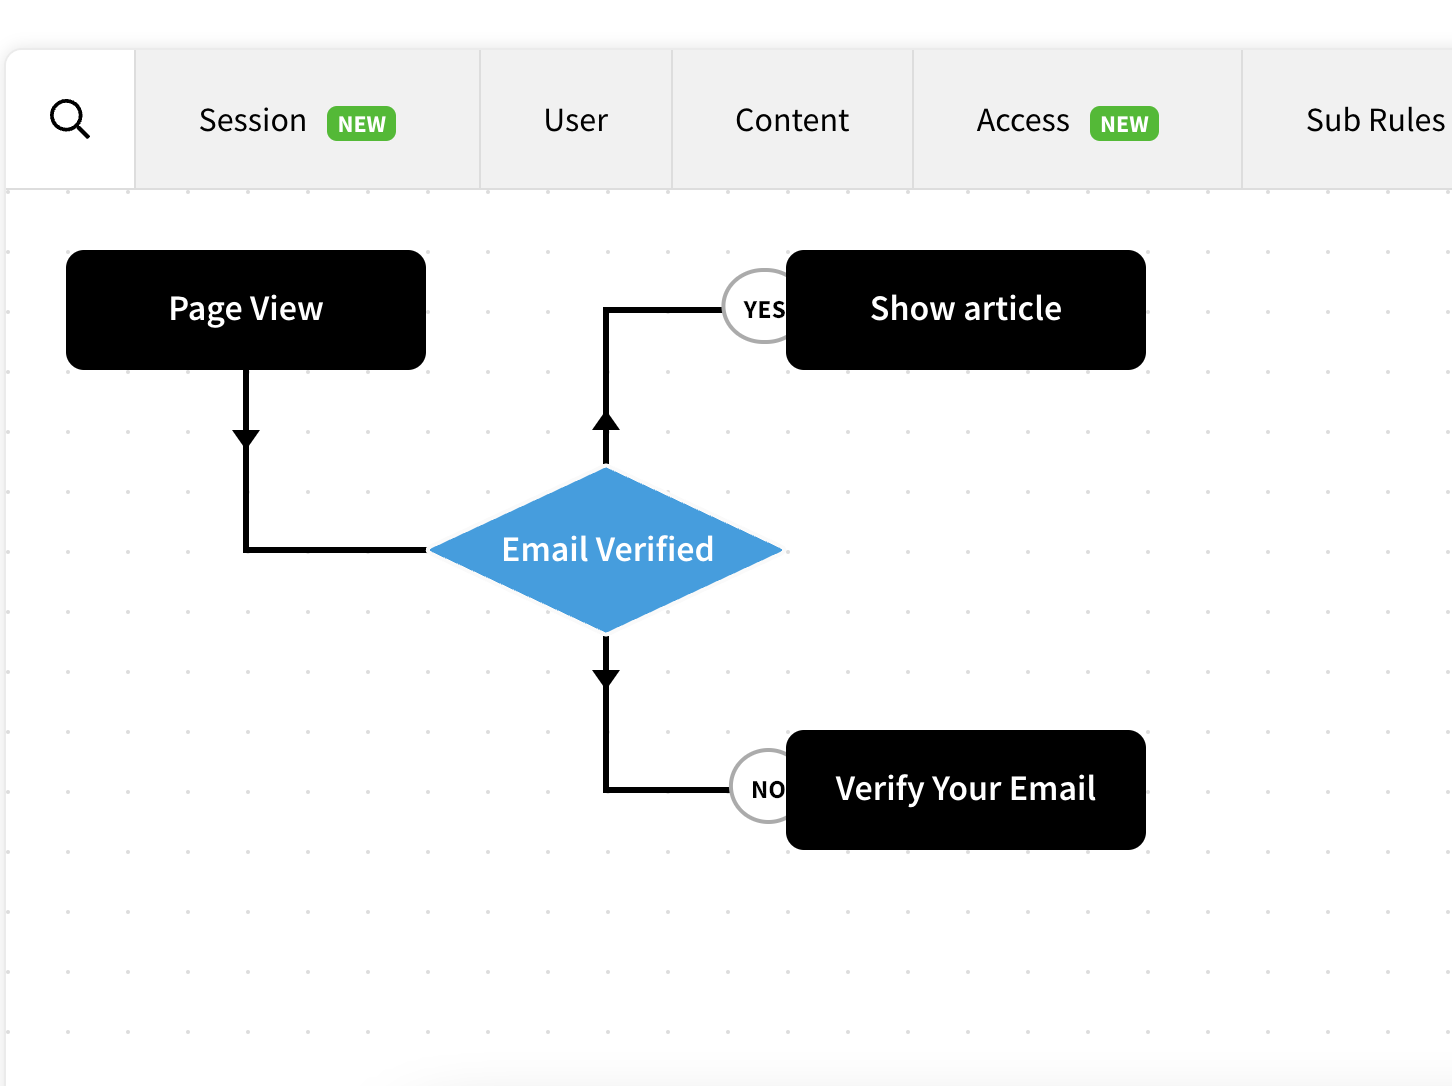
Email Verified
This decision node can only be used for registered and customer user types.
You can use this decision node to ask end-users to verify their email address after registering instead of at the point of registration. Not forcing end-users to verify their emails could lower the barrier to registration.
The below rule will ask the registered users to verify their email to continue reading content:
The following example code would implement the rule:
<hr>
<center><p>To continue, please verify your email address by using the button below and following the instructions on screen.</p><center>
<center><button id="verify-email-button">Verify Email</button><center>
<p id="verify-email-message"></p>


<script>
    let button = document.getElementById("verify-email-button");
    let message = document.getElementById("verify-email-message");
    button.addEventListener('click', e => {
        fetch('/blaize/account')
            .then((response) => response.json())
            .then((data) => {
                console.log(data)
                let email = data.identifiers.email_address;
                return email;
            })
            .then((email) => {
                let payload = {
                        identifiers: {
                            email_address: email
                        },
                        delivery: {
                            method: "email",
                            destination: email,
                            action: "login",
                            redirect: window.location.href
                        }
                    }
                fetch("/blaize/token-exchange", {
                        method: 'POST',
                        credentials: 'same-origin',
                        headers: {
                            'Content-Type': 'application/json'
                        },
                        body: JSON.stringify(payload) // body data type must match "Content-Type" header
                    })
                    .then((response) => response.json())
                    .then((data) => {
                        console.log(data)
                        button.disabled = true;
                        message.innerHTML = "Please check your email for a verification link";
                    });
            });
    });
</script>
Note that email verification does not need to be switched on.
For further information on sending an email to allow the user to verify their email, see the Send a Verification Link topic.
For information on the email templates used when sending emails, see the Email Templates section.
Registered Date
Use this node to configure a decision based on the date and time the end users registered.
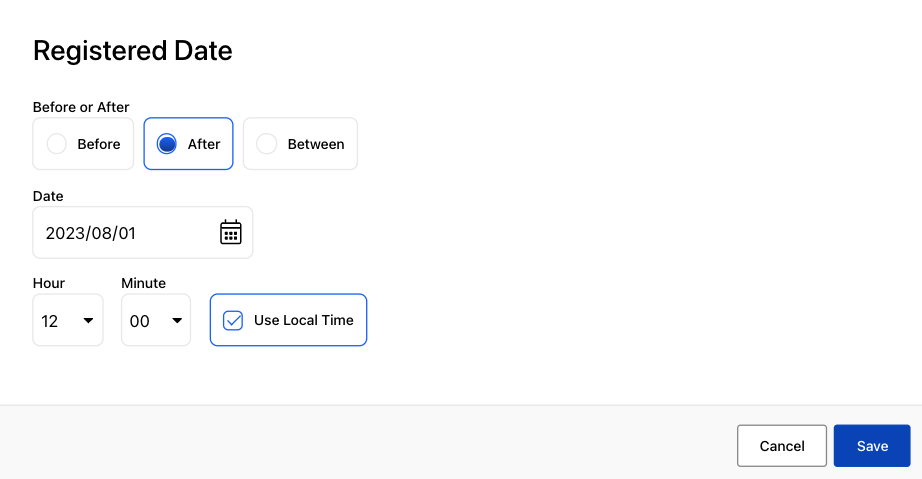
To configure a Registered Date decision node, take the following steps:
- On the top of the Rules Builder Canvas, click User, and then drag the Registered Date node to the canvas
- Complete the settings to set up the decision. Note that by default, local time of the end users will be used. Alternatively, a specific timezone can be chosen for the comparison.