Embed Hosted Pages in Visualforce
Overview
This page shows how to use the HostedPage component to embed a Zuora hosted page on a custom Visualforce page. A sample scenario is used to describe each step.
Embed a Hosted Page on a Visualforce Page
The summary of the process to embed a hosted page is:
- Configure a hosted payment page in Salesforce.
- Create a custom hosted page controller.
- Create a custom hosted page.
- Create a custom callback controller.
- Create a custom callback page.
- Configure the callback URL in Zuora to point to the custom callback page.
- Create a custom button for hosted payment page.
Create a Custom Hosted Page Controller
Create an Apex controller, CustomHpmController,with the custom parameters. The custom parameters of the hosted page are identified in comments below.
public with sharing class CustomHpmController extends zqu.ZCheckoutBaseController {
public CustomHpmController() {
this.hostedPageSettingName = 'VisaAndMasterCard';
}
// If you do have the Back and Next buttons, add the target URLs in the following methods.
public override String getBackUrl() {
return '';
}
public override String getNextUrl() {
return '/';
}
public override PageReference getPageRef() {
setPageRef(Page.CustomHostedPage);
return Page.CustomHostedPage;
}
public override Map<String, String> getExtraParameters() {
return new Map<String,String> {
'field_maxConsecutivePaymentFailures' => '1',
'field_maxConsecutivePaymentFailures' => '1',
'field_creditCardType' => 'MasterCard', // <-- custom parameter
'param_supportedTypes' => 'Visa,MasterCard', // <-- custom parameter
'field_creditCardCountry' => 'USA' // <-- custom parameter
};
}
}
Create a Custom Hosted Page
Create a custom hosted page, named CustomHostedPage, using the HostedPage component and the CustomHpmController you created above. The hostedPageSettingName should refer to the Hosted Page Setting name in the Hosted Pages Settings. In this example, the Hosted Page Setting name is "VisaAndMasterCard".
<apex:page controller="CustomHpmController" sidebar="true" showHeader="true" tabStyle="zqu__Quote__c">
   <script>function callbacksuccess(pmid, displayMessage) {
         window.location = "{!$Page.zqu__PaymentMethodConfirm}?pmid=" + pmid + '&id=' + '{!$CurrentPage.parameters.id}' + '&displayMessage=' + displayMessage;
      }
   </script>
   <apex:sectionHeader title="Quote" subtitle="Create Payment Method" />
   <zqu:HostedPage injectedController="{!thisController}" includeButtonBar="true" hostedPageSettingName="VisaAndMasterCard" />
</apex:page>
Create a Custom Callback Apex Controller
Create a callback controller by extending zqu.ZCheckoutBaseController. The hostedPageSettingName must be set up correctly in the controller constructor.
public with sharing class CustomCallbackController extends zqu.ZCheckoutBaseCallbackController {
  public CustomCallbackController() {
    this.hostedPageSettingName = 'VisaAndMasterCard';
  }

  public String refId {
    get;
    set;
  }

  public String objectId{
    get;    set;
  }

  public override void processCallbackParameters() {
    super.processCallbackParameters();
    this.refId = callbackparameters.get('refId');
    this.objectId = callbackparameters.get('field_passthrough1');
  }
}
Create a Custom Callback Page
Using the CustomCallbackController you created above, create a callback page, CustomCallbackPage, as shown in the example below:
<apex:page controller="CustomCallbackController" action="{!onload}" sidebar="false" showHeader="false">
    <script>
        function callback() {
            if({!success} && parent.callbacksuccess ){
              //Does this have valid JS characters
              parent.callbacksuccess("{!refId}", "The reference id is {!refId}.");
            }else if ( parent.callbackfailure ) {
              parent.callbackfailure( "{!JSENCODE( paramString ) }");
            }
        }
    </script>
    <body onload="callback();" style="background-color: rgb(248, 248, 248);"/>
    <apex:messages />
</apex:page>
Configure the Callback URL in Zuora
To configure the callback URL in Zuora to point to the custom callback page, follow the steps for Hosted Payment Method pages or Hosted Checkout pages and update the following fields:
- Hosted Domain - c.<your Salesforce server>.force.com. The standard subdomain for a Visualforce page is c.<Salesforce-server>.visual.force.com where as the subdomain for a managed package is typically <namespace>.<Salesforce-server>.force.com.
- Callback Path - /apex/CustomCallbackPage?hostedPageName=VisaAndMasterCard
Create a Custom Button for Hosted Payment Page
You can create a Hosted Page button and launch the Hosted Page using the button on the Quote Detail page.
To create a custom button for hosted pages:
- Create a custom Visualforce page, named
CreateCreditCard, using the standard controllerzqu.Quote__cand theCustomHostedPagecreated in the pevious section:
<apex:page standardController="zqu__Quote__c">

         <apex:include pageName="CustomHostedPage"/>

</apex:page> - Navigate to Setup > App Setup > Create > Objects, and click Quote.
- In the Buttons, Links, and Actions section, click New Button or Link.
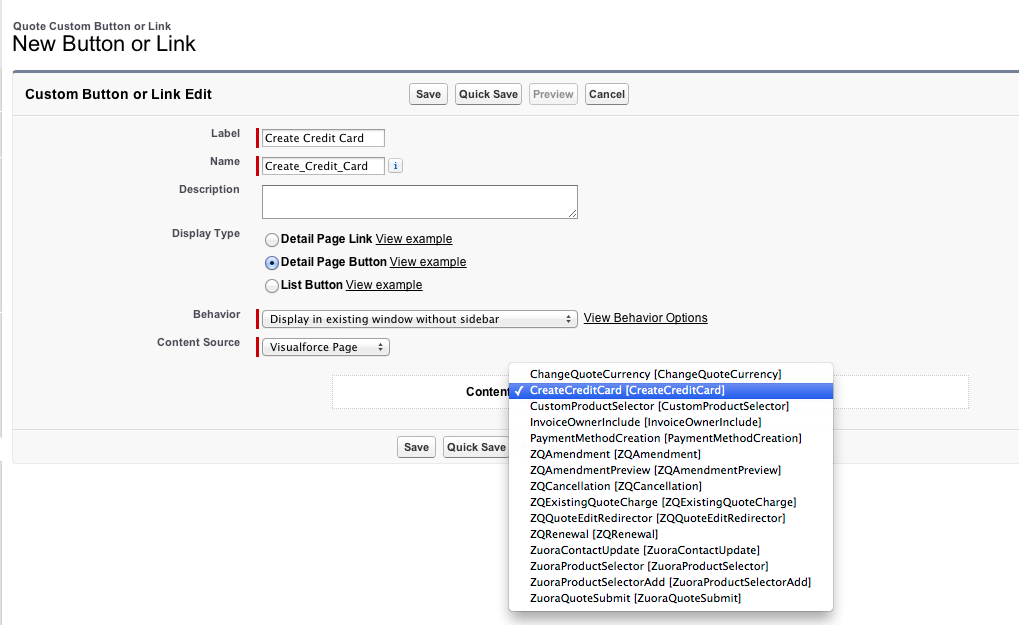
- Create a new Page Button. In this example, the button is named "Create Credit Card".
- Enter the rest of the required fields as shown below.

- Click Save.
- Click the link, Back to Custom Object: Quote.
- In the Page Layouts section, click Edit next to the Quote Layout - Default V6.1 page layout.
- Click Buttons, and drag the newly created button to the button bar.
- Click Save.
