Customize Quote Templates using Word Mail Merge
This article explains how to create a custom quote template using the Microsoft Mail Merge feature and covers the mail merge features that apply to quote templates. For more specific information about Mail Merge, refer to the Microsoft Office Word documentation. Also, if you are using a version of Word that this article does not cover, refer to the Microsoft Office Word documentation for the exact steps to work with the Mail Merge features.
You are able to use up to 500 unique merge fields on a single quote template. The time to generate a quote PDF/document is proportionate to the amount of merge fields on the quote template.
Insert a Mail Merge Field in a Quote Template
You can create a custom billing document template using the Microsoft Mail Merge feature, as well as insert mail merge fields to a template and customize the format, and use the mail merge tables to add multiple line items to a template.
Insert a Mail Merge field in Microsoft Word 2007 and Word 2010
To insert a mail merge field in your template in Word 2007 and 2010, complete the following steps:
- In Word, click Insert > Quick Parts > Field.
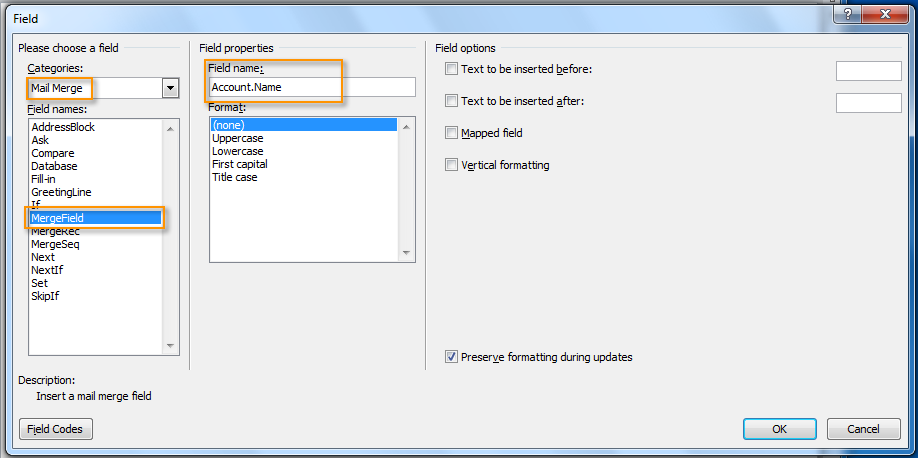
- In the Field dialog box, click Categories and select Mail Merge.
- In the Field names field, click MergeField.
- In the Field Name field, enter the name of the merge field that you want to insert, for example,
Account.Name. The merge field is inserted in your document. For example, if you added the account name,Account.Name, in the document, the field will be displayed as: «Account.Name». See Supported Merge Fields for a list of available merge fields.

- Click OK.
- Save the template file as the Word 97-2003 Document (
.doc) type.
Insert a Mail Merge field in Microsoft Word 1997 to Word 2003
To insert a mail merge field in your template in Word 1997 to Word 2003, complete the following steps:
- In Word, navigate to Insert > Field.
- In the Field dialog box, click the Categories arrow and select Mail Merge.
- In the Field names field, click MergeField.
- In the Field name field, enter the name of the merge field that you want to insert, e.g.
Account.Name. The merge field is inserted in your document. For example, if you added the account name,Account.Name, in the document, the field will be displayed as:
«Account.Name» - Click OK.
Insert a Merge Field in Word for Mac
To insert a mail merge field in your template in Word for Mac, complete the following steps:
- In the Macintosh Word, navigate to Insert > Field.
- Click the Categories arrow and select Mail Merge.
- In the Field names field, click MergeField.
- In the Field codes field, enter a space after "MERGEFIELD" then type the field name you want to insert, e.g.
Account.Name. For example, if you have "MERGEFIELD Account.Name" in the Field codes field, in the document, the field will be displayed as:
«Account.Name» - Click OK.
- Save the file in the Word 97-2004 Document (
.doc) format.
Edit a Mail Merge Field in a Quote Template
To update a merge field using Edit Field on Windows, complete the following steps:
- In your template document, right-click on the merge field you want to edit and select Edit Field.
- In the Field name field, enter the new merge field name.
- Click OK.
To update a merge field using Toggle Field Codes on Windows and Mac, complete the following steps:
- In your template document, click the merge field you want to edit.
- Toggle the field code and result:
- Press Shift + F9 on Windows.
- Press option + fn + F9 on Mac.
- Edit the field name in the field code.
- Update the field:
- Press F9 on Windows.
- Press option + fn + F9 on Mac.
- Repeat Step 2 to verify that your change has been saved.
You cannot change a merge field by simply typing a new merge field over the current field.
