Payment Pages 2.0 Implementation Overview
This article presents an overview of Payment Pages 2.0 and the summary of steps required to configure and implement Payment Pages 2.0 through the iFrame in your commerce website.
Instead of using the iFrame, if you want to create an HTML form version of a Payment Page that posts directly to Zuora to create a payment method, follow the steps described in Implement Payment Pages 2.0 via Direct POST.
How Payment Pages 2.0 Work
The following diagram shows the default flow of Payment Pages 2.0:
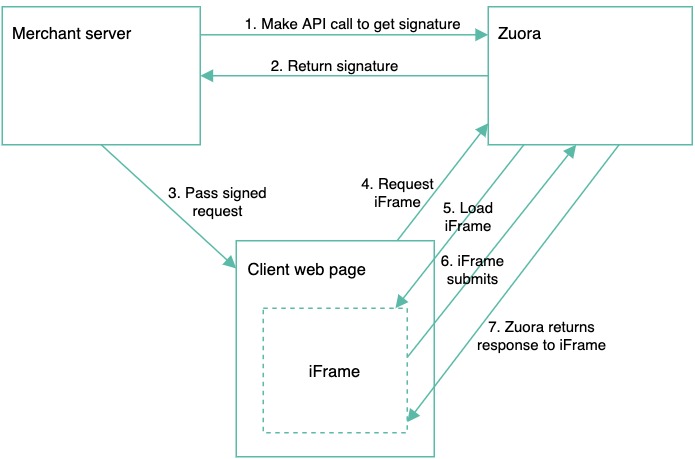
If you further customize Payment Pages 2.0 with additional fields, the above flow will slightly change. See Advanced Integration of Payment Pages 2.0 for advanced implementation of Payment Pages 2.0.
Payment Pages 2.0 Implementation Process
Use the following steps to set up Payment Pages 2.0 for your website:
- Understand the security measures to be implemented to secure your Payment Page.
- In Zuora, set up the Payment Page and configure the security measure provided by Zuora:
- Configure the Payment Page for the payment method you want to use. See Overview of payment methods supported by Zuora payment gateway integrations for the supported payment methods.
- Preview the Payment Page.
- Optionally, translate and localize the Payment Page.
- Optionally, update the CSS for the Payment Page.
For the list of supported browsers for Payment Pages 2.0, see Browser Support Policy.
- In your server, request from Zuora a signature for the Payment Page. The REST API used in Payment Pages 2.0 is CORS enabled and therefore requires the digital signature. You pass the generated signature, the key, and the rest of the information to your client.
- Using the Payment Pages 2.0 JavaScript library, customize your client code to load the Payment Page.
- Include the Zuora JavaScript library.
- Provide the client parameters for Payment Pages 2.0.
- Optionally, pre-populate the Payment Pages 2.0 form fields.
- Implement the callback function.
- Optionally, integrate Payment Pages 2.0 with advanced options.
- Render the Payment Pages 2.0 form.
- Add a <div> container for Payment Pages 2.0.
To quickly get a sample hosted payment page up and running, see Hosted Payment Page Tutorial.
For more information about sample codes for implementing Payment Pages 2.0, see Sample Code for Payment Pages 2.0.