Configure the Configurable Payment Retry feature
Before the retry logic of Configurable Payment Retry can be triggered upon the initial failed payment from the payment run, you need to complete the required configurations in both Configurable Payment Retry and Zuora Payments settings. Configuration tasks vary for the different retry logic.
Prerequisites
- You must have installed the Configurable Payment Retry feature. See Install Zuora Collections Features for more information.
- The feature must be created by using the OAuth credential. See Verify and update OAuth credentials for more information.
- The Configurable Payment Retry feature is compatible with the Event Framework and Notifications feature. However, the Configurable Payment Retry feature does not require the Event Framework and Notifications feature to be enabled in your Zuora tenant.
- If the Event Framework and Notifications feature is not enabled in your Zuora tenant, Zuora recommends that you submit a request at Zuora Global Support and ask for the feature to be enabled.
- If you want Configurable Payment Retry to trigger a workflow as a retry action, you must install Workflow and design a workflow to implement additional retry logic. Configurable Payment Retry uses the endpoint and API token of the workflow designed for payment retries.
Procedure
Configuring Configurable Payment Retry involves the following tasks:
- Disable the payment run retry rules in Zuora.
- Configure system settings.
- If you plan to edit retry rules manually based on gateway response codes, configure response codes.
- Configure callout notifications for Configurable Payment Retry.
- Configure customer groups.
- Edit retry rules for a customer group, through either editing retry rules manually or enabling AI-driven Smart Retry.
- Optional: Export or import your settings.
Disable the payment run retry rules in Zuora
Ensure that out-of-box payment retry is not running in Zuora environment. Failure to disable the out-of-box payment retry while running Configurable Payment Retry will result in disruption to the retry service.
While CPR will continue to make retry attempts, no actual payments will be created for specific invoices that fail the validation run as specified by these retry rules.
- In Zuora UI, navigate to Settings > Payments > Configure Payment Retry Rules.
- Turn off the Enable Payment Run retry rules option.
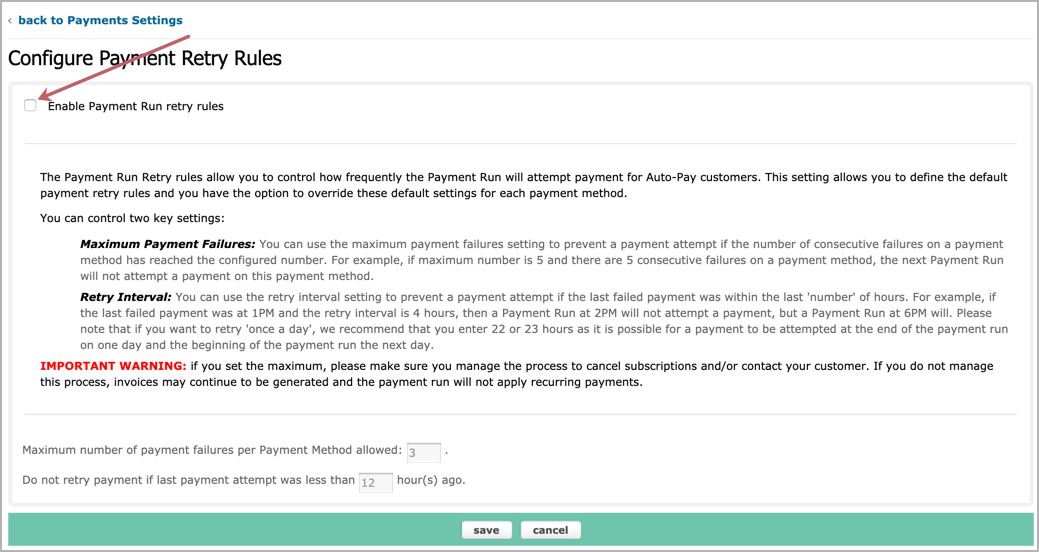
- Click save.
Configure system settings
Complete the following steps to configure the system settings for your retry logic:
-
Start Configurable Payment Retry.
-
Click the Settings tab. The API Token at the top is the API token of Configurable Payment Retry used for configuring the payment run callout notification in a later step.
-
On the Settings tab, complete the following configurations for your needs and then click Save All Settings to save the updates.
- Instance time zone - Select the same time zone as for your Zuora environment to avoid payment errors.
- Retry level - Select the desired level retry attempts will be counted against. Invoice is the preferred method.
- Process a single Payment for all Invoices/Debit Memos that are due on an account - Click to enable or disable the setting.
- Process payments even if the default payment method is closed - Click to enable or disable the setting.
- Auto-apply unapplied credit memos during payment runs - Click to enable or disable the setting.
- Auto-apply unapplied payments during payment runs - Click to enable or disable the setting.
- Default label - Select the default code mapping label to classify any unknown gateway response codes. Skip this setting if you plan to use Smart Retry.
- Workflow API token - The Workflow API token was generated during feature installation and indicates which Workflow is being used for the Workflow callouts in the retry logic.
Configure response codes
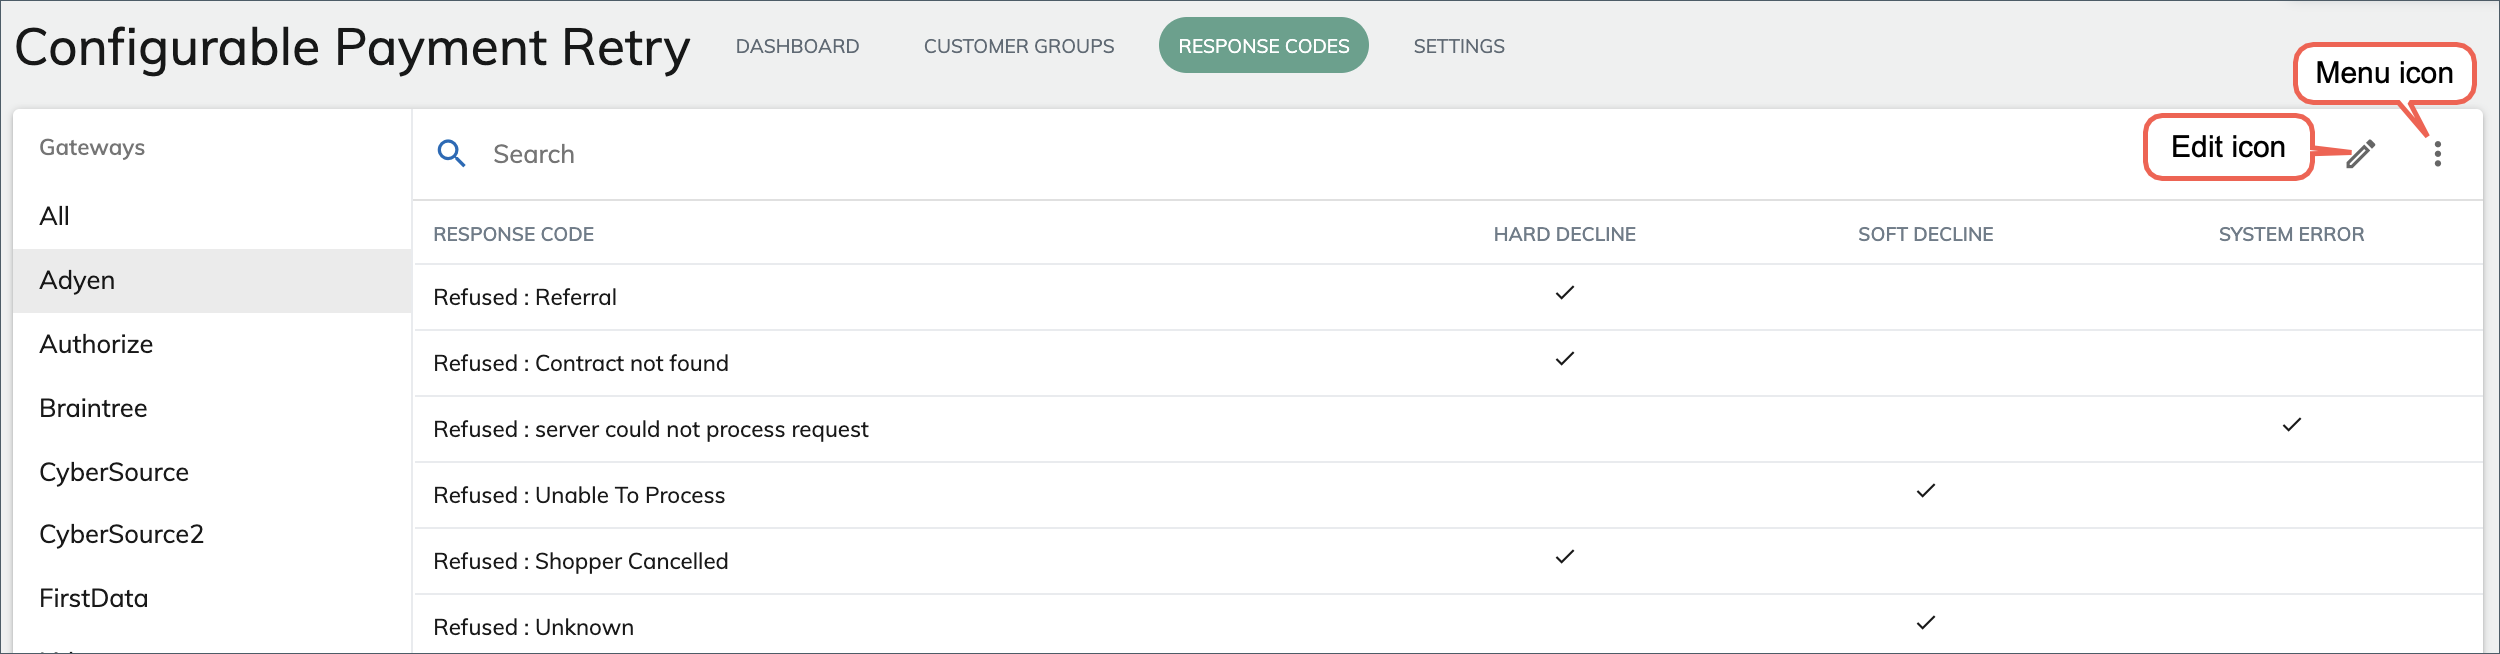
The response code mapping for each gateway is presented on the Response Codes tab. Each response code is mapped to one of the code labels, including the built-in labels (Hard Decline, Soft Decline, System Error) and the custom labels.
Only one custom payment gateway created through the Universal Payment Connector (UPC) service can be supported in Configurable Payment Retry.
If you plan to edit the retry rules manually based on gateway response codes, complete the following steps to configure the response code mapping:
-
Click the Response Codes tab. The default response code mapping is shown on the Response Codes tab if you did not edit the mapping previously. The default mapping is a recommendation. A response code can be reassigned to other available code labels.
-
On the Response Codes tab, configure the response codes and mappings for your needs:
-
To reassign response codes to other available code labels, click the Edit icon in the upper right and click the radio button under the desirable code label. You can use the Gateways filter and the Search bar to quickly locate the response codes. After you complete your editing, click Save All Mappings.
-
To add a custom code label, complete the following steps:
-
Click the Menu icon in the upper right and then click Edit Code Labels.
-
In the Edit Code Labels window that opens, click Create Code Label.
-
Input the name and description for the custom label and click Create. You can delete a custom label if no response code is mapped to this label.
-
-
To edit the response codes in batch by importing your own mapping file, complete the following steps:
-
Click the Menu icon in the upper right and then click Bulk Edit Response Codes.
-
In the Bulk Edit Response Codes window that opens, export the code list as the base for your editing by clicking Export CSV and then selecting Master Code List or My Code List. The Master Code List is a template in CSV format that contains gateway response codes and suggested code mappings. The Master Code List may not contain all response codes applicable to the gateway. Check with your gateway to ensure all codes are correctly listed and mapped. The My Code List is a CSV file containing the current code list and mappings.
-
Edit the exported CSV file to include new response codes in your mapping. Make sure the following rules are met.
-
Gateway names and code labels are case-sensitive.
You must use the payment gateway type names. Use the List all payment gateways REST API to identify the gateway type names. In the response, the type field of each returned gateway indicates the type name of that gateway.
-
Only existing code labels can be mapped to codes. New code labels can be added only through the UI (Menu icon > Edit Code Labels > Create Code Label).
-
Duplicate response codes are not accepted.
The addition of new codes will not be added to the master list.
-
-
When you complete your editing, in the Bulk Edit Response Codes window, import the custom CSV file by choosing it from your computer and clicking Import CSV. Once imported, the new code list will override the existing code configuration.
Importing a new CSV will override all existing response code configurations.
-
-
Configure callout notifications for Configurable Payment Retry
Callout notifications are used to notify Configurable Payment Retry that a payment run has been completed, regardless of whether the payment run was triggered by Advanced Payment Manager or Zuora Payment Run. This initiates the retry process for all payments that failed during the payment run.
If your tenant utilizes the Event Framework and Notifications feature, contact Zuora Global Support to enable Legacy Notifications.
-
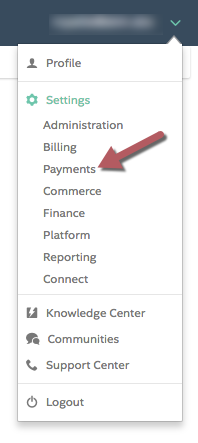
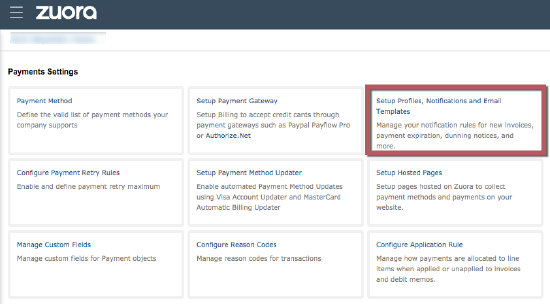
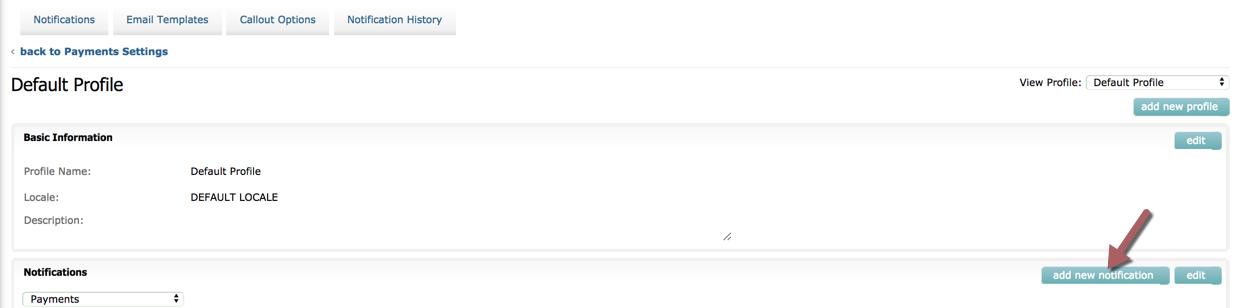
In Zuora environment, navigate to Settings > Payments > Setup Profiles, Notification and Email Templates.
-
Click Add New Notification.

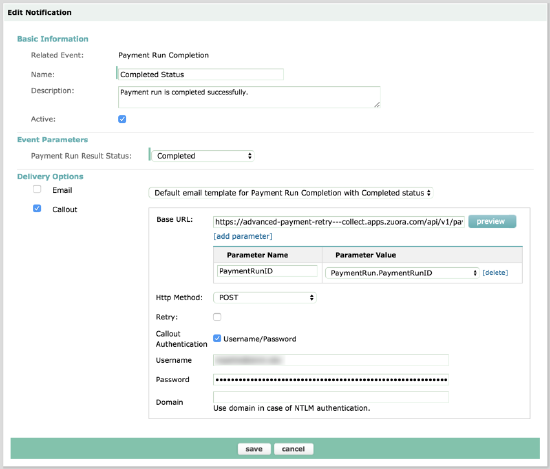
The Edit Notification dialog box opens:
-
Complete the Edit Notification details.
Basic Information:
- Name - Enter “Completed Status”
- Description - Enter the desired description of notification (optional)
- Active - Enable
Event Parameters:
- Payment Run Result Status - Select Completed
Basic Information:
-
Enable Callout
-
Select Default email template for Payment Run Completion with Completed Status
-
Base URL - Enter https://advanced-payment-retry---collect.apps.zuora.com/api/v1/payment_run
-
Parameter Name - Select PaymentRunID
-
Parameter Value - Select PaymentRun.PaymentRunID
-
HTTP Method - Select POST
-
Body Format - JSON (only required for tenant using the Event Framework and Notifications feature)
-
Callout Authentication - Enable Username/Password
-
Username - Enter the Zuora username associated with the Zuora tenant
-
Password - Enter the CPR app instance API Token
-
To obtain your API token, navigate to Configurable Payment Retry instance, click the Settings tab, and the API Token is shown at the top. If it is not shown, click the Show API Token button.
-
-
Click Save.

Configure customer groups
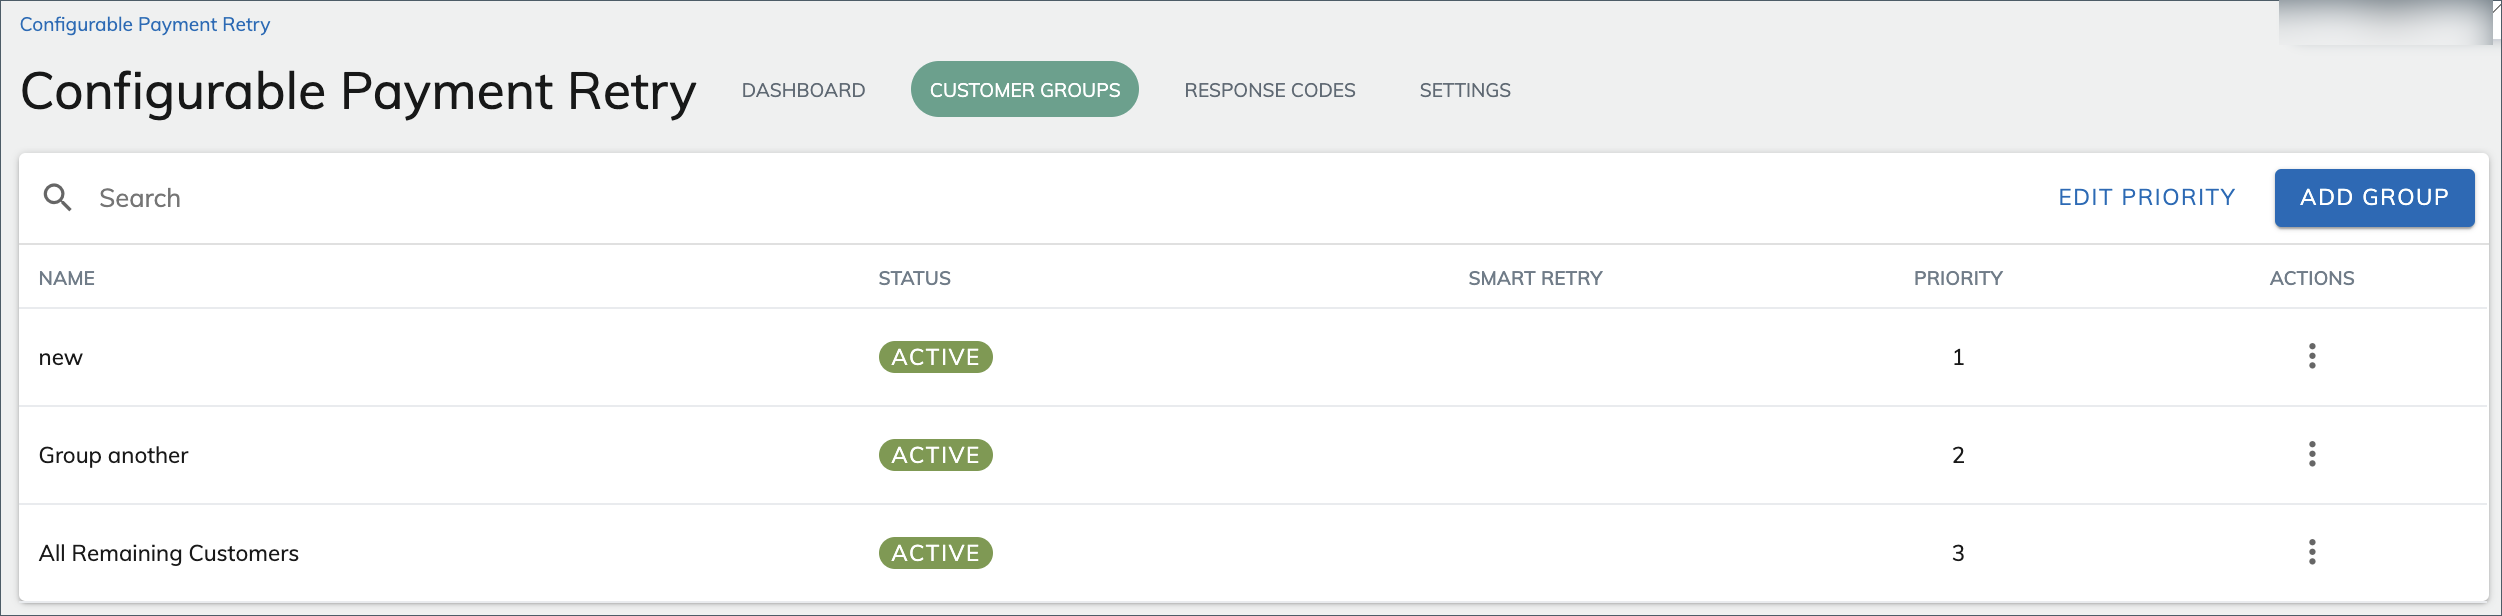
You can group your customers based on certain criteria so that they can use the same set of retry rules. Customer groups have priorities. If a customer falls into multiple customer groups, the retry rules for the group of the highest priority will be applied. All customers that do not fall into a custom group get processed in the default group ("All Remaining Customers").
-
Click the Customer Groups tab. All customer groups that have been defined are displayed. The predefined “All Remaining Customers” is intended as a catch-all to ensure all accounts are included in the retry process. This customer group cannot be removed or disabled, but the retry rules can be edited. No filters are allowed for this group.
-
To create a new customer group, complete the following steps:
- Click Add Group.
- Enter a name to identify the customer group.
- If you want the group to be included in the retry process, enable Active Status. Once enabled, the customers who meet the definition will begin filtering into the group.
- Define a customer group with either filters or custom ZOQL query:
- To use the filters, click the Plus icon and then configure the fields, operators, and values. You can add multiple filters but only AND relation is supported.
For example, if you want to define a customer group for customers living in Hawaii, you can create a customer group with the name "Hawaii living" and use "SoldToContact.State = Hawaii" as the filter.
Field value must match the value displayed in the tenant. For example: Value = United States, not Value = US.
If you want customers with the billing contact in Georgia and Florida to have the same retry logic, you need to create two groups and assign them the same retry logic. Combining the two filters "BilltoContact.State = Georgia" AND "BilltoContact.State = Florida" will generate no results, because a bill-to-contact can only live in one state.
- To use the custom ZOQL query, enable the Custom ZOQL Query option and then enter filter statements for the WHERE clause of a ZOQL query. Here is an example. Note the Custom ZOQL Query does not support querying subscription data. The query only supports PaymentApplication, or InvoicePayment objects add and their related objects.
(((((((Account.AccountNumber like '%1') or Account.AccountNumber like '%2') or Account.AccountNumber like '%3') or Account.AccountNumber like '%4') or Account.AccountNumber like '%5') and Account.Batch = 'Batch1')
- To use the filters, click the Plus icon and then configure the fields, operators, and values. You can add multiple filters but only AND relation is supported.
-
If you plan to use the AI-driven Smart Retry logic instead of editing retry rules manually based on gateway response codes, enable Smart Retry. See Enable Smart Retry for details about the configuration. Once enabled, Smart Retry will override existing retry logic with AI machine learning.
-
Click Create.
-
To change the priority of a customer group, click Edit Priority, drag the customer group and drop to a desirable location, and click Save.
The customer group with the highest priority is on the top of the list and the group with the least priority is at the bottom. The lowest priority group should always be the default customer group of “All Remaining Customers”. If a customer is in multiple customer groups, the retry rules for the group with the highest priority will be applied.
Edit an existing customer group
To edit an existing customer group, complete the following steps:
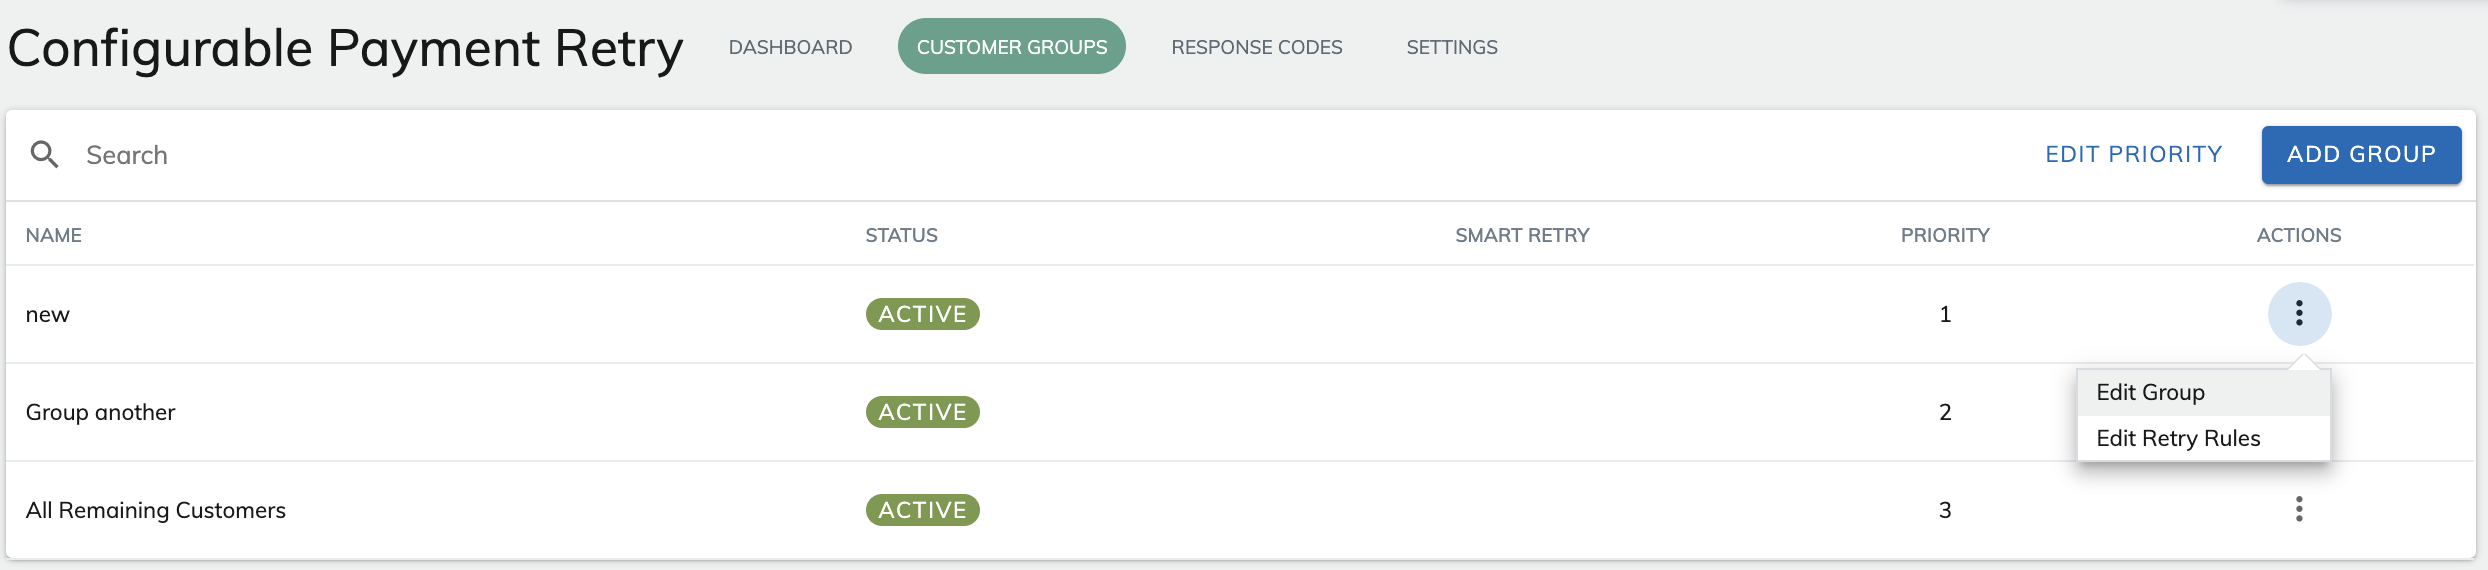
- On the Customer Groups tab, click the menu icon in the Actions column.
- Click Edit Group.
- Edit the customer group in the Update Customer Group window and click Update.
Customer Groups can have their selection criteria modified, group priority changed, and the status of the group or the use of Smart Retry can be activated/deactivated.
Configurable Payment Retry assigns the invoices to a customer group when the invoice initially enters the retry process. Any changes will not impact those invoices in an active retry cycle and will continue with the logic of the customer group to which they were initially assigned. Any changes to a customer group will not restart a retry cycle for any previously concluded cycle.
Edit retry rules for a customer group
Retry logic is configured for each customer group to indicate the required action for the retry attempt. For a customer group, you can select to configure the retry logic with either of the following methods:
- Enable the AI-driven Smart Retry to automatically retry failed payments at optimal times.
- Manually configure the retry rules for each retry attempt based on gateway response codes.
Enable Smart Retry
Smart Retry utilizes machine learning to assist you in establishing an effective retry strategy. When the time comes to retry a payment, Smart Retry analyzes over 15 characteristics of a transaction such as an account MRR, currency, payment amount, payment gateway, gateway response codes, the issuing bank region, when it last had a failed payment, and more. The analysis is then applied to Zuora’s training dataset. The machine learning model then automatically retries an account’s failed payment at the optimal times.
To enable Smart Retry, complete the following steps:
- On the Customer Groups tab, click the Menu icon in the Actions column and then click Edit Group. The Update Customer Group window opens.
- In the Smart Retry section, enable Smart Retry. The Smart Retry settings are displayed.
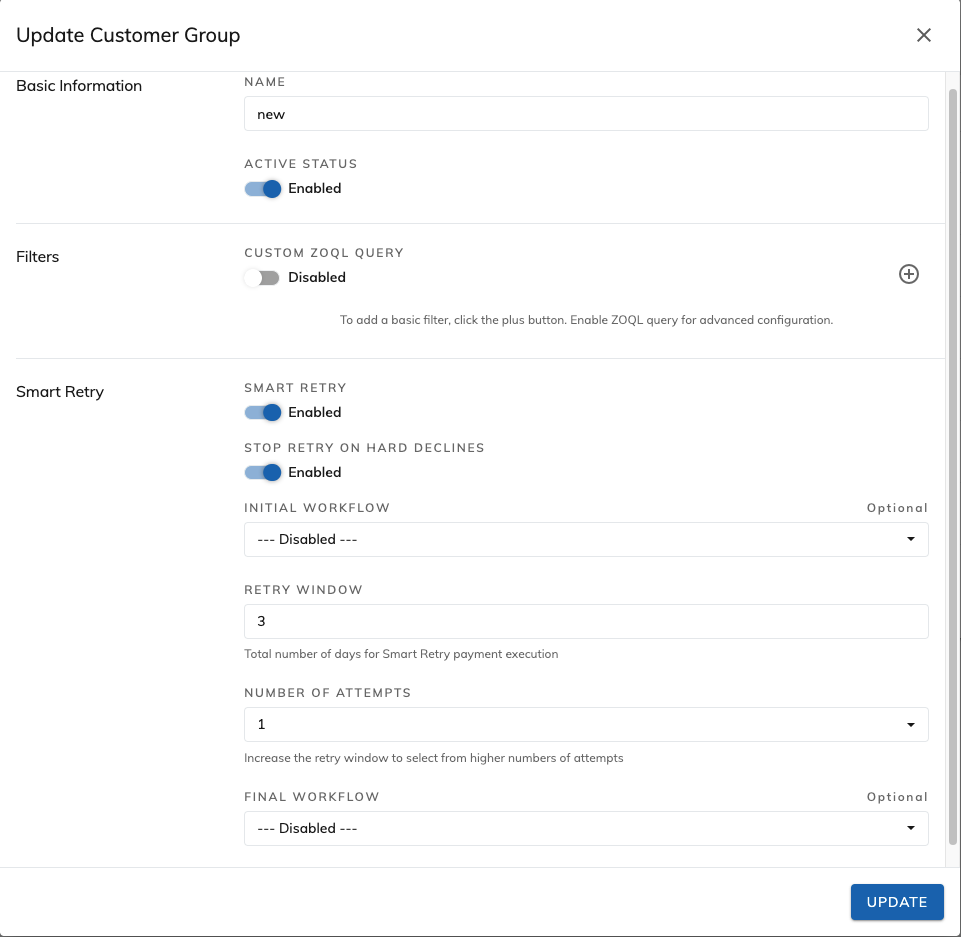
- Complete the configuration details.
- Stop Retry On Hard Declines: If enabled, the Configurable Payment Retry stops the smart retry cycle for any payment with a gateway response code mapped to hard decline. Once the smart retry cycle is stopped, the Final Workflow is triggered. The smart retry cycle continues for all the other response codes such as soft decline, system error, or different custom mapping till the attempts have been exhausted or the payment is received.
- Initial Workflow - Optional. Select the workflow to be triggered at the time the account/invoice enters the retry process. The workflow is triggered only once at the start of the retry cycle and would not be called for subsequent attempts. In the drop-down list, workflow names are listed based on the Workflow API token entered on the Settings page. The Workflow API token points to a specific Workflow instance where the names of configured workflows are retrieved.
- Retry Window - Specify the days for the retry window, from the time the payment enters retry until the last attempt can be made. The minimum number of days depends on the number of attempts. An inline message will prompt you if the number of days is not valid. The maximum number of days allowed is 90.
- Number of Attempts - Specify how many attempts Configurable Payment Retry will execute on the failed payment. If you enter 5, you will see a total of 6 attempts because the first attempt is executed by the payment run and then 5 additional attempts by Configurable Payment Retry. The maximum number of attempts allowed is 20.
- Final Workflow - Optional. Select the workflow to be triggered upon the completion of a retry cycle. It is recommended to execute a workflow on the last retry attempt as it indicates the account/invoice has completed the cycle and payment was not collected and subsequent action should be taken, such as writing off invoice, canceling subscription, suspending service, etc.
- Click Update. Smart Retry is enabled for this customer group.
If Smart Retry is enabled for a customer group, an indication is shown for this group on the Customer Groups tab, and the Edit Retry Rules menu will not be available for this group. To enable editing retry rules manually, disable Smart Retry in the Update Customer Group window and click Update.
Configure retry rules
-
On the Customer Groups tab, click the menu icon in the Actions column and then click Edit Retry Rules. The Edit Retry Rules page opens.
- In the left Attempts section, select the attempt that you want to edit.
- Complete the details for the available responses in the attempt. For each response, you need to decide and enable the action option first, including whether to stop retrying and whether to trigger a workflow. Other options vary for the enabled action.
The following table describes the system behaviors for different scenarios:
| Workflow Selected | Workflow Disabled | |
| Stop Retrying Enabled |
The selected workflow will be triggered but no further attempts will be made. |
No further action to recover the failed payment. |
| Stop Retrying Disabled |
The selected workflow will be triggered and retry attempts will be made according to your configuration. You need to configure the retry to occur in an incremental time or at a specific time or day. To learn about the configuration in Workflow, see Integrate Workflow with Other Zuora Products. |
Further payment attempts will be made according to your configuration. You need to configure the retry to occur in an incremental time or at a specific time or day. |
Edit existing retry rules
To edit the retry rules of an existing customer group, complete the following steps:
- On the Customer Groups tab, click the menu icon in the Actions column.
- Click Edit Retry Rules.
- Edit the desired retry attempt and then click Update.
You can add or delete additional attempts to a retry logic and modify the retry timing.
Configurable Payment Retry schedules the next retry attempt at the time of payment failure. For instance, attempt three is scheduled after retry attempt two is executed. At the time of payment retry execution, the configured logic is used to schedule the next attempt. Any changes made to the retry rules will impact future payment attempts, which will be taken into consideration after the scheduled attempt is executed (the scheduled attempt = the next immediate retry attempt). These changes apply to the basic retry rule logic and Smart Retry. Any changes to retry logic will not restart a retry cycle for any previously concluded cycles.
Consider the following scenarios:
Example 1
- Configure a retry rule with a 24-hour window with three retry attempts.
- Modify the retry rule to include an additional two attempts.
After the third retry attempt is executed, the fourth attempt will be scheduled 24 hours after the third attempt and the subsequent attempt 24 hours later.
Example 2
- Configure the smart retry rule with a ten-day retry window and five retry attempts.
- Update the smart retry logic to six retry attempts.
CPR will execute the additional attempt within 10 days. CPR will not exceed the retry window length. If it cannot execute all of the retry attempts within the given retry window time frame due to configuration changes, the retry cycle will end with a failure status.
Export and import your configurations
Zuora recommends that you back up your configurations regularly so that you can restore a previous copy of configurations in case of serious errors. You can create a backup and restore the following data through exporting and importing your configurations:
- Response code mappings
- System settings configured on the Settings tab
- Customer groups
You can create a backup for your configuration data in Configurable Payment Retry, but neither Collections nor Zuora will store your backup data. You need to store the data with your own system.
To export/import your configurations, complete the following steps:
- Click the Settings tab.
- On the Settings tab, scroll down to the Data Configurations section.
- To export the configurations, click Export and then the configuration data will be displayed in JSON format in the window. Copy the JSON code and paste it into a document that is in the cloud. You can include the current date in its title to help you distinguish different copies of the configurations.
- To import the configurations, click Import. In the window that opens, copy and paste the JSON code of the configurations that you want to import into the text field and click Save.
- When you import configurations, all existing configurations, including customer groups, code labels, code mappings, and system settings, will be overwritten. Any workflows associated with retry logic must be updated to point to the appropriate workflows in the production environment.
- Make sure that the mapping code for
gateway_mappingis set todescriptionin the JSON Configuration file for import and export options.
Set up a test to compare Smart Retry and your existing retry logic
To compare Smart Retry and your existing retry logic configured based on gateway response codes, you can set up an A/B test by replicating your current retry logic to the Smart Retry customer group.
-
Create a new customer group for Smart Retry.
-
Name the group. It is recommended to name the new group to be easily identified as using Smart Retry, such as “Group Smart Retry”.
-
Create filters for the “Group Smart Retry” customer group. It is recommended to use ZOQL filter to help segment out the number of the customers. To use ZOQL filter, enable the Custom ZOQL Query option.
The ideal situation is to have 50% of the customers entering your smart retry customer group and the other 50% continuing to use previously configured logic.
Here are two examples. Filters can be added such as region, gateway, or other customer filters. It is recommended to use a random filter to obtain true A/B testing.
(((((Account.AccountNumber like '%6') or Account.AccountNumber like '%7') or Account.AccountNumber like '%8') or Account.AccountNumber like '%9') or Account.AccountNumber like '%0')
(((((Payment.GatewayResponseCode = '15006') or Payment.GatewayResponseCode = '15007') or Payment.GatewayResponseCode = '15008') or Payment.GatewayResponseCode = '15009') and Payment.Gateway = 'PayPalEC') and (Account.AccountNumber like '%6')
-
-
Apply the existing retry logic to the “All Remaining Customers” group.
-
Enable Smart Retry on “Group Smart Retry” and configure the retry logic to mimic your existing retry logic.
For example, if your current retry logic retries payments every 48 hours for 4 attempts, you can set up the time constraints of Smart Retry as the following:
-
Number of attempts: 4
-
Number of days: 8
-
Optional: Add workflows upon entry into retry and/or upon exit. The best practice is to include a workflow upon exit to ensure any account/invoice that was not collected to address the outstanding balance, such as writing off invoice, suspending/canceling subscription, sending customer communications, etc.
-
-
Ensure that the “Group Smart Retry” group is of a higher priority than the “All Remaining Customers” group.
It is recommended to run the A/B test long enough (at minimum for 4 to 6 weeks) for several retry cycles to complete.