Custom object definitions
Zuora Custom Objects provide the service to define custom objects. You can extend the Zuora data model to accommodate your specific use cases with custom objects.
This article describes how to view, create, update, and delete custom object definitions through UI. Once a custom object definition is created, you can create custom object records of this type. See Custom object records for more information.
If you want to access custom object definitions by API, see Custom Object Definitions in Zuora API Reference.
The bulk deletion of custom fields on standard and custom objects is temporarily unavailable as we refine the Custom Field feature. This change affects both the Zuora UI and API:
- UI: Navigate to Object Manager in the left navigation menu and then access the custom field list page of a standard or custom object.
- API: Submit custom field deletion requests via the Update a custom object definition API operation.
You can still delete custom fields individually during this refinement process. The bulk deletion capability will be restored once the refinement is complete.
View custom object definitions
To view custom object definitions, perform the following steps:
- Navigate to Platform > Object Manager.
- Click the object name in the Label column. The custom object records page opens.
- Click Edit Object Definition. The custom object detail page opens.
Create a new custom object definition
To create a new custom object definition, perform the following steps:
- Navigate to Platform > Object Manager, and then click + Create in the upper right of the page.
- Fill in the information on the new custom object page.
- The Name field is required.
- The API Name field is required.
- Switch the following toggles on or off to indicate whether to audit the creation or deletion of custom object records of this custom object definition: Note that you must enable the Custom Object Definition audit trail setting in your Zuora tenant before auditing custom object record creation or deletion. For more information, see Manage audit trail settings.
- Audit Create Record
- Audit Delete Record
- Click + New Custom Field.
- You must create at least one custom field for a new custom object.
- You can add at most 50 custom fields to a custom object.
- All custom fields in a custom object can be indexed.
- Input the information of the custom field on the Add New Custom Field page:
- Name: The custom field name displayed on UI.
- API Name: The API name of the custom field. The value must end with
__c(two underscores and the letter "c") and cannot be edited once created. - Description: (Optional) The description of the custom field.
- Detail: Specify field type and settings. For more information about supported field types, settings, and limitations, see Custom field types and settings.
- Click the Save and Add Another to save the custom field definition and immediately start creating a new custom field. Repeat until you input the information for the last new custom field. Click Save and Close to save the custom field definition and return to the new custom object page.
- Click Save on the new custom object page.
The new custom object definition will be displayed in the custom object list view.
Note that you should not store PCI, sensitive PII, or other regulated data in custom objects. See Responding to individual requests for access, correction, and deletion of data under applicable privacy laws for more information.
Update a custom object definition
You can make the following updates to an existing custom object definition:
- Edit existing custom field definitions
- Add new custom field definitions
- Delete existing custom field definitions
To edit an existing custom field in the custom object definition, click the Edit icon  to the right of a custom field on the custom object detail page. You can make the following updates to an existing custom field definition:
- Update the default value.
- Change a required field to optional.
- Change an optional field to required if the custom object contains no record.
- Change a filterable field to non-filterable, and vice versa.
- Remove the unique constraint on the field.
- Add a unique constraint to a filterable field if the custom object contains no record.
To add a new custom field definition to a custom object definition, perform the following steps:
- Click + New Custom Field on the custom object detail page.
- A custom object can contain at least 1 and at most 50 custom fields
- All custom fields in a custom object are indexed.
- Input the information of the custom field on the Custom Field page. The Name and API Name are required.
- Click Save and Close to save the new field.
Note that you can only add a required field, a relationship type field, or a unique constraint to an existing custom object with no records.
To delete an existing custom field definition from a custom object definition:
- Click the Delete icon
 on the right side of the field on the custom object detail page.
 - Click Delete on the confirmation dialog.
Note that you can only delete field definitions for custom object definitions that contain no records.
Delete a custom object definition
To delete a custom object definition, perform the following steps:
- Click the Delete icon on the right of the custom object in the custom object list view.
- Click Delete in the confirmation dialog.
Note that you can only delete the custom object definitions that contain no custom object records. See Custom object records for more information.
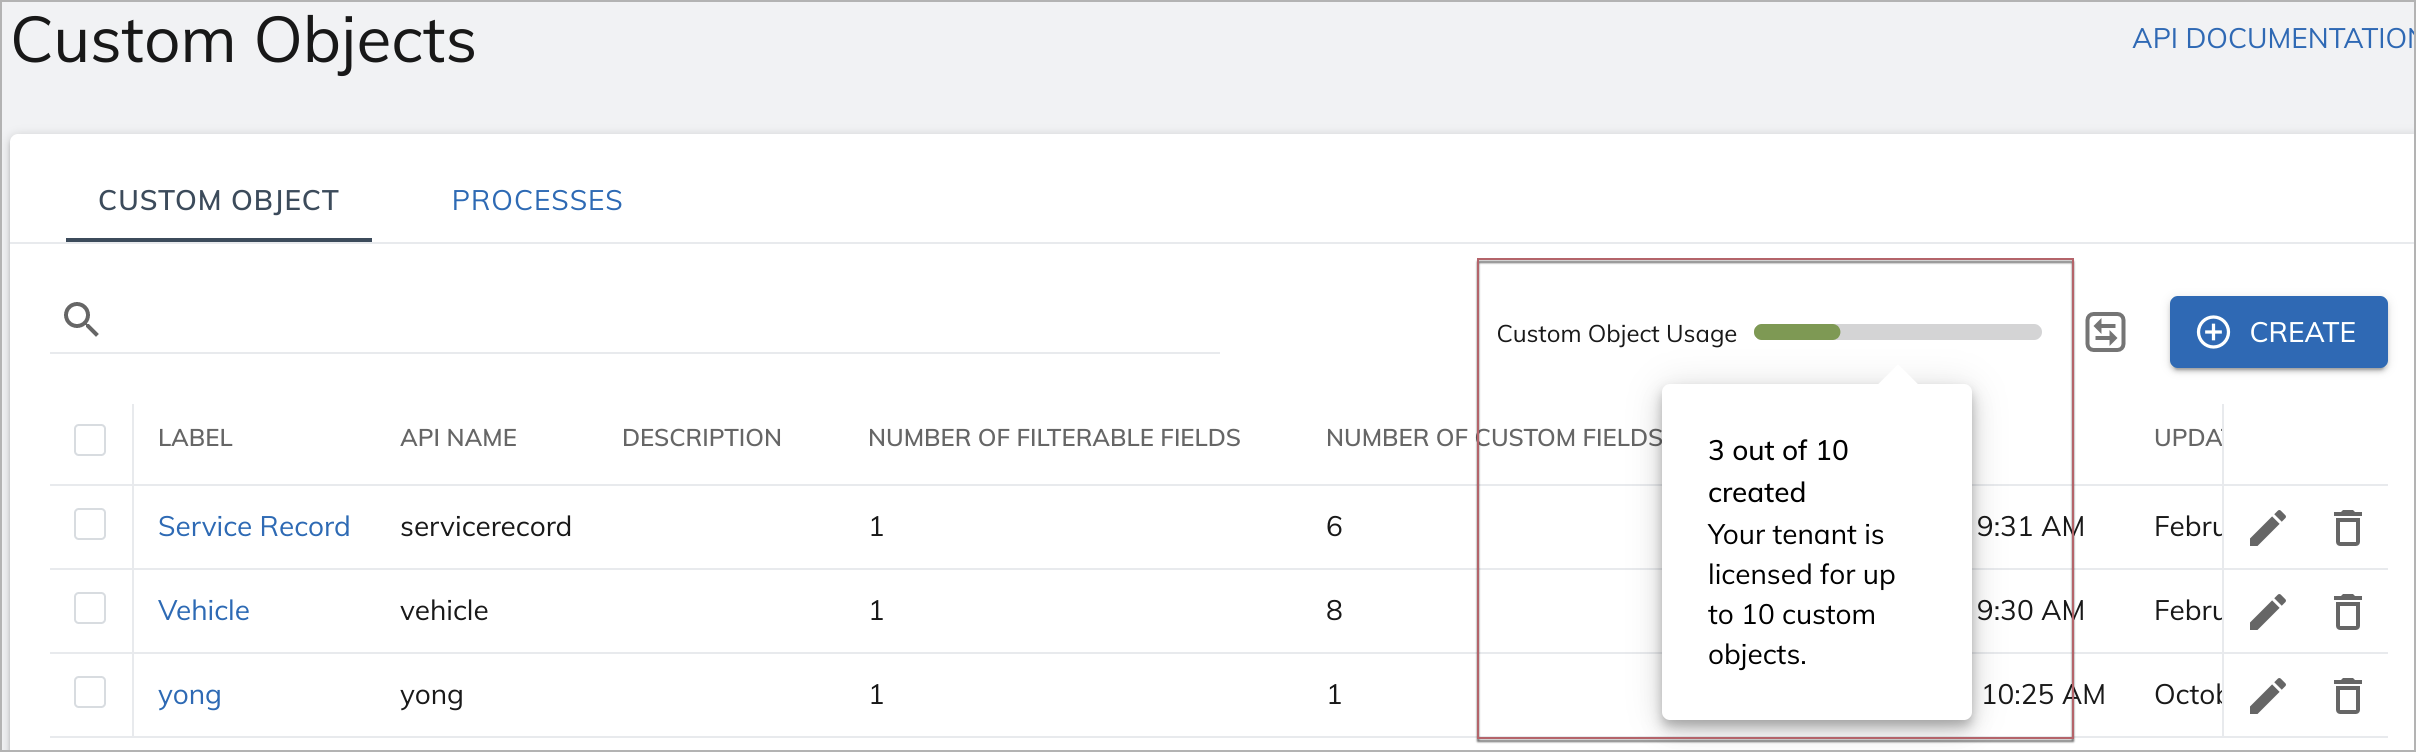
View custom objects usage
You can view how many custom objects have been created towards the limit in your tenant by hovering over the Custom Objects Usage meter in the Custom Objects list view.
Import and export custom objects
You can import custom object definitions in bulk, and export existing definitions for later use.
Import custom objects
To import custom objects, perform the following steps:
- Click the Import icon
 at the upper right of the Custom Object list view. The Import Definitions window pops up.
 - Paste the JSON format object definitions to the text editor. See the request schema of the Create custom object definitions API for the required JSON structure. You can find a JSON example in the JSON example for import section of this article.
- Click Import.
JSON example for import
The following is a JSON example for import with one custom object definition named Vehicle:
{
  "Vehicle": {
    "type": "Vehicle",
    "schema": {
      "object": "Vehicle",
      "label": "Vehicle",
      "title": "Vehicle",
      "type": "object",
      "description": "Object stores vehicle information",
      "enableCreateRecordAuditing": false,
      "enableDeleteRecordAuditing": false,
      "properties": {
        "brand__c": {
          "maxLength": 512,
          "description": "The brand of the vehicle",
          "label": "Brand",
          "type": "string"
        },
        "model__c": {
          "maxLength": 512,
          "description": "The model of the vehicle ",
          "label": "Model",
          "type": "string"
        },
        "color__c": {
          "maxLength": 512,
          "description": "The color of the vehicle",
          "label": "Color",
          "type": "string",
          "enum": [
                "white",
                "red",
                "black",
                "silver",
                "blue"
           ],
          "default": "white"
        },
        "MSRP__c": {
          "description": "The MSRP of the vehicle",
          "label": "MSRP",
          "type": "number"
        }
      },
      "required": [
        "brand__c",
        "model__c"
      ],
      "filterable": [
        "brand__c",
        "model__c"
      ],
      "enableRecordMigration": false
    }
  }
}
Export custom objects
To export custom objects, perform the following steps:
- Select the custom objects that you want to export in the Custom Object list view.
- If you want to export the selected custom object definitions to a JSON file, click the Export to Json icon
 . If you want to copy the definitions to the clipboard, click the Copy to Clipboard icon
  .
.
You can then import these selected custom object definitions to another tenant with the exported JSON file or from the clipboard.
Use cases
Create the display name for custom objects
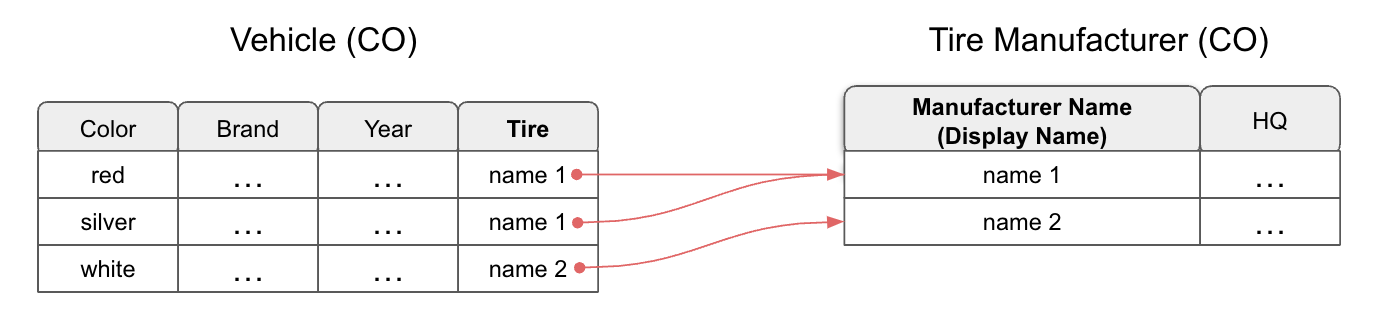
The display name can be used as a user-friendly name for a custom object linked to other custom objects.
For example, suppose that you have created two custom object definitions named "Vehicle" and "Tire Manufacturer" in your tenant. The Vehicle object contains a relationship-type field Tire linking to the Tire Manufacturer object. You can enable the display name for the Tire Manufacturer object by creating a text-type field Manufacturer Name. When creating custom object records for the Vehicle object, real manufacturer names can be recorded as values for the Tire field, instead of meaningless 36-character record IDs.
To create the display name, complete the following steps when creating or editing a custom object definition:
- Create a text-type custom field definition.
- Ensure none of the format checkboxes (UUID or URL) is selected.
- Select the Display Name checkbox.
Display names have the following limitations:
- Each custom object definition can have at most one field as the display name.
- Only text-type fields with no format (such as UUID or URL) can be used as display names.