Configure custom endpoints
Cross-Origin Resource Sharing (CORS) allows the restricted resources in a web application running at one origin to be accessed from different origins. Cross-site HTTP requests initiated from scripts in the client's browser (e.g. JavaScript in your customer's browser) are subject to much tighter restrictions for security reasons. For more information about CORS, see Zuora CORS REST.
Custom endpoints allow you to define an endpoint that is internal or external to Zuora, and use your custom panels or custom pages to:
- Push data collected in the portal to a downstream system.
- Pull data from downstream systems to display or configure in the portal.
- Call downstream systems to validate information provided by the user.
- Trigger a downstream process, such as Zuora Workflow.
How to use custom endpoints
Custom endpoints can be requested using JavaScript from any custom panel or custom page in the Subscriber Portal.
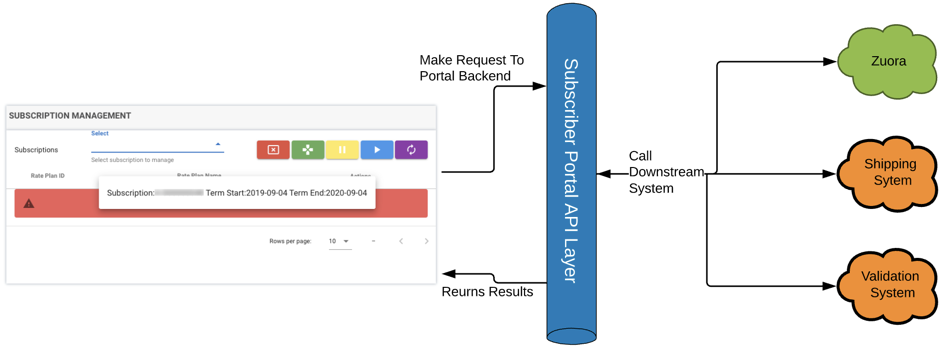
When calling a custom endpoint from the Subscriber Portal, the following processes take place:
- A caller, for example, a custom webpage, makes a call to the backend system of the Subscriber Portal (Subscriber Portal API Layer).
- The portal back-end calls the endpoint of downstream systems such as Zuora, a shipping system, or a validation system. The results are then returned to the Subscriber Portal back-end system.
- The response is returned to the caller and the results are displayed in the front-end UI.
For example, a custom panel makes a request to retrieve a list of subscriptions, the Portal calls Zuora to retrieve this information and then returns a list of subscriptions to be displayed on the custom page. The sample call is:
$.ajax({
    url: "api/v1/endpoints/getSubs",  //call the custom endpoint named getSubs
    Type:'post',   //always post the request to custom portal endpoint and the custom endpoint is setup to perform a get/post downstream
    headers: {
        'access-token': window.localStorage.getItem('accessToken'),
        'client': window.localStorage.getItem('client'),
        'tokenType': window.localStorage.getItem('tokenType'),
        'uid': window.localStorage.getItem('uid'),
        'expiry': window.localStorage.getItem('expiry')
    }
}).then(function(data) {
    //perform desired action with result
}
Configure custom endpoints
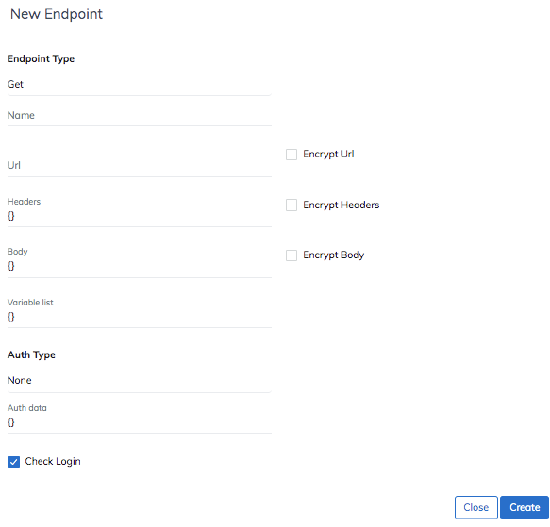
Take the following steps to configure custom endpoints in the Subscriber Portal app instance:
- Launch the Subscriber Portal instance from your Zuora tenant, and click the ENDPOINTS tab.
- Click Create Endpoint.
- Enter the details of the endpoint:

- Endpoint Type - Select Get or Post.
- Name - The unique name for this endpoint. This is used to reference the endpoint. Note: Do not include any space in the name.
- URL - The URL of the endpoint to be requested.
- Headers - If you need to pass a value in the header of your request, enter the values here. The format of the header follows the standard JSON formatting. For example:
{ "Content-Type": "application/x-www-form-urlencoded" } - Body - Enter the request body to pass values to downstream systems. The format of the body follows standard JSON format. For example:
{
  "existingAccountNumber":"{{accountNumber}}",
  "orderDate": "{{orderDatePassedInName}}",
  "subscriptions": [
    {
      "customFields": {
        "CustomFieldOne__c": "{{customFieldOneValue}}"
      },
      "orderActions": [
        {
          "cancelSubscription": {
            "cancellationEffectiveDate": "{{cancellationEffectiveDate}}",
            "cancellationPolicy": "{{cancelVariableValue}}"
          },
          "type": "{{type}}"
        }
      ],
      "subscriptionNumber": "{{subscriptionNumber}}"
    }
  ]
}
Taking the first key-value pair as an example, the value for the
existingAccountNumberfield is the retrieved value of a variable namedaccountNumberdefined in the downstream system. For example, the endpoint https://rest.apisandbox.zuora.com/v1/orders allows a parameter calledaccountNumberto be passed in, so you should specify{{accountNumber}}as the value of theexistingAccountNumberfield so that it is passed into this endpoint. Variables are retrieved by using the curly braces. - Variable List - This field is used to define the fields sent to downstream systems. To improve security, only variables in the variable list will be passed to downstream systems. These variables are passed in from the caller. The names of these variables do not need to match the name of the argument to the downstream system.
For example, to set the variables used in the previous sample, add the following snippet:{ "body": { "Zuora-Account-Id":"", "existingAccountNumber":"", "orderDatePassedInName":"", "customFieldOneValue":"", "cancellationEffectiveDate":"", "cancelVariableValue": "", "type": "", "subscriptionNumber": "" } }In this example,
bodyrepresents the level of the variable. The variables listed will be available to the request body. Additional values areurlandheader.
Note: The Account ID and CRM ID of the active account do not need to be passed in. Subscriber Portal retrieves these values from the session to ensure that only data from an active account is retrieved. The field name used for these variables areZuora-Account-IdandZuora-CRM-Id. - Auth Type - The available authentication types are None or Basic. The Basic authentication type accepts a username and password in the following format:
{
  "username":"apiuser@system.com",
  "password":"pass123"
}
Note that passwords are automatically encrypted so the values cannot be viewed once saved. - Check Login - This option enforces that end-users must log in with a valid session in order to execute this endpoint.
- Encrypt URL, Encrypt Headers, and Encrypt Body - Select these check boxes to encrypt the information so that the URL, header, and the body of the request cannot be viewed in the database nor the UI when configuring the endpoints.
- Click Create to create the endpoint.

