Manage user reports in OneID
OneID enables Admins to export a report of their users, roles, and access levels across Zuora tenants. You no longer have to log in to each tenant separately to generate user management reports for auditing purposes. Only users with the Admin role in OneID can access this feature, which allows them to create, download and delete user management reports.
Administrators can generate the following reports in OneID.
- Global user report
- Tenant level report
The section below provides an overview of the available user reports in OneID, detailing the fields and user data tracked at global and tenant levels.
Global user report
The Global user report offers an organization-wide view of user statuses within OneID. This report is ideal for monitoring user accounts when group provisioning mode is enabled across all users.
Fields in global user report
The fields included in the Global User Report provide essential user information for organization-wide visibility and management.
- User ID: A globally unique identifier (GUID) for users within OneID, used in both the OneID Audit trail and Tenant-level reports.
- User Name: Unique identifier for login within OneID.
- First Name & Last Name: The user’s name as registered in OneID.
- OneID User Status: The user status in OneID can be Active, Inactive, Pending Activation, or a Pending Setup(Similar to Pending Activation but allows account activation directly from the Billing application using local credentials).
- Work Email: The email address used for OneID-related communications.
- Federated ID: User identity managed by a Federated Identity Management (FIM) system for Single Sign-On (SSO).
- SSO Enabled: Indicates whether Single Sign-On is enabled in OneID.
- OneID Role: Indicates if the user has Organization Administrator privileges within OneID.
- Created On: Date of account creation in OneID.
- Deactivated On: Date of account deactivation in OneID.
- User Groups: Lists the user’s group memberships within OneID, displayed as a comma-separated field.
- Last Login: The last login date and time for the user’s OneID account.
Tenant-level user report
The Tenant-level user report provides detailed insights into user access and roles at the tenant level within Zuora applications. It enables the selection of specific tenants before generating reports. Each selected tenant will have a separate report displaying both OneID fields and tenant-specific user data.
Notes
The tenant-level report combines OneID-level fields with tenant-specific user data, offering a detailed view of each user’s access and permissions within Zuora tenants.
- Inclusion: The report includes both OneID-level and tenant-specific fields, allowing for a seamless transition to OneID.
- User scope: Includes users migrated to OneID and those managed locally within the tenant.
- Deprecation notice: Tenant-level reporting will eventually be phased out, consolidating user reporting at the OneID level.
Fields in tenant-level user report
The Tenant-Level User Report includes both tenant-specific and OneID fields, providing a complete view of each user's access and permissions within a particular tenant.
Global fields in tenant-level reports
The global fields included in the Tenant-Level Report section provide core OneID data for each user, ensuring that tenant and global-level attributes are accessible for a comprehensive user overview.
- SSO Enabled: Indicates if SSO is enabled in OneID.
- Federated ID: Managed identity by a Federated Identity Management system.
- Created On: Date of user account creation in OneID.
- Activated On: Date of account activation in OneID.
- Deactivated On: Date of account deactivation in OneID.
- Last Login Time: Last successful login date and time for OneID.
- OneID Role Name: Specifies access rights at the tenant level; includes modular roles.
- OneID User ID: Globally unique identifier for OneID users, accessible in audit and tenant-level reports.
- OneID User Name: Unique identifier for login within OneID.
- OneID Work Email: Email address for OneID communications.
- OneID User Type: Specifies whether the user has Administrator or Standard privileges.
- OneID User Status: The user status in OneID can be Active, Inactive, Pending Activation, or a Pending Setup(Similar to Pending Activation but allows account activation directly from the Billing application using local credentials).
- OneID Enabled: Indicates if the user is managed at the OneID level or locally within the tenant.
- OneID First Name & Last Name: User’s name as registered in OneID.
- API User: Indicates if the user is an API user at the local tenant which has ‘API write access’ but no ‘UI Access‘ platform permissions within the local tenant. And this filed appears only for the Billing tenant-level report.
Billing tenant-level fields
The fields in the Billing Tenant-Level section outline specific identifiers and roles assigned to users at the tenant level in the Billing application.
- Tenant ID: Unique identifier for the Zuora tenant.
- Tenant Name: The name of the Zuora tenant in the report.
- Entity ID: Identifies the organization's specific entities or business units if multi-entity is enabled.
- Tenant User ID: Unique user identifier at the tenant level, specific to each Zuora tenant.
- Tenant User Name: Formerly used for tenant-level login.
- Tenant Work Email: Email address for tenant-level communications.
- Tenant First Name & Last Name: User’s name as registered in the tenant.
- Tenant User Status: Reflects the user’s status within the tenant following the transition to OneID. When a global account is deactivated in OneID, associated local accounts are also deactivated.
- Platform Role: User role for the Platform module within the Billing application.
- Billing Role: User role for the Billing module.
- Payments Role: User role for the Payments module.
- Finance Role: User role for the Finance module.
- Commerce Role: User role for the Commerce module.
- Reporting Role: User role for the Reporting module.
Revenue tenant-level fields
The Revenue Tenant-Level Fields section provides data on identifiers and roles assigned to users within Revenue tenants, supporting tenant-specific access control and role management.
- Tenant ID: Unique identifier for the Zuora tenant.
- Tenant Name: The name of the Zuora tenant in the report.
- Entity ID: Identifies the organization's specific entities or business units if multi-entity is enabled.
- Revenue Role ID: Unique identifier for the user roles in Revenue tenants.
- Role Name: Indicates the user access level in the Revenue tenant; synchronized with the OneID role post-transition.
- Role Start Date & Role End Date: The local role validity period within the Revenue tenant.
- Revenue User ID: Unique user identifier at the tenant level.
- Revenue Username: Formerly used for tenant-level login.
- Revenue Work Email: Email address for tenant-level communications.
- Revenue Full Name: User’s name as registered in the tenant.
- Revenue User Status: Reflects the user’s status within the Revenue tenant following the transition to OneID.
Create a global user report in OneID
- Log in as administrator in the OneID account.
- Navigate to the Users menu and click the download button from the top-right corner of the page.
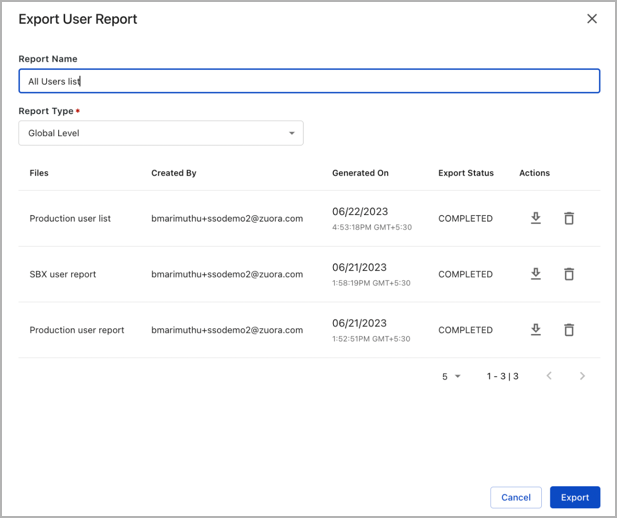
- In Export User Report, enter a Report Name.
- Set the Report Type to Global Level and click Export.
- You can download the report when the Export Status changes from Pending to Complete.

Create a tenant-level report in OneID
- Log in to the OneID account.
- Navigate to the Users menu and click the download button from the top-right corner of the page.
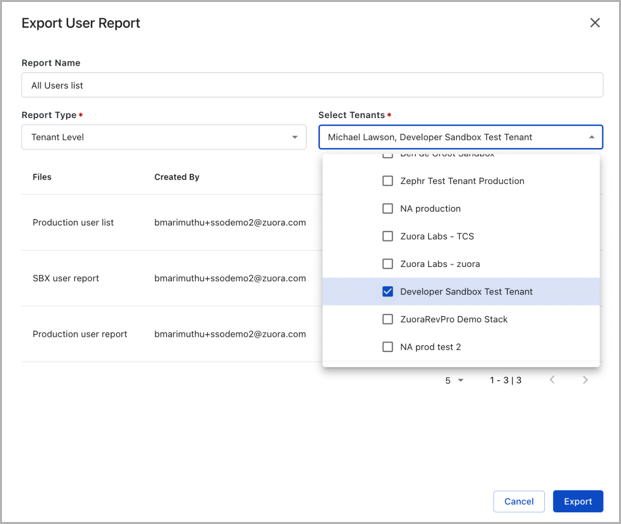
- In Export User Report, enter a Report Name.
- Set the Report Type to Tenant Level and select the tenant(s) for which you must generate the report.
- Click Export.
- You can download the report when the Export Status changes from Pending to Complete.

Manage reports in OneID
To view and manage reports in OneID, perform the following steps.
These operations apply only to organization admins.
- Log in to the OneID account.
- Navigate to the Users menu.
- Use the filter icon to search users based on User Group, Global Role, Status, Name, and more.
- Click the download button from the top-right corner of the page to perform the following actions.
- To manage generated reports, click on the download option from the top right corner of the page.
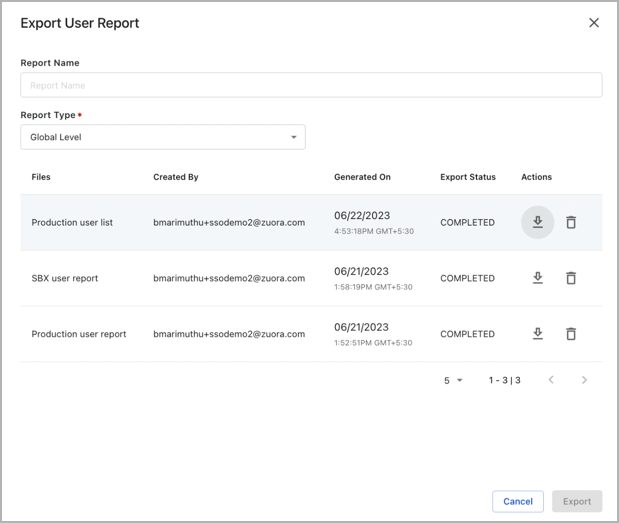
- You can perform the following operations in Export User Report.
- Download: Click on the download button.
- Delete: Click on the delete button.

