Create subscriptions
This tutorial demonstrates how to create a subscription by creating an order.
You will set the duration of the first term to be 12 months. You will also set the duration of the renewal term to be 12 months. In this tutorial, you will set the following dates to today's date:
- The date when the order is signed
- The contract effective date of the subscription
- The service activation date of the subscription
- The customer acceptance date of the subscription
- The start date of the first term of the subscription
Create a subscription using the Zuora UI
To create a subscription by creating an order in the Zuora application:
-
Navigate to Customers > Orders. The Orders page opens.
-
Click Create New Order at the top right. The Create New Order page opens.
-
In the Account field, enter the name of the account that owns the order. By default, the account that owns the order will also own the subscription. If you want to set a different account as the subscription owner, you can do it in Step 6.
You can enter the account by clicking either Account Name or Account Number.
- If you click Account Name, type part of the account name in the Account field and the filtered accounts can be dynamically listed for your selection.
- If you click Account Number, type the complete account number.
-
In the Order Date field, enter the order date you are to assign to the order.
-
Choose what you want to do by clicking Create a New Subscription.
-
In the Create a New Subscription area, complete the following steps:
For more information, see Basic information for subscriptions, Invoice subscriptions separately, and Renew subscriptions automatically.
-
In the Subscription Overview section, to set another account as the subscription owner, specify the account in the Subscription Owner field.
-
In the Terms and Conditions section, enter
12in the Initial term and Renewal term fields. -
In the Billing and Payment section, enter the appropriate details.
You can set a Currency value that can be different from the currency value set while creating the customer account. You must have the multiple currencies feature enabled to change the currency value.
-
In the Trigger Dates section, specify the appropriate dates in the Contract effective, Service activation, and Customer acceptance fields for the subscription. For more information, see Billing Trigger Dates.
-
(Optional): In the Custom Fields section, enter the reason for creating the subscription in the Change Reason field.
-
If you have enabled Payment Profiles, enter the Payment Method and Payment Gateway information.
-
-
Click Continue.
-
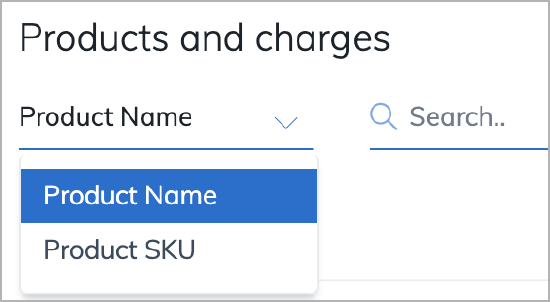
In the Products and charges area, search and locate the product to be added by performing one of the following steps:
-
You can choose one of your recently added products by placing your cursor in the search field. If the recently added products are displayed in a drop-down list (maximum eight), choose one from the list. Note that the recently added products mean the products you selected and then clicked Add Product in the bottom right corner in your previous order actions, no matter whether your previous order actions are completed.

-
You can choose to search by product name or by product SKU by using the drop-down list. The displayed products will dynamically change as you type in the Search field. Note that the default product and charge list displays a maximum of 30 products in the UI. After a search, a maximum of 20 products are displayed on each page of your search result.
-
-
To add a rate plan, click the right arrow ( > ) next to the product name to expand all its rate plans, and then select the checkbox in front of the rate plan.
You can select more than one rate plan in multiple products. To remove a rate plan from your selection, clear the checkbox in front of the rate plan. The number of the selected rate plan is also indicated in the UI.
-
Click Add Product in the bottom right corner to continue. For charges with charge definitions, if you want your subscription to look up the charge definitions or you encountered an error page with a Re-Lookup option, see additional steps in Apply charge definition lookup to subscriptions.
-
(Optional): Update the charges for the selected rate plan if necessary. Click the name of a charge to expand the charge details and update it. For taxation configuration, see Use tax code and set tax mode.
-
Click Review Order. The Review Order page opens. The operations that you can perform on the subscription are listed to the right of the new subscription name.

-
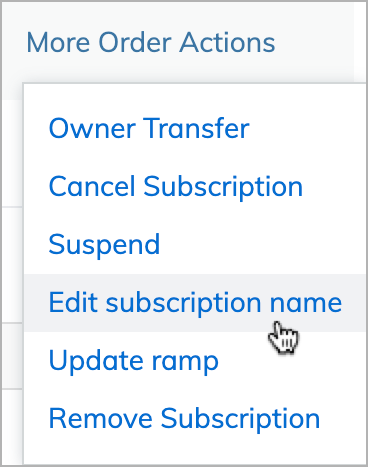
To change the subscription name, complete the following steps:
-
In the Associated subscriptions area, click More Order Actions and then click Edit subscription name.
-
In the Subscription name field, enter the subscription name and then click Save.

-
-
(Optional): To preview billing information for the subscription, click Preview Billing. Specify the preview settings and click Update Preview to see the preview invoices. After you are finished, click Done to return to the previous page.
-
Click Activate to activate the subscription.
Create a subscription using the REST API
You can use the Create an order operation to create a subscription.
Before the Orders feature is enabled, you would have used the "Create subscription", "Subscribe", or "Create account" operation.
To create a subscription and subscribe to a product rate plan by creating an order:
-
Determine the values of the following variables:
Variable Description $AccountNumThe number of the account that will own the order and the subscription. For example,
A00000001.To create the order under a new account instead of an existing account, specify the
newAccountfield instead of theexistingAccountNumberfield.$productRatePlanIdThe ID of the product rate plan to subscribe to. For example, 2c92c0f85e5019d7015e513826e650f7.$TodayToday's date. For example, 2017-09-30. -
Use the "Create an order" operation to create an order under an existing account:
Request POST /v1/orders/Request Body 01{02"orderDate": "$Today",03"existingAccountNumber": "$AccountNum",04"subscriptions": [05{06"orderActions": [07{08"type": "CreateSubscription",09"triggerDates": [10{11"name": "ContractEffective",12"triggerDate": "$Today"13},14{15"name": "ServiceActivation",16"triggerDate": "$Today"17},18{19"name": "CustomerAcceptance",20"triggerDate": "$Today"21}22],23"createSubscription": {24"terms": {25"initialTerm": {26"startDate": "$Today",27"period": 12,28"periodType": "Month",29"termType": "TERMED"30},31"renewalSetting": "RENEW_WITH_SPECIFIC_TERM",32"renewalTerms": [33{34"period": 12,35"periodType": "Month"36}37]38},39"subscribeToRatePlans": [40{41"productRatePlanId": "$productRatePlanId"42}43]44}45}46]47}48],49"processingOptions": {50"runBilling": false,51"collectPayment": false52}53}
To preview invoices for the new subscription, use the "Preview order" operation.