Overview of Tax apps
Zuora's Tax app offers a pre-built integration that can efficiently deal with various tax types and rules. The Tax app connects you to the tax vendors that hold the up-to-date tax rate data for numerous sales tax jurisdictions globally and eliminates the need for manual updates. You can use the Liquid Template Language to customize templates. The customization allows the dynamically created requests to be sent to your tax vendor in order to automatically calculate the correct tax rates for invoices, with various account tax conditions, customer locations, and tax types and rules taken into consideration. With this app, Zuora makes it easier to integrate your existing tax services with our world-class subscription relationship management solutions.
Marketplace apps
The Tax apps offer integrations with various tax vendors. The following Tax apps are available in Zuora Integration Hub. Note that accessing these links requires that you log into Zuora Connect.
Features
- Ability to generate custom tax requests.
- Automatically process all taxation items for invoices in real time.
- Utilize a variety of external tax vendors.
Benefits
- Use external tax vendors of your choice to retrieve the most accurate taxes to date.
- Avoid maintaining tax rates in multiple locations.
- Customize your need to tailor reporting to your business.
- All processes are automated to ensure speed and accuracy.
Notes and limitations
-
Only billing users with the Admin permission can access configurable tax apps in a Zuora tenant.
-
If you use the configurable Tax app, Zuora calculates tax when invoices are posted. Draft invoices generated by bill runs do not contain tax calculations.
If the tax calculation fails for a particular invoice, the invoice will remain in draft status. This behavior is different from the behavior of Zuora's direct Avalara integration. See Direct Avalara integration.
-
The configurable Tax app does not return tax information for invoice item adjustments. The only method of AR supported by the configurable Tax app is Invoice Settlement (Credit Memos and Debit Memos).
-
Maximum taxable line items supported in a single tax call (Overall, Zuora’s configurable tax apps can support a maximum of 15,000 line items, but tax vendors have their specific limitations as shown below. If you have confirmed with your tax vendor that a higher number of items can be processed in a timely manner (within 120 seconds), submit a request at Zuora Global Support and ask to test a higher limit.):
- Avalara AvaTax for Sales: 1000
Note: By default, the limit per invoice is 1000, but Zuora can coordinate with Avalara to raise it to 15k on a case-by-case basis, at no additional charge. - Avalara AvaTax for Communications: 10,000
- OneSource Determination: 5,000
- Vertex O Series: 5,000
- Vertex Advantage: 3,000
- Avalara AvaTax for Sales: 1000
-
Usage records (for location-based tax) are not visible to the connector.
-
Currently, tax vendors don’t return the exempted tax amount to Configurable tax apps when the product price is tax-inclusive and the customer is exempt from tax. Therefore in such cases, the invoice item amount will be the tax-inclusive amount and the tax amount will be 0.
-
We do not support password management tools like LastPass or Dashline while configuring a new Connect Tax Engine.
Get started
To get started, you have to purchase an app first and create an OAuth login for your Tax app to connect to Zuora.
Purchase an app
You can purchase apps in the Marketplace that is available in your tenant.
- In the left navigation menu of Zuora, select Marketplace > Marketplace.
The available apps are displayed. - Find the app that you want to purchase.
- Click Purchase on the overview page of the app.
Zuora will then contact you with information about completing the purchase and setting up the app.
Purchased apps can be used by all Zuora administrators and Zuora standard users in your organization. To view your purchased apps, navigate to Marketplace > Purchases in your Zuora tenant. Before you can use a purchased app, you must install the app.
Create an OAuth login for your Tax app to connect to Zuora
Some apps use OAuth to authenticate to your Zuora tenant. This article explains how to create a Integration Hub login that stores OAuth authentication details for you Zuora tenant. You can then select the Integration Hub login when you install an app that uses OAuth.
To create a Integration Hub login:
-
In your Zuora tenant, select Administration > Manage Users from the Profile & Settings menu, then create a user.
Apps that use OAuth to authenticate to your Zuora tenant will perform actions as this user.
Zuora recommends that you create an API user specifically for this purpose. See Create an API User for more information.
-
On the Users page in your Zuora tenant, select the user you created in the previous step, then create an OAuth client for the user.
See Manage Users for more information.
- Zuora displays the Client ID and Client Secret for the OAuth client. Copy and paste these details in a note when Zuora displays them (this aids in inputting them in the next step). This is the only time you can see the Client Secret.
- If the Client Id and Secret are not saved, or lost, you can simply remove the created OAuth client and create another one for the new Client ID and Client Secret.
-
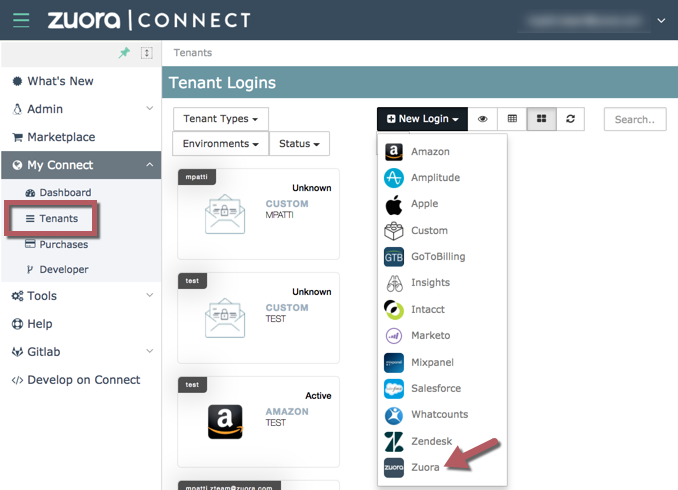
In Zuora Connect, navigate to My Connect > Tenants, then select Zuora from the New Login menu:

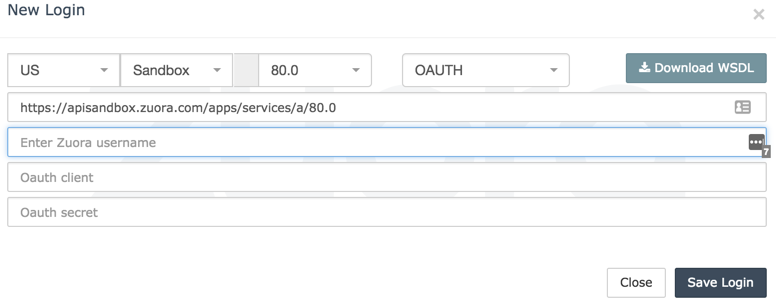
The New Login dialog box opens.
-
In the New Login dialog box:
- Select your Zuora tenant's data center and environment type.
- Select OAUTH from the drop-down menu.
- Enter the Client ID and Client Secret for the OAuth client.

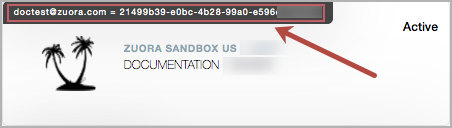
A tile for the new login displays on the Tenants page. An OAuth login has the token following the account name in the top of the tile.
When you install an app that uses OAuth, select the OAuth login in the New Configuration dialog box. See Install an App for more information.