Avalara for Brazil App
You can manage tax configurations easily and ensure compliance with local tax laws in Brazil using Avalara’s integration with Zuora Billing. With Avalara for Brazil tax engine, you can:
- Establish, modify, and manage tax configurations directly within the Zuora platform, eliminating the need for tax configurations in two separate platforms (Zuora Connect and Zuora Billing).
- Enhance security while maintaining flexibility and configurability.
- Monitor tax configurations through System Health.
- Utilize enhanced liquid templates for UI with request and tax previews.
Prerequisite
You must enable the Connect Tax Engine feature before using the Avalara Brazil tax app. If you do not have access to the sandbox and production environments for AvaTax Brazil, please contact Avalara Sales.
Setup Avalara for Brazil tax engine
Follow these steps to streamline your tax compliance process:
- Configure Avalara Brazil in Zuora Billing:
- Click Setup New Tax Engine and select Avalara Brazil from the dropdown list.
- Enter the following details:
- Engine Name - The name of the engine.
- Vendor - The name of the third-party vendor. By default, Avalara Brazil is displayed in the field.
- Environment - The environment where the tax engine will be applied.
- Authentication Type - OAuth 2.0 is the default authentication type. Enter the client ID and client secret from your tax vendor. Refer to Avalara Brazil's documentation for authentication setup. If you don't have access to the sandbox and production environments for AvaTax Brazil, please contact Avalara Sales.
Note: Avalara offers two environments for AvaTax Brazil: Sandbox and Production. Each environment operates independently, with its own set of credentials. Users with a Sandbox account cannot access Production, and vice versa.
- Adjust the Advanced Settings as needed.
Field Description Advanced Settings Tax Void Call Handling The option to determine whether the external Vendor must be voided. The available options are:
- Pass Through - No call will be made to the vendor; however, the Invoice Cancel Post will be successful (as it says Pass Through)
- Enable - A call will be made to the vendor.
- Block - No call will be made to the vendor, and it will return blocked (i.e., Invoice Cancel Post wouldn't be successful).
Netread Timeout The duration of time in minutes before the timeout occurs. Request Headers The option to add additional headers to your tax requests. While custom headers may not be frequently necessary, they prove beneficial in situations where authentication is required through firewalls or in other specific scenarios. Field Mappings The option to retrieve data from the tax engine response and store it on the Taxation Item object. For more information on Flexible Field Mapping, see Flexible Tax Mapping. Custom Fields The option to select existing custom fields for the tax engine. Company and Seller Information The option to add company code, name, and address. - Configure the template as required in the Request Template section. Click Use Default Template to use the preconfigured template. The Request Template, in Text/XML or Application/JSON format, is where Zuora populates invoice information based on your configuration.
- Click Save.
- Create and Activate Tax Code
- After configuring the tax engine, create and activate a tax code.
- Follow the steps in Set Up Tax Codes - Zuora.
- Associate Product Rate Plan Charge with Tax Code
- After configuring the tax engine, create and activate a tax code.
- Follow the steps in the Set up tax codes section.
- Generate Invoice
- Create a bill run for the test account and generate an invoice. For more information, see Creating Bill Runs.
- Verify that the tax value is correctly displayed on the invoice.
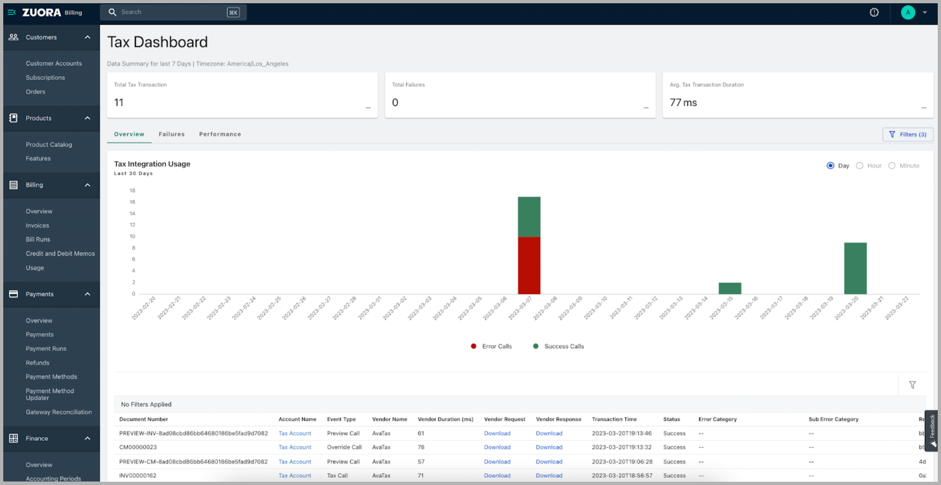
- View Tax Logs on System Health
- Navigate to the Tax Dashboard under System Health to review request and response logs from your new tax engine.
- Navigate to the Tax Dashboard under System Health to review request and response logs from your new tax engine.
- Settings API Quickstart
- Use the Settings API for CRUD actions related to tax engines.
- Create, update, get, and delete tax engines with the provided API endpoints. For more information, see Connect Tax Engines Settings.
- Setup Tax Codes with API
- After completing the configuration process, create a tax code with Settings API. For more information, see Set Up Tax Codes - Zuora.
curl --location 'https://rest.sandbox.eu.zuora.com/se...global-tax-hub' \
--header 'Authorization: Bearer ec165dca4d3842848e8224944aa9a843' \
--header 'Content-Type: application/json' \
--data '{
    "taxEngineId": "8a90a9b785947dfb0185949dd1231a36",
    "active": true,
    "description": "",
    "name": "TaxCode Name",
    "taxCompanyId": "8a90a9b786544a6901865cec97ae6a6c"
}'
- After completing the configuration process, create a tax code with Settings API. For more information, see Set Up Tax Codes - Zuora.
- Associate Product Rate Plan Charge with Tax Code (API)
- Associate a tax code with a product rate plan charge. For more information, refer to the following links:
- Generate Invoice
- Create a bill run for the test account and generate an invoice. For more information, see Creating Bill Runs.
Field Mappings between Zuora and Avalara Brazil
The following table shows how Zuora’s TaxationItem object fields map to Avalara Brazil fields:
| Zuora Field | Description and Mapping (Avalara Brazil Field) |
| name | taxType |
| locationCode | “” |
| jurisdiction | jurisdictionName |
| taxCode | Tax code of invoice item |
| taxCodeDescription | jurisdictionType |
| taxMode |
Tax mode applied to the invoice item. Note: This field is not extracted from Avalara’s response. All tax items under the same invoice item must share the same tax mode. Mixing inclusive and exclusive tax modes within the same invoice item is not supported. |
| taxRate |
Tax rate applied to the invoice item. This is mapped from the rate field in Avalara’s response, divided by 100. |
| taxRateType |
Type of tax rate. Zuora Billing always uses Percentage and cannot map to FlatFee. |
| taxRateDescription | citation |
| taxDate | This defaults to the invoice date and may differ based on configuration. For more details, see Configure tax dates. |
| taxAmount |
Tax Total tax amount applied to the invoice item. |
| exemptAmount |
BigDecimal.ZERO Exempt portion of the tax. |
| taxDescription |
Filtering informative items
Zuora automatically filters out taxation items where impactOnFinalPrice is Informative. In the Avalara response, the field impactOnFinalPrice can have values such as Included, Add, Subtracted, or Informative. Zuora filters out all tax detail items where impactOnFinalPrice = Informative, regardless of whether the tax amount is zero. Tax detail items with other values (Included, Add, or Subtracted) are retained, even if their tax amount is 0 or their accounting field is set to none.
Informative items are used only for reference and do not affect the calculation of charges or the final price. As a result, these items are not stored in Zuora.
Only taxation items that have a direct financial impact are retained in the system.
Sample response payload
"taxDetails": [
  {
    "jurisdictionName": "BRASIL",
    "jurisdictionType": "Country",
    "taxImpact": {
      "impactOnFinalPrice": "Informative",
      "impactOnNetAmount": "Informative",
      "accounting": "none"
    },
    "taxType": "cbs",
    "subtotalTaxable": 18.86,
    "rate": 0.009,
    "tax": 0.1697
  },
  {
    "jurisdictionName": "BRASIL",
    "jurisdictionType": "Country",
    "taxImpact": {
      "impactOnFinalPrice": "Included",
      "impactOnNetAmount": "Included",
      "accounting": "liability"
    },
    "taxType": "cofins",
    "citation": "Lei nº 10.833/2003, Artigos 1º e 2º",
    "subtotalTaxable": 21.99,
    "rate": 7.6,
    "tax": 1.6712
  },
  {
    "jurisdictionName": "RIO DE JANEIRO",
    "jurisdictionType": "City",
    "taxImpact": {
      "impactOnFinalPrice": "Included",
      "impactOnNetAmount": "Included",
      "accounting": "liability"
    },
    "taxType": "iss",
    "citation": "Decreto nº 10.514/1991, Artigo 19, Inciso I",
    "subtotalTaxable": 21.99,
    "rate": 5,
    "tax": 1.0995
  }
]
Tags recommended by the template: article:topic