Perform data backfill
On the Data Backfill page, you can perform data backfill to update the object records with necessary field values for revenue recognition, such as updating the booking date on a rate plan charge or updating the accounting codes on a product rate plan charge.
You can also view the backfill logs for your tenant.
To access the Data Migration page, click your username at the top right and navigate to Revenue > Data Backfill.
You must perform data backfill when enabling the Order to Revenue feature on an existing Billing tenant. Data backfill must be performed after configuring the revenue settings and before data migration. For more information about the required operation sequence, see Implementation guide.
Also, perform data backfill only once before your tenant goes live. If you perform data backfill again after your tenant goes live, data inconsistency will occur between Zuora Billing and Zuora Revenue.
If you see an error "timeout of 120000ms exceeded" or a similar message on the page, please do not retry immediately. We recommend that you wait for a while and check the page later. You will see that the corresponding job is in a processing state. For example, if you have more than 10 million subscription versions, you may need to wait for more than an hour.
Perform data backfill
You can perform the following data backfill actions:
- Use Charge Original Created on Date as Booking Date
If you became a Zuora customer after 2022, you do not need to perform the Use Charge Original Created on Date as Booking Date action.
- Update Product Rate Plan Charge
- Use Product Rate Plan Charge Revenue Related Fields Value for RPC
If there are any new data such as a new subscription version/RPC generated once an auto backfill job is submitted, it will not be covered.
-
Use Product Rate Plan Charge Revenue Related Fields Value for OLI
If there are any new data such as a new OLI generated once an auto backfill job is submitted, it will not be covered.
- Update Rate Plan Charge
- Update Invoice Item
- Update Credit Memo Detail
- Update Debit Memo Detail
- Update Invoice Item Adjustment
- Update Order Line Item
To update the booking date field with the charge's original created-on date, do the following:
- Go to the Select Data Backfill Action dropdown field, and select the Use Charge Original Create on Date as Booking Date action.
- Click Generate.
To update the fields other than the booking date, do the following:
- Go to the Select Data Backfill Action dropdown field, and select the update action that you want to perform, for example, Update Product Rate Plan Charge.
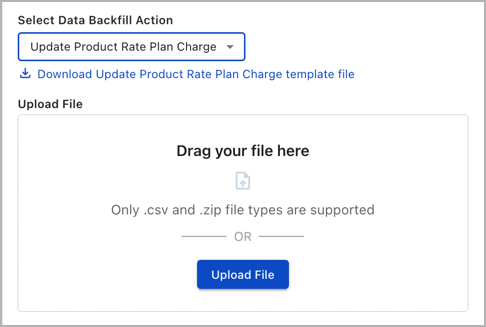
- Click the link below the preceding dropdown field to download the template for the corresponding update action.
- In the template file, add the necessary values that you want to update in the object records. Also, remove the field columns that you do not want to update. Note the following:
- Only the field columns predefined in the template can be updated in the data backfill. You cannot add new columns to extend the scope of fields for your data backfill.
- You can add read-only columns in the template by using a column name starting with #. These read-only columns do not affect the data backfill and are just used as reference fields in the template file. For example, you can add a column called # Product Rate Plan Charge Name to add corresponding product rate plan names for your reference. However, the product rate plan charge names appearing in this column will not be updated in the system's product rate plan charge records.
- If you do not want to update the field values for a predefined column in the template, you must remove the column from the template. Otherwise, null values in the predefined column of the template will be updated to the records during the data backfill.
- In the Upload File section, click the Upload File button to upload the template file.
- Click Generate.
As the data backfill starts, you can view the backfill progress and results in the Backfill Logs section. For more information, see View backfill logs.
If you choose the Use Product Rate Plan Charge Revenue Related Fields Value for RPC or Use Product Rate Plan Charge Revenue Related Fields Value for OLI data backfill action in the preceding step 1, the following Revenue related fields will be copied from the Product Rate Plan Charge object to the Rate Plan Charge (RPC) object or the Order Line Item (OLI) object:
- Exclude Item Booking from Revenue
- Exclude Item Billing from Revenue
- Right to Bill Flag
- Allocation Eligible
- Product Family
- Product Category
- Product Line
- Product Class
- Revenue Recognition Timing
- Revenue Amortization Method
View backfill logs
In the Backfill Logs section, you can view your backfill progress, results, and other information, as in the following diagram:

As the preceding diagram shows, you can see the following information for a data backfill:
- Backfill Action: the type of backfill action that you perform
- Uploaded File: When the data backfill is completed, you can download the file that you previously uploaded for data backfill. This file now contains the data backfill result for each record in the Success column of the file. For the record that fails to be updated, you can see the reason for failure in the Error Message column of the file.
- Start Date: the time that a data backfill starts
- End Date: the time that a data backfill ends
- Generated By: the user who performs the data backfill
- Records Processed: the number of records that have been processed in the data backfill
- Status: The result status of the data backfill. See the following table for all the possible statuses for a data backfill:
Status Description Accepted The booking date backfill action is triggered and ready for processing. Pending The file that you uploaded for data backfill is being validated. Processing The data backfill is in progress. Failed The data backfill has failed. Contact Zuora Global Support for more information. Completed The data backfill is completed. For a data backfill action for which you uploaded a file, you can now download the file and check the result for the data backfill.
You can also click the Action icon  to open the Backfill log details window and view more detailed information.
You can cancel a pending or progressing backfill job by clicking the Action icon and choosing Cancel.