Configure the Configurable Lockbox feature
Prerequisites
- You must have installed the Configurable Lockbox feature. For more information, see Install Zuora Collections Features.
- The feature must be created by using the OAuth credential. See Verify and update OAuth credentials for more information.
- If you need to split and apply a single check across multiple invoices or debit memos, you must specify the amount that will be applied to each billing document with the individual record in your input file. For example, if a $100 payment is to be evenly split across INV00000123 and INV00000456, the input file must contain one record for each of the invoices, i.e. $50 for INV00000123 and $50 for INV00000456. During the initial configuration of your lockbox file format, ensure the allocated amount for each invoice is appropriately mapped. The configurations can be updated according to your requirements.
Procedures
Complete these steps to configure a lockbox file format. Each step is elaborated in the following sections. You can have multiple lockbox file formats in one instance of Configurable Lockbox.
- Configure the basic settings of a bank file format.
- Map lockbox file headers to Zuora payment fields.
- Optional: Configure additional payment fields.
- Configure payment options.
- Configure additional app settings.
Step 1: Configure basic settings of a bank file format
-
On the Lockboxes tab, click the Add icon to start the configuration.

-
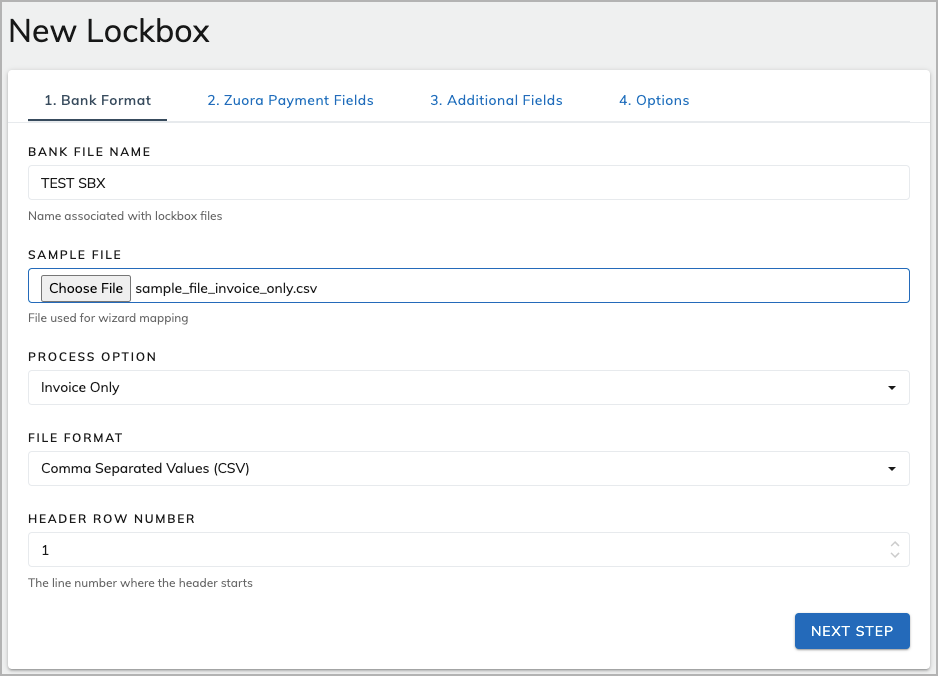
In the window that opens, complete the following configurations and click Next Step.
-
Bank File Name: Specify a name to identify the lockbox file format being created. It is recommended the name correspond to the bank from which the lockbox files are obtained.
For example, BoA, Wells Fargo, First Union, etc.
-
Sample File: Select a lockbox sample file to be uploaded. The sample file can be an actual lockbox file.
-
Process Option: Select the process option for the uploaded lockbox file.
-
Account Only: Payments will be made based on the account information in the lockbox file.
-
Invoice Only: Payments will be made based on the invoice information in the lockbox file.
-
Account and Invoice: Payments will be made based on both the account and the invoice information in the lockbox file.
If payments cannot be processed based on the invoice information (for example, the invoice number is incorrect), payments will still be processed based on the account information and processing rules. -
Document Only (Debit Memo and/or Invoice): Payments will be made based on billing documents including debit memo and/or invoice information in the lockbox file.
-
-
File Format - Identify the format of the file being uploaded. Additional fields may be required depending on the format selected.
File Format Settings Comma Separated Values (CSV) - Header Row Number: Identify the line number of the header row in the uploaded document.
- CSV file values separated by a semicolon will not be accepted.
Excel - Header Row Number: Identify the line number of the header row in the uploaded document
Bank Administration Institute 2 (BAI2) - Select Summary or Transaction
- Type Code List: Enter the list of type codes to be processed from bank file. Must be separated by a comma with no spaces. Codes not listed will not be processed.
Fixed Width Text - Single-Record Type - Column header: Define the field that will be defined in the selected sample file and file format: Invoice Number, Account Number.
- Starts from: Identify the character number that corresponds to where the information starts in the selected file.
- Ends at: Identify the character number that corresponds to where the information ends in the selected file.
- Add an additional row by selecting the + sign. Rows can be added if additional information is needed for mapping purposes.
Fixed Width Text - Multi-Record Type - Column header: Define the field that will be defined in the selected sample file and file format: Invoice Number, Account Number.
- Record type: Select the record type from the list or specify the record type. Only numeric values of 4, 5, and 6 are supported.
- Starts from: Identify the character number that corresponds to where the information starts in the selected file.
- Ends at: Identify the character number that corresponds to where the information ends in the selected file.
- Add an additional row by selecting the + sign. Rows can be added if additional information is needed for mapping purposes.
SWIFT Structured File Format - MT940 - Check Multiple Fields for Invoice or Account Number: Check the checkbox to select multiple lockbox file header fields for Invoice or Account Number or both in Zuora Payments Field. Check Multiple Fields for Invoice or Account Number checkbox is enabled only when you select Invoice Only or Account and Invoice option under the Process Option dropdown.
-
CSV file formats are preferred over Excel for data transfer because they store plain text, which helps to avoid errors from complex formatting, formulas, or hidden cells.
- Header row number: The number of header rows.
Empty rows below the header row in the sample file will prohibit sample values from being properly displayed.
Step 2: Map lockbox file headers to Zuora payment fields
-
Optional: If Invoice Only is selected as the process option, you can select which Zuora payment field to use to identify invoice numbers.
-
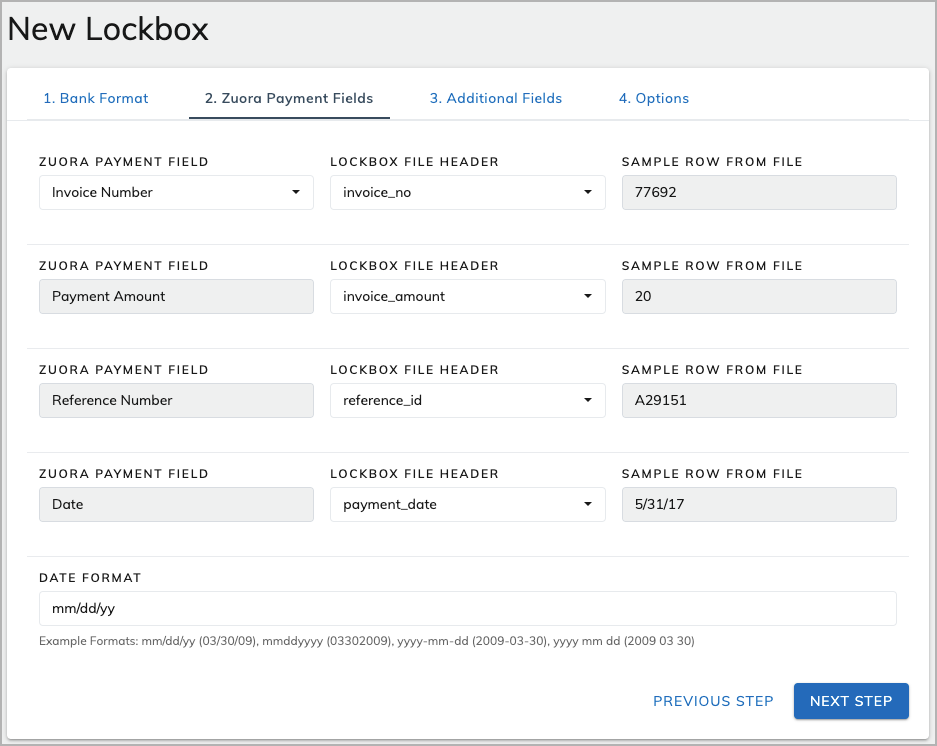
Select the auto-populated lockbox file headers from the uploaded file (Step 1) that best correlate to the Zuora payment fields. All fields are required.
The Sample Row From File will auto-populate with information from the uploaded file for an example and to ensure accuracy.
-
Click Next Step.
Step 3: Configure additional payment fields
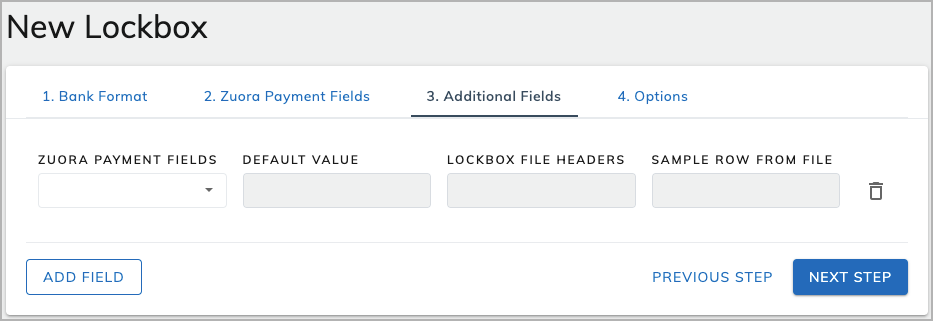
Additional Zuora payment fields, or custom fields, can be added to customize the lockbox file for tracking purposes. This step is optional and can be left blank if further fields are not needed.
-
Click Add Field to add a new custom field.
-
Select a Zuora payment field from the drop-down list, and select a lockbox file header from the dropdown list that correlates to the Zuora payment field. A Default Value can be added, but will nullify any lockbox file header selected.
The Sample Row From File will auto-populate with information from the uploaded file for an example and to ensure accuracy. -
Click Add Field to add a new custom field. Click the trash bin icon to remove a field.
-
Click Next Step when there are no further fields to be added.
Step 4: Configure payment options
Payment options vary according to the process option selected (Account Only, Invoice Only, Account and Invoice, or Document Only (Debit Memo and/or Invoice)).
Process Option: Account Only
-
Select the account document processing option.
- Unapplied Payment - Payments will be applied as an unapplied payment that is not attached to any billing documents. This option is applicable only if the Invoice Settlement feature is enabled for your Zuora tenant.
- Debit Memos Only - All payments will be applied to debit memos on the account. This option is applicable only if the Invoice Settlement feature is enabled for your Zuora tenant.
- Invoices Only - Payments will be made based on the invoice information in the lockbox file.
- Debit Memo First Then Invoices - Payments will be applied to all outstanding invoices and then to debit memos. This option is applicable only if the Invoice Settlement feature is enabled for your Zuora tenant.
- Invoices First Then Debit Memos - Payments will be applied to outstanding invoices and then debit memos. This option is applicable only if the Invoice Settlement feature is enabled for your Zuora tenant.
- Find Next Oldest Invoice or Debit Memo - Payments will be processed to the oldest debit memo or invoices and pay off in chronological order. This option is applicable only if the Invoice Settlement feature is enabled for your Zuora tenant.
If you have existing Lockbox files, take the following steps to modify your Account Only lockbox file formats:
- Click the Lockbox tab.
- Hover over the target lockbox file, and click
 on the far right.
 - Select Mappings and Options from the displayed menu.
- Click the Options tab. Then you can update your existing configuration.
-
Select the account overpayment option.
- Pay as Credit Balance on Account - Invoice payment will be processed and the remaining balance will become a credit on customer’s account.
- Reject Lockbox Record - Payment will not be accepted by the system.
-
Specify a payment method:
- Cash
- Check
- Wire Transfer
- Other
-
Optional: Select Lenient Matching.
Lenient matching helps avoid unnecessary error reports by matching lockbox invoice and account numbers to Zuora fields without using standard or exact numbers. Zuora recommends that lenient matching is enabled.
Lenient matching follows these rules:-
Lenient matching is only applicable for Invoice Only or Account Only processing.
-
Invoice and account numbers cannot have more than 8 digits. Otherwise, the file will be rejected.
-
If an invoice or account number includes less than 8 digits, the system will add in necessary 0s in front of the number so that all invoice or account numbers have 8 digits.
-
You can also enter multiple invoice prefixes separated by a comma.
For example, if an invoice in the lockbox file is listed as 1234, lenient matching will recognize the invoice as INV00001234 or ABC00001234 or XYZ00001234.
-
-
Optional: If you use the Invoice Settlement feature, select Invoice Settlement.
It must be enabled if the feature is supported. For more information about this feature, see Invoice Settlement for more information. -
Optional: Select File Processing Review.
If this option is enabled, you can review the ingested payment records before payments are processed. The files to be reviewed will remain in the Paused status until you take further review actions. See View lockbox runs for details about how to review the payment records on the Runs tab. -
Click Create Lockbox.
Process Option: Invoice Only
-
Configure the overpayment behavior. Overpayment refers to a scenario in which the payment amount is greater than the invoice amount.
- Reject Lockbox Record - Payment will not be accepted by the system.
- Pay as Credit Balance on Account - Invoice payment will be processed and the remaining balance will become a credit on customer’s account.
- Find Next Oldest Invoice (if none, create credit) - Current invoice will be paid and the remaining balance will be applied to the most recent outstanding invoice. If there is no outstanding invoice, the balance will be placed on the account as a credit.
-
Configure the underpayment behavior. Underpayment refers to a scenario in which the payment amount is less than the invoice amount.
- Reject Lockbox Record - Payment will not be accepted by the system.
- Process Lockbox Record - Payment will be processed by the system with an outstanding balance remaining on customer’s account.
-
Specify the invoice number prefix, which is the input prefix used in invoice numbering. You can also enter multiple invoice prefixes separated by a comma.
For example, company Z identifies their invoices by company-specific invoice numbering of ZCODE11223344 or ZCODE00001234. Invoice Number Prefix: ZCODE.
-
Identify Payment Method
- Cash
- Check
- Wire Transfer
- Other
-
Optional: Select Lenient Matching
Lenient matching helps avoid unnecessary error reports by matching lockbox invoice and account numbers to Zuora fields without using standard or exact numbers. Zuora recommends that lenient matching is enabled.
Lenient matching follows these rules:-
Invoice and account numbers cannot have more than 8 digits. Otherwise, the file will be rejected.
-
If an invoice or account number includes less than 8 digits, the system will add in necessary 0s in front of the number so that all invoice or account numbers have 8 digits.
-
For example, an invoice in the lockbox file is listed as 1234, lenient matching will recognize the invoice as INV00001234.
-
-
Optional: If you use the Invoice Settlement feature, select Invoice Settlement.
It must be enabled if the feature is supported. For more information about this feature, see Invoice Settlement for more information. -
Optional: Select File Processing Review.
If this option is enabled, you can review the ingested payment records before payments are processed. The files to be reviewed will remain in the Paused status until you take further review actions. See View lockbox runs for details about how to review the payment records on the Runs tab. -
Click Create Lockbox.
Process Option: Account and Invoice
When this processing option is selected, payments will be processed based on both invoice rules and account rules. If payments cannot be processed based on the invoice information (for example, the invoice number is incorrect), payments will still be processed based on the account information and processing rules.
-
Select the invoice overpayment behavior. Overpayment refers to a scenario in which the payment amount is greater than the invoice amount.
- Reject Lockbox Record - Payment will not be accepted by the system.
- Pay as Credit Balance on Account - Invoice payment will be processed and the remaining balance will become a credit on customer’s account.
- Find Next Oldest Invoice (if none, create credit) - Current invoice will be paid and the remaining balance will be applied to the most recent outstanding invoice. If there is no outstanding invoice, the balance will be placed on the account as a credit.
-
Select the Invoice underpayment behavior. Payment amount is less than the invoice amount.
- Reject Lockbox Record - Payment will not be accepted by the system.
- Process Lockbox Record - Payment will be processed by the system with an outstanding balance remaining on customer’s account.
-
Select the account document processing option.
- Unapplied Payment - Payments will be applied as an unapplied payment that is not attached to any billing documents. This option is applicable only if the Invoice Settlement feature is enabled for your Zuora tenant.
- Invoices Only - Payments will be made based on the invoice information in the lockbox file.
-
Select the Account Overpayment Option.
-
Pay as Credit Balance on Account - Invoice payment will be processed and the remaining balance will become a credit on customer’s account.
-
Reject Lockbox Record - Payment will not be accepted by the system.
-
-
Identify the payment method.
- Cash
- Check
- Wire Transfer
- Other
- Optional: Enable Process by Invoice First.
When this option is enabled, the payment will be made against the invoice first and then against the account. -
Optional: If you use the Invoice Settlement feature, select Invoice Settlement.
It must be enabled if the feature is supported. For more information about this feature, see Invoice Settlement for more information. -
Optional: Select File Processing Review.
If this option is enabled, you can review the ingested payment records before payments are processed. The files to be reviewed will remain in the Paused status until you take further review actions. See View lockbox runs for details about how to review the payment records on the Runs tab. -
Click Create Lockbox.
Process Option: Document Only (Debit Memo and/or Invoice)
-
Configure the overpayment behavior. Overpayment refers to a scenario in which the payment amount is greater than the debit memo/invoice amount.
- Reject Lockbox Record - Payment will not be accepted by the system.
- Pay as Credit Balance on Account - Debit memo/invoice payment will be processed and the remaining balance will become a credit on customer’s account.
- Find Next Oldest Document of Same Type (if none, create credit) - Current debit memo/invoice will be paid and the remaining balance will be applied to the most recent outstanding billing document of the same type. If there is no outstanding debit memo/invoice, the balance will be placed on the account as a credit.
-
Configure the underpayment behavior. Underpayment refers to a scenario in which the payment amount is less than the debit memo/invoice amount.
- Reject Lockbox Record - Payment will not be accepted by the system.
- Process Lockbox Record - Payment will be processed by the system with an outstanding balance remaining on customer’s account.
-
Specify the debit memo number prefix, which is the input prefix used in debit memo numbering. You can also enter multiple invoice prefixes separated by a comma.
For example, company Z identifies their debit memo by company-specific debit memo numbering of DMCODE11223344 or DMCODE00001234. The debit memo prefix is DMCODE.
-
Specify the invoice number prefix, which is the input prefix used in invoice numbering. You can also enter multiple invoice prefixes separated by a comma.
For example, company Z identifies their invoices by company-specific invoice numbering of ZCODE11223344 or ZCODE00001234. The invoice number prefix is ZCODE.
-
Identify Payment Method.
- Cash
- Check
- Wire Transfer
- Other
-
Optional: If you use the Invoice Settlement feature, select Invoice Settlement.
It must be enabled if the feature is supported. For more information about this feature, see Invoice Settlement for more information. -
Optional: Select File Processing Review.
If this option is enabled, you can review the ingested payment records before payments are processed. The files to be reviewed will remain in the Paused status until you take further review actions. See View lockbox runs for details about how to review the payment records on the Runs tab. -
Click Create Lockbox.
Step 5: Configure additional lockbox settings
After the initial configuration is completed for a lockbox, you can configure payment field mapping, SFTP upload credential and schedule, and notification settings.

-
Mappings and Options - Optionally, adjust the mapping relationships that are configured in Step 2.
-
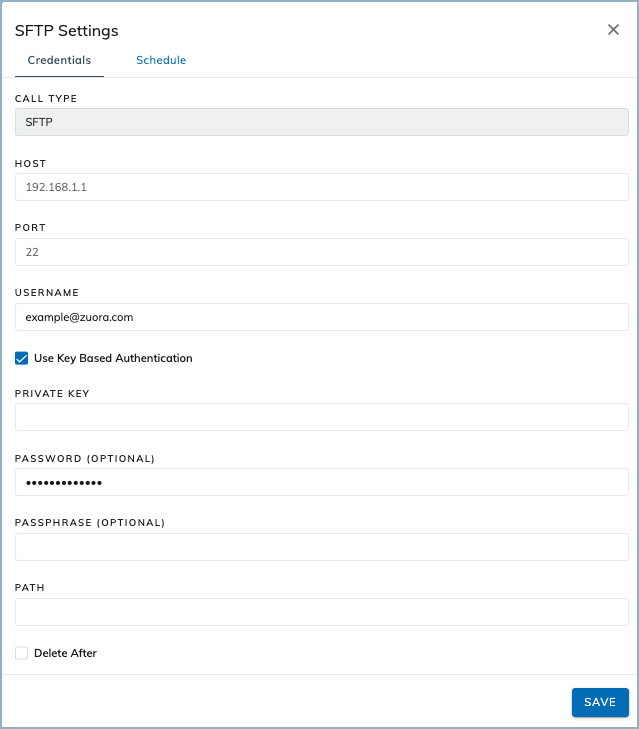
SFTP Settings - Configure the SFTP server that stores lockbox files and a schedule to download files from the server.
Complete Credential details:
- Host - Enter the IP address of the SFTP server.
- Port - Enter the port number of the SFTP server.
- Username - Enter the username to authenticate to the server.
- Use Key Based Authentication - Specify whether to use the key-based authentication.
- Password - If Use Key Based Authentication is not checked, you must enter the password of the user. If Use Key Based Authentication is checked, you can optionally enter the password of the user.
- Private Key - If Use Key Based Authentication is checked, you must enter the private key of the user.
- Passphrase - If Use Key Based Authentication is checked, you can optionally enter the passphrase of the user.
- Path - Identify the location of the lockbox files. The path provided should be a directory path because the feature can fetch multiple files from the directory. For example, /outbound/LBX01. The uploaded file format for Fixed Width Text - Single-Record Type (FWTSR) and Fixed Width Text - Multi-Record Type (FWTMR) should be a .txt file.
- Delete After - Select whether lockbox file should be deleted after being obtained.
SFTP will continue to run until the folder is empty.
Click Save.
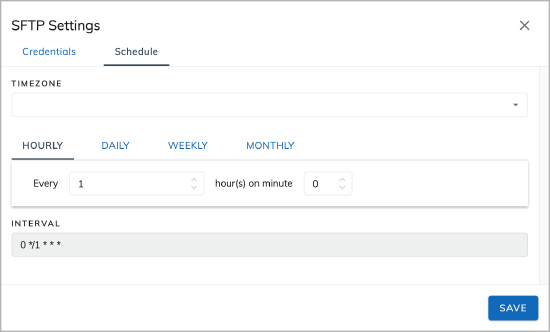
Optionally, complete the Schedule details. If no schedules are defined, you can manually download lockbox files by selecting Run Automated File Download from the menu of the lockbox.
-
Timezone - Select the same time zone as for the tenant to avoid payment errors
-
Select to begin schedule builder - Identify time frame of run schedule
Yearly, Monthly, Weekly, Daily, Hourly, Minutes
Complete specific time frame details. Start times are in military time.
For example, company Z will perform a monthly lockbox run at the beginning of the third day of the month.
-
Select to begin schedule builder: Monthly
-
Complete Specific Details for Monthly builder:
- Select Day 3 (input data) of every 1 (input data) month(s)
- Start Time: 00:01
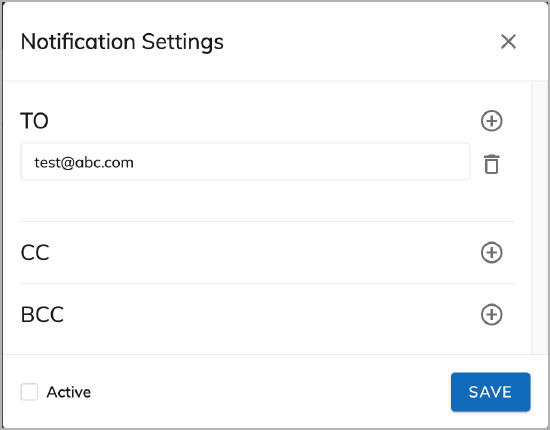
Notification Settings - Specify emails to receive notification of completed runs. The To line is required.
