Set up data augmentation rule
The purpose of data augmentation is to modify the transaction source data before the data collection process starts in Zuora Revenue. Set up data augmentation rules according to your business needs. The following types of data augmentation rules can be defined in Zuora Revenue.
| Rule type | Description |
|---|---|
| Advanced Rule | This type of data augmentation rules updates the same target field to different values for different lines. You use a rule set to define the criteria to filter the lines and the corresponding target value. |
| Clear Value | This type of data augmentation rules clears an attribute value for the filtered lines. |
| Constant | This type of data augmentation rules updates an attribute value to a specified constant value for the filtered lines. |
| Formulae | This type of data augmentation rules updates an attribute value based on a formula for the filtered lines. |
| Lookup | This type of data augmentation rules updates an attribute value based on a lookup. For example, if a reference field is found to be the specified reference value, the system will update the target field to the specified target value. |
Prerequisites
Before you set up the data augmentation rule, complete the following steps:
- Add RPRO_RC_TRNSLTR_RULE_PKG.trnsltr_rule_wrapper as a processor to use the defined data augmentation rule.
- Navigate to Setups > Application.
- Click
 to open the side menu and then click Pre/Post Processor.
 - To add a processor, click the New Processor icon
 .
. - In the New Processor window, specify a unique procedure name, select RC_COLLECT for the Object Type field.
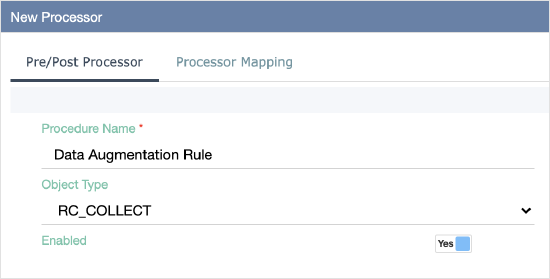
- Ensure the Enable switch is toggled to Yes and then click the save icon
 .
. - Click the Processor Mapping tab to add a procedure.
- Click
 to add a row. Select Procedure for the Processor Type column, enter RPRO_RC_TRNSLTR_RULE_PKG.trnsltr_rule_wrapper in the Processor Object column and select Before Validate for the Stage Name column.

- Click the save icon
 and close the window.
- Enable the CUSTOM_CODE_ALLOWED profile.
- Navigate to Setups > Application.
- Click to open the side menu and then click Profiles.
- Find the CUSTOM_CODE_ALLOWED profile and make sure the system-level value of this profile is Yes.
Procedure
Complete the following steps to set up data augmentation rules:
- Navigate to Setups > Data Augmentation.
- To add a data augmentation rule, click the New Rule icon .
- In the New Data Augmentation window, specify the following information:
Field name Description Book Name Select the name of the primary revenue book. The augmented data for the primary book will be copied to any other additional (non-primary) revenue books. Sequence Sequence to apply data augmentation rules. Rule Name Enter a unique name of the data augmentation rule. Start Date Enter a start date for the data augmentation rule. It is important to note that the data augmentation rule becomes effective at the beginning of the next accounting period following the start date. For example, if the start date is January 15, 2020, the rule will be effective starting February 1, 2020. To make the data augmentation rule effective immediately, choose a start date in the prior accounting period. Description Enter a description for the data augmentation rule. End Date Optionally enter the end date. Enabled Toggle to Yes to enable the data augmentation rule. Processor Type Select RC_COLLECT. Stage Name Select the appropriate stage to apply the data augmentation rule. - Click the save icon . The data augmentation rule is created.
- In the Conditions tab, to add a rule, click
 and then complete the following steps depending on your selection in the Rule Type column:
Rule Type Substeps Advanced Rule - In the Rule Type column, select Advanced Rule.
- In the Field to be Updated column, select the name of the field whose value is to be changed.
- In the Start Date column, specify the effective start date of this rule type.
- (Optional): In the End Date column, specify the effective end date.
- In the Enabled column, ensure this rule is enabled.
- Click
 in the Actions column. The Advanced Rule window is displayed.
 - In the Advance Rule Set section, click to add a row.
- In the Rule Set column, specify a meaningful name and then enter the new value to be set in the Target Value column.
- To save this rule set, click
 .
. - In the Advanced Rule Filters section, define the condition to filter the lines for which the new value is to be set. Click to add a row. You can create more than one line and use the Seq column to determine the sequence of these filter conditions.
- To save the filter conditions, click . A rule set is defined. The value specified in the Target Value column will be set for the lines that satisfy the filter conditions in the Advanced Rule Filters section.
- If you want to update the same field to another value for other lines. Repeat Step d - h to define another rule set.
- After you are done, click save and close the window.
Clear Value - In the Rule Type column, select Clear Value.
- In the Field to be Updated column, select the name of the field whose value is to be cleared.
- In the Start Date column, specify the effective start date of this rule type.
- (Optional): In the End Date column, specify the effective end date.
- In the Enabled column, ensure this rule is enabled.
- To save this rule, click .
- Click the Filters tab to define the conditions to filter the lines whose values are to be cleared.
- Click to add a row. You can create more than one line and use the Seq column to determine the sequence of these filter conditions.
- After you are done, click and close the window.
Constant - In the Rule Type column, select Constant.
- In the Field to be Updated column, select the name of the field whose value is to be changed.
- In the Target Value column, enter the new value to be set
- In the Start Date column, specify the effective start date of this rule type.
- (Optional): In the End Date column, specify the effective end date.
- In the Enabled column, ensure this rule is enabled.
- To save this rule, click .
- Click the Filters tab to define the conditions to filter the lines whose values are to be cleared.
- Click to add a row. You can create more than one line and use the Seq column to determine the sequence of these filter conditions.
- After you are done, click and close the window.
Formulae - In the Rule Type column, select Formulae.
- In the Field to be Updated column, select the name of the field whose value is to be changed.
- In the Start Date column, specify the effective start date of this rule type.
- (Optional): In the End Date column, specify the effective end date.
- To specify the formula for calculating the target value, click in the Actions column.
- In the Formulae window, specify the formula by using the listed columns, keypad characters, and functions, and then close the window. The formula is displayed in the Expression column.
- In the Enabled column, ensure this rule is enabled.
- To save this rule, click .
- Click the Filters tab to define the conditions to filter the lines whose values are to be cleared.
- Click to add a row. You can create more than one line and use the Seq column to determine the sequence of these filter conditions.
- After you are done, click and close the window.
- Click the Filters tab to define the conditions to filter the lines whose values are to be cleared.
- Click to add a row. You can create more than one line and use the Seq column to determine the sequence of these filter conditions.
- After you are done, click and close the window.
Lookup - In the Rule Type column, select Lookup.
- In the Lookup Type column, select the lookup type. To create a new lookup definition, select New_Look.
- In the Start Date column, specify the effective start date of this rule type.
- (Optional): Specify the effective end date in the End Date column.
- Click in the Actions column to specify the lookup. The Lookup window is displayed.
- If you are creating a new lookup, specify the lookup name in the Lookup Type Name field.
- In the Lookup Fields section of the window, click
 to add a row.
 - Provide a unique name in the Name column.
- Specify at least one lookup field name in the Reference Field column and one filed name in the Target Field column. You can specify up to 5 reference fields and 5 target fields.
- Click in the Lookup Fields section.
- In the Lookup Values section, specify the values for the lookup fields in the Reference Value and Target Value columns respectively. If the reference field of a line is found to be the specified reference value, update the target field to the target value.
- Click to save your settings.
- Repeat Step c ~ j to create as many lookup rule sets as you need, and then close the window.
- Ensure this rule is enabled in the Enabled column and close the window.
- In the Edit Data Augmentation Rule window, if the SQL statement is used for the Target Value column, click Validate SQL Statements for validation.
- Click the save icon and close the window.