Transfer journal entries to general ledger
With Zuora Revenue, you can transfer either the journal entries that are created by Zuora Revenue or the journal entries that are manually uploaded to the general ledger. The netting entries and long-term/short-term reclassification entries can also be transferred during this process.
For MJEs that are created by linking a revenue contract line in Zuora Revenue, the journal entries will be posted like revenue schedules, which are not to be selected or transferred in a transfer batch by using the JE Batch Id value in the procedure below.
Configuration requirements
For the transfer accounting functionality to work, you must configure the related lookup and profiles and lookup appropriately.
It is recommended that you complete the configuration in a testing environment and make sure the transfer accounting functionality works well before the configuration is moved to the production environment.
Profiles
Refer to the following table to find a detailed description of each related profile (Setups > Application > Profiles).
| Profile name | Description |
|---|---|
| POST_SCHEDULES |
Use this profile to enable posting of the regular journal entries (revenue and/or allocation schedules) that are created by Zuora Revenue to the general ledger. When this profile is toggled to Yes, the regular schedules can be posted to the general ledger. |
| POST_MANUAL_JE_SCHEDULES |
Use this profile to enable posting of the journal entries that are manually uploaded to Zuora Revenue. When this profile is toggled to Yes, the manual journal entries can be posted to the general ledger. Otherwise, the manual journal entries will not be posted and the posting batch status will be displayed as NO DATA FOUND on the Accounting/Transfer Accounting page. |
| WEB_SERVICE_ENABLED |
Use this profile to enable a separate web service to post the journal entries. When this profile is toggled to Yes, after the transfer accounting process is completed in Zuora Revenue, the batch status will be displayed as READY TO TRANSFER on the Accounting/Transfer Accounting page. Then, a separate web service can be started to transfer the journal entries from the Zuora Revenue server to your system. |
| GENERATE_FILE_TRNSFR_BATCH |
When the WEB_SERVICE_ENABLED profile is toggled to Yes, use this profile to specify whether to create a file on the Zuora Revenue server after the transfer accounting process is completed. After the file is created, the outbound web service can be started to transfer the file from the Zuora Revenue server to your system. |
| SUMMARY_TRANSFER |
Use this profile to enable the journal entries to be transferred at the summary level based on the field grouping. When this profile is toggled to Yes, the transaction accounting records will be transferred in groups based on the field grouping at the summary level. Otherwise, the transaction accounting records will be transferred as standalone entries. |
| DO_TRANSFER_VALIDATION |
Use this profile to enable validation against the journal entries during the transfer accounting process. When this profile is toggled to Yes, the transfer hold will be applied in one of the following circumstances:
|
| VALIDATE_UNPOSTED_TRXNS |
Use this profile to enable validation against the unposted journal entries during the closing period process. |
| STOP_BATCH_ON_ERROR |
When the DO_TRANSFER_VALIDATION profile is toggled to Yes, use this profile to specify whether to stop the whole posting batch if any journal entry fails the validation. When this profile is toggled to Yes, transfer accounting cannot be performed for the whole batch if any journal entry fails the validation. Otherwise, the journal entries that pass the validation can still be posted. |
| ENABLE_GL_LINK |
This profile is used for the summary-level posting where the line-level posting is grouped based on selected fields. When posting is done at the summary level, use this profile to enable drilling down the grouped transaction lines. |
| ADJUST_UNBALANCED_CR_DR |
When posting is done in the functional currency, there might be some unbalances between the accounted DR and the accounted CR due to exchange rates. Use this profile to specify whether to create an entry to adjust the balances and then post them to the general ledger. |
| COMPRESS_XFER_REP_FILE_OUTPUT |
Use this profile to indicate whether to do file compression before the accounting transfer. The default value is Y for yes. This profile is available only in version 37.002.00.00 and later versions. |
| ENABLE_GL_LINK |
The profile value, This profile is hidden in Sandbox and Production environments. If you require this functionality, please reach out to Zuora Global Support to enable this profile.
|
Lookups
In addition to profile configuration, you must also define the TRANSFER_BATCH_CRITERIA lookup. This profile defines the fields that can be selected for filter criteria when you create a transfer batch.
- Navigate to Setups > Application > Lookups.
- Locate the TRANSFER_BATCH_CRITERIA lookup on the list.
- Hover the mouse over the line and click the Edit Lookup Definitions icon
 .
. - In the Edit Lookup Definition window, click
 to create a line and define the field. The lookup values will be displayed for your selection when you create a filter for a transfer batch in the following procedure. Only the journal entry that satisfies the filter criteria will be transferred. The following fields are typically used:
- Book name
- Period name
- JE name
- JE batch ID
- Schedule type
- RC ID
- Add as many fields as you need.
- Click
 and close the window.
Interface mapping
The interface mapping determines the fields to be transferred from Zuora Revenue to the general ledger. The interface mapping is usually set up during the Zuora Revenue implementation process. To add or change any field to be transferred, complete the following steps:
- Navigate to Setups > Application.
- Click
 to open the side menu and then click Interface Setup.
 - In the GL Mapping tab, add one line for each field to be transferred or edit an existing line.
- To add a line, click
 .
. - On the new line, select one field for the Interface Field column. The listed fields are in the RPRO_GL_INT_STAGE table. Only the selected fields will be populated in the RPRO_GL_INT_STAGE table and then posted to the general ledger.
- In the Source From column, select the source for the field. The following types are supported.
Source Description Example Constant A constant value is transferred for the field. You must specify the value in the Constant Value column. Interface Field Name: Attribute1
Source From: Constant
Constant Value: 'REVPRO'
Dynamic A dynamic value is transferred for the field. You must specify an SQL statement in the Source SQL column. Interface Field Name: Transaction Date
Source From: Dynamic
Source SQL: Select 'SYSDATE' FROM DUAL
Expression An expression is used to calculate the value for the field. You must specify an SQL statement in the Source SQL column. Interface Field Name: Transaction Date
Source From: Expression
Source SQL: Select 1 FROM DUAL
Transaction A transaction attribute is transferred for the field. You must select the source field of the transaction in the Source Field column. Interface Field Name: Transaction Date
Source From: Transaction
Source Field: Line Rc Id
- In the Display Sequence column, specify the number to indicate the sequence that you want to display the transferred fields in the GL.
- (Optional): In the Display Label column, specify a meaningful label for the transferred field in the GL.
- Use the Enabled and/or Required columns to indicate whether the field is to be transferred and/or required during the transfer process.
- To add a line, click
Known limitations
When you do the above configurations, be aware of the following limitation:
- If both the SUMMARY_TRANSFER and the MJE_SUMMARY_TRANSFER profiles are set to Yes, GL/Manual JE mapping should not have "Dynamic" or "Expression" in the amount-based fields and the source must always be from "Transaction". Zuora Revenue is applying functions to the amount-based fields for the summarized posting.
- A transfer batch in Zuora Revenue must have either an MJE or a Revenue Contract schedule and must not be posted together.
- The Transfer Accounting report mapping of columns must be the same for GL and MJE.
- The Transfer Accounting Master is not compatible at a global level.
Procedure
Complete the following steps to transfer the journal entries from Zuora Revenue to the general ledger:
- Navigate to Accounting > Transfer Accounting.
- To create a new transfer batch, click the New Batch icon
 . The New Transfer Batch window is displayed.
 - In the Batch Name field, specify a unique batch name and then select the appropriate revenue book from the Book Name list.
- Click
 . The transfer batch is created and its status is displayed as NEW.
 - Click the Filters tab and specify the conditions to filter out the specific journal entries to be transferred:
- Click
 to add a line.
 - In the Name column, select the field name to be used as the filter. The available fields are defined by the TRANSFER_BATCH_CRITERIA lookup.
- Use the combination of the Operator column and the Operand column to specify the criterion that the journal entry must satisfy to be transferred.
The operand value must be embraced by single quotation marks (''). Separate multiple values by commas.
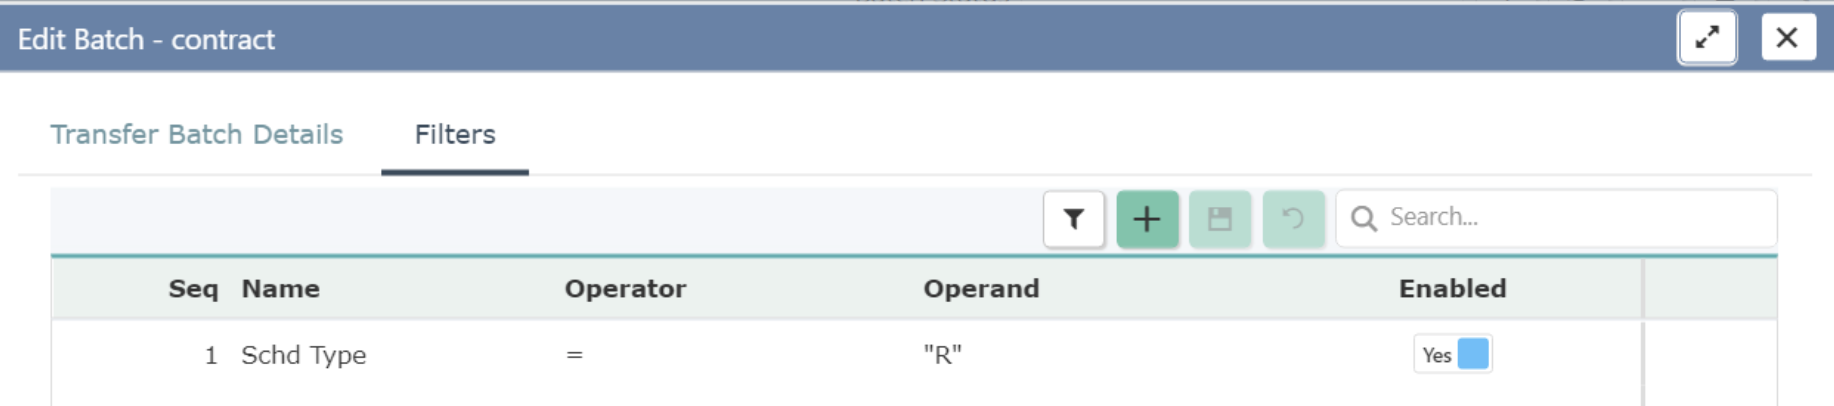
- Make sure the criterion line is enabled. For example, you can add a line as shown in the following graphic to filter out the journal entries with the schedule type being R. So that only the journal entry that satisfies this criterion will be identified and transferred.
- Repeat the above steps to add as many criteria as you need and use the Seq column to determine the sequence to apply them.
- After you specify all the criteria, click
 and close the window.
- Click
- On the Transfer Accounting page, hover the mouse over the transfer batch line that you just created and click the Update icon .
- In the pop-up window, confirm that you want to update the batch by clicking OK. The RevPro3.0 Accounting Transfer program is started.
If the status shows NO DATA FOUND, it means either there is no journal entry to be transferred or the specified filter criteria are not correct.
After the program completes, the batch status changes to UPDATED on the Transfer Accounting page. It means the POST_BATCH_ID field in the RPRO_RC_SCHD_G table has been updated with the transfer batch ID for the filtered schedules. However, the accounting data has not been transferred so the first letter of the INDICATOR field value is N.
- To transfer the accounting entries, hover the mouse over the line again and then click the Transfer icon
 .
. - Confirm that you want to transfer the batch by clicking OK in the pop-up window.
Additional Capabilities (37.014.00.00 and onwards)
The Following enhancements are available in Transfer Accounting to enable you with self-serve capabilities on the Transfer Accounting process:
| Enhancements | Description |
| Timing of status change |
Before 37.014.00.00, the status moved to Ready to Transfer during the outbound file generation process. If an outbound integration is triggered immediately, it will result in a file not found error. 37.014.00.00 onwards, the status will change to Ready to Transfer only after the outbound file generation process completes, thus resolving the issue. |
| Regeneration of GL files |
You can regenerate your file when the status is READY TO TRANSFER or S3 FILE UPLOAD ERROR. Click the Regenerate icon, select the applicable action from the options below, and click the Save icon.
The WEB_SERVICE_ENABLED profile must be configured to yes to enable this feature. |
| Manual status change for accounting batch |
To change the status of your accounting batch from Transferred to Ready to Transfer, click the Update Status icon and click Update Status. This action will make the batch eligible for outbound integration.
|
| Currency rounding | Zuora Revenue GL Transfer will now handle currency rounding based on the precision defined in the currency setup. |
| Downloadable GL outbound file |
To download a GL outbound file, click the Download icon.
This feature applies to files in READY TO TRANSFER or TRANSFERRED status. The WEB_SERVICE_ENABLED profile must be configured to yes to enable this feature. |


What to do next
When the transfer accounting process completes, the batch status on the Transfer Accounting page changes to TRANSFERRED. You can review the batch data by hovering the mouse over the batch line and clicking one of the following icons:
-
Review Summary
 : View a high-level summary of the transferred accounting entries in the Transferred Summary window. You can also export or download the summary data depending on the number of accounting entries. If you click the download icon, you will be directed to the report download page to access the file containing the transferred accounting entries.
 -
Review Detail
 : View the details of each transferred accounting entry in the Transferred Details window. You can also export or download the details depending on the number of accounting entries. If you click the download icon, you will be directed to the report download page to access the file containing the transferred accounting entries.
 -
To customize the fields that are displayed for the review summary or details, create your own layout to use in the Transferred Summary or Transferred Details window. For more information, see Configure the layout for transfer accounting review.
-
View Log
 : If the batch status shows ERRORS, click this icon to view the error messages during the transfer progress in the View Log window. To fix any error that occurs, edit the batch and then update the batch by clicking the Update icon to start the transfer accounting progress again.