Document Generation with S-Docs
Overview
With S-Docs, you can create documents quickly, easily, and more securely using the Salesforce Platform. You can create refined documents that reduce errors, increase efficiency, and eliminate tedious tasks. Since S-Docs is completely native to Salesforce, it acts like a natural extension of the Salesforce UI. Due to its 100% native nature, sensitive data never leaves Salesforce. With S-Docs, traditional templates (e.g. existing MS Word or PDF files) are not used, but instead, you can design your own templates with all the merged fields across Salesforce S-Docs Template records.
To use S-Docs, you must configure templates related to your custom or standard objects. Multiple templates can be configured, and you can select one to generate the document in the process.
The following articles will help you gain a better understanding of S-Docs installation and configuration, as well as guide you through the process of creating and setting up templates:
- S-Docs Quick Install & Configuration: This article provides step-by-step instructions on how to install and set up S-Docs in your Salesforce org. It covers the prerequisites, installation process, and initial configuration steps.
- Create Templates in S-docs: This article explains how to create templates in S-Docs.
- S-Docs Sample Template Code Library: This article provides examples of S-Docs template codes.
- Import Microsoft Word templates into S-Docs: This article explains how to import existing Microsoft Word (DOC) templates into S-Docs using the Paste From Word button in the S-Docs template editor.
- S-Docs - Display record for unrelated objects: This article explains how to display a record for objects that do not have a direct relation with each other.
- Explore the Possibilities with S-Docs: This comprehensive article provides various capabilities and features offered by S-Docs, a document generation and automation solution integrated with Salesforce.
S-Docs is currently available for users who have adopted the new CPQ X Quote Studio UI.
This guide will walk you through how to set up S-Docs integration.
S-Docs Quick Install & Configuration
To install and configure S-Docs in Salesforce, complete the following steps:
Step 2: Install S-Docs license key
Step 3: Add lookup field to allow relationship linking
Step 4: Add S-Docs Action Button to Quote Object Page Layout
Step 1: Install S-Docs
Take the following steps to install S-Docs:
- Navigate to AppExchange Marketplace, click Get It Now button from the S-Docs.
- Select Install for All Users and then click Install. S-Docs is now installed in your org.
Step 2: Install S-Docs license key
With an S-Docs license key, you can begin using S-Docs' robust features and functionality.
To obtain a License Key, please contact Zuora Global Support after installing the S-Docs package.
The following external S-Docs documentation demonstrates installing your license key: Install & Renew Your S-Docs License Key.
Only versions released before S-Docs Fall '24 (8.0) require S-Docs license keys.
Step 3: Add lookup field to allow relationship linking
This step allows you to link the S-Doc to the Custom object for easy access to all S-Docs created on your Custom Object's page layout.
- In the Setup menu, navigate to the object manager and select SDoc Template.
- Click Fields & Relationships in the sidebar.
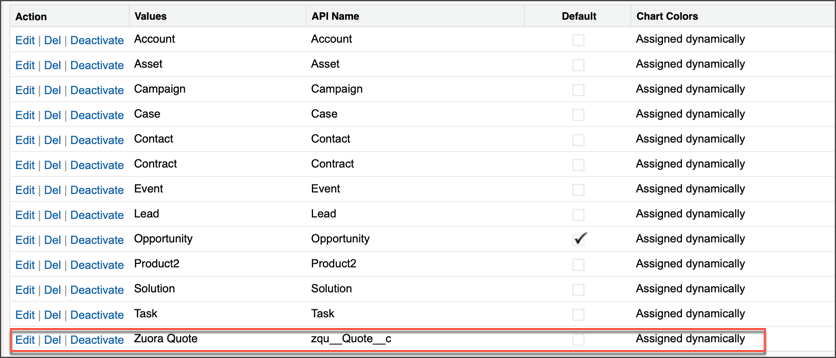
- Pick Related To Type (SDOC__Base_Object__c).
- Add Zuora Quote entry as shown below.
Step 4: Add S-Docs Action Button to Quote Object Page Layout
Once you save the S-Docs Action button, you'll need to add it to the detail page layout for your object.
Take the following steps to add S-Docs Action Button to Quote Object Page Layout:
- In your Salesforce org, click
 and select Setup. The Setup homepage opens.
 - Under Object Manager, click the Zuora CPQ Quote (zqu__Quote__c) object.
- Click Page Layouts in the left navigation menu, and click Quote Layout - Default V8.0 layout. This layout determines the components exposed on the Quote Detail page for a New Subscription Quote.
- From the box at the top in the main region, click Buttons in the left pane or Mobile and Lightning Actions if using Salesforce Lightning.
- Drag and drop the S-Docs-Action button in the Salesforce Mobile and Lightning Experience Actions section.
- Click Save to save the configuration.
- Repeat steps 3, 4, 5, and 6 for Quote Layout - Amendment v8.0 and Quote Layout - Renewal V8.0.
What to do next
After S-Docs is installed and configured, you can create templates in S-Docs. See Create templates in S-Docs for more information.
More information about S-Docs can be found in the following external documentation: Knowledge Base - S-Docs for Salesforce