Create MSQ in CPQ X
Create new Multi-Subscription Quote
You can create a new Multi-Subscription Quote from an opportunity, an account, or any other page that meets your business requirements. The below steps are based on the assumption that quotes are created from the Opportunity Detail or Account Detail page.
Both ramp deals and non-ramp deals are supported.
Prerequisites
- Before starting using MSQ, ensure that your Salesforce administrator has completed all necessary configuration.
- Familiarize yourself with the Quote Studio page. See MSQ Quote Studio user interface to learn different components, icons, and additional actions you can take in Quote Studio.
- Ensure that the opportunity against which you want to create a quote has been associated with an account.
- The New Quote (New) button has been added to the Opportunity Detail or Account Detail page. See Configure Opportunity, Account, and Quote page layouts for more information.
- The Multi Sub Preview and Multi Sub Send to Zuora buttons have been added to the MSQ Quote Detail page. See Configure Opportunity, Account, and Quote page layouts for more information.
Points to remember
- By default, Subscription 1 will be in the expanded view, while other subscriptions will be in the collapsed view.
- Loading time for preview metrics is dependent on the number of subscriptions.
- The success message notification for sending the quote to Zuora will take some time to load, and the duration is influenced by the number of subscriptions.
Procedure
Take the following steps to create a new subscription:
- In your Salesforce org, navigate to the Account Detail page of an account or the Opportunity Detail page of an opportunity.
- Click the New Quote (New) button.
- In the area of Step 1: Select a Billing Account, select a billing account from the table.
- In the area of Step 2: Select a Subscription, click New Multi-Sub Quote on the right.
- In the resulting dialog box, enter the number of subscriptions you want to create.
- Click Create.
The Multi-Subscription Quote page shows the specified number of subscriptions. For instance, if you provided two subscriptions, two distinct subscriptions will be presented as Subscription 1 and Subscription 2. These will be collectively labeled as Associated Subscriptions ({Number of subscriptions}). - Click
 in the Quote Summary card at the top to review and configure the parent quote information in the expanded view, including the quote name, associated account and opportunity, the valid period of the quote, and whether it is a primary quote.

- Access the summary of the quote by clicking View Parent Quote Summary.
- The first subscription will be in expanded view where you can review and configure basic information of the subscription, including the subscription type, terms and conditions, whether it is a ramp deal, and billing information.
- If you want to create a ramp deal:
- Switch the Ramp toggle to the on position.
- Select the length of ramp intervals from the Ramp Interval Length dropdown list. The ramp intervals are determined based on the quote start date and ramp interval length.
Note: if you select Specific Months, you must also specify the Specific Ramp Frequency field that indicates how many months are included in a ramp period.
- If you want to create a non-ramped subscription, switch the Ramp toggle to the off position.
- If you want to create a ramp deal:
- Select the products and rate plans on which the subscription is created.
- Enter the keyword in the search bar to search for existing product rate plans, then select the target product rate plan from the dropdown list. The selected product rate plan charges are then added to the table. Repeat this step until you have added all intended one-time charges.
- Alternative to using the keyword to search for items, you can leverage the Browse Products button to select product rate plans.
- Click Browse Products.
- Find the product and rate plan upon which the subscription quote will be created, hover over the rate plan, and click
 . Repeat this step until you have added all intended product rate plans.
You can define the sequence in which charges are displayed within a Quote Rate Plan. For more information, see Sequence charges within a Quote Rate Plan. - Click Add Selections. The selected product rate plan details and charge metrics are then displayed. For ramp deals, you can click different ramp interval tabs to view the charge information and charge metrics for each ramp interval.
- (Optional) Repeat the steps 10 and 11 for the Subscription 2.
- Preview quote metrics.
- If the Enable Preview On Demand Quote Studio admin setting is not enabled, you can click the amount in the Charge Subtotal column to see the charge breakdown by billing period. See the following screenshot as a sample charge breakdown modal.
- If the Enable Preview On Demand Quote Studio admin setting is enabled, the metrics for each item in the Charge Subtotal column are not calculated in real-time. Instead, the Preview Metrics button is displayed at the bottom of the page. You can click this button to preview quote metrics on demand. See Enable Preview On Demand for more information.
- (Optional) To preview the charge metrics, click
 on the right. The Total Contracted Billing (TCB) and Monthly Recurring Revenue (MRR) metrics are available for preview, including:
- Gross TCB
- Discount TCB
- Net TCB
- Gross MRR
- Discount MRR
- Net MRR
- (Optional) To review all changes made to the subscription or non-subscription items, click
 on the right. The following screenshot is an example of the logged changes to a subscription.
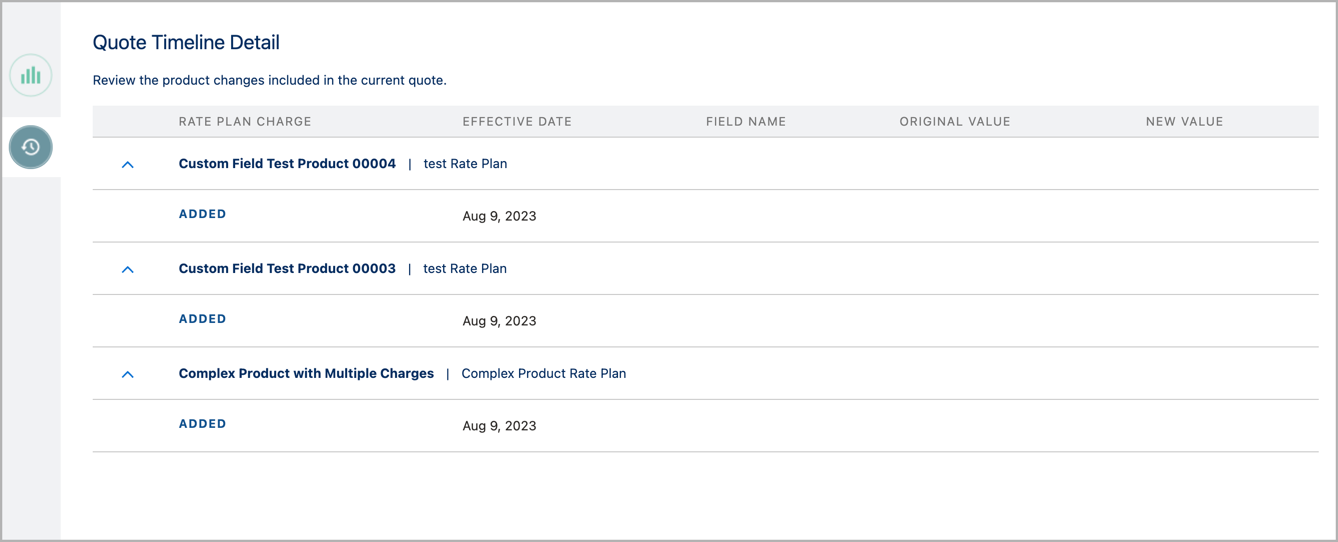
The sidebar will display the charge metrics and any changes made that are associated with the subscription currently in the expanded view. To illustrate, if Subscription 2 is expanded, the sidebar details will exclusively pertain to Subscription 2.
- Click Submit. The configuration is then submitted successfully.
- To preview the MSQ quote, click the Multi Sub Preview using the quick action buttons on the MSQ Quote Detail page.
- To send the MSQ quote to Zuora, click Multi Sub Send to Zuora using the quick action buttons on the MSQ Quote Detail page.
Create amendment or renewal quote in MSQ
Procedure
Take the following steps to create an amendment or renewal quote in MSQ:
- In your Salesforce org, navigate to the Account Detail page of an account or the Opportunity Detail page of an opportunity.
- Click the New Quote (New) button.
- In the area of Step 1: Select a Billing Account, select a billing account from the table. After a billing account is selected, all subscriptions associated with this account are displayed in Step 2: Select a Subscription area.
- Select the desired subscriptions by checking the checkbox on the left side of each subscription.
- (Optional) You can also Click the Amend
 or Renew
  icon to create an amendment or renew a subscription, similar to a single quoting flow.
 - Click Amend Selected Subscriptions or Renew Selected Subscriptions button. The system will fetch subscription products from Zuora in the background and load products to the amendment or renewal quote once the process is complete.

- Configure quote information and submit the configuration upon completion.