Integration setup in Zephr console
The Billing extension allows you to use Zuora Billing and other third-party services as the payment provider for your subscription services. This extension also allows you to create multiple testing environments apart from the conventional staging and live environments. These environments can be linked to a specific domain with unique payment provider keys. This ensures meticulous and efficient testing across varied environments while maintaining the security and flexibility needed for successful development and deployment.
Currently, the option to test with multiple environments is available only when Zuora Billing is selected as your default payment provider.
Step 1. Add user attributes
- Navigate to Identity > User Attributes.
- Add attributes for First Name and Last Name, and make sure these are both of type Text.
Step 2. Configure and activate the Billing extension
- Navigate to Settings > Extensions.
- Select the Billing extension.
- Select the required environment, such as Live Environment. The selected environment screen is displayed as shown in the following image:
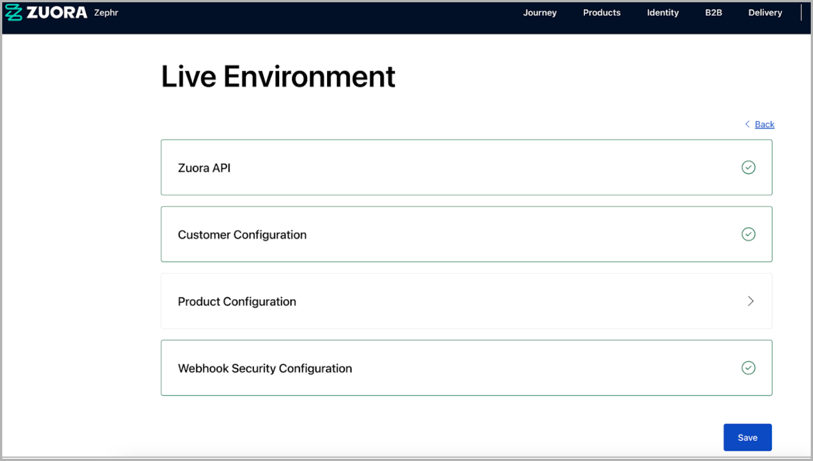
- On the Zuora API tab, enter a Zuora Client ID, Client Secret and the Zuora API URL for the environment you want to integrate.
To access the Zuora Payment Form Publishable Key field, the feature flag, feature.dynamicHostedPaymentForms.enabled, must be enabled. If it’s not, you can contact Zuora Support to have this field enabled.
- You can create a Zuora client ID and client secret code in the Zuora console by clicking on your profile icon in the top right corner and then navigating to Administration > Manage Users. On the Users page, open the details page of the Zuora user and scroll to the bottom of the page. You can then create a client credential by clicking Create. For more information, see the Manage OAuth 2.0 clients topic in the Zuora Knowledge Center.
- You can enter the API endpoint of your Zuora tenant in the Zuora API URL field. For a list of the available API endpoints, see Zuora Data Centers for more information.
- You can enter the publishable key from Zuora Billing in the Zuora Payment Form Publishable Key field to integrate and display your custom payment form in Zephr.
Once integrated, you can use the payment form directly on a Zephr payment page (Delivery > Component Library) and subsequently on your website.
- On the Customer Configuration tab, complete the following fields:
- Add the slugs for the first and last name user attributes you added in the Add user attributes section.
- Enter the CRM system key, for example, from Salesforce or another external CRM in the CRM Foreign System Key field. Once this key is configured and saved, any new subscribers using the Zuora Billing payment provider will automatically have their crm_id set in their Zuora Billing Account. This crm_id links the Zephr subscriber profile with the external CRM record, enabling streamlined identity and account management.
Zephr pulls billing information from Zuora at both the account and subscription levels, depending on the context:- Account-level data is used to sync user information such as custom fields, CRM ID, and account name.
- Subscription-level data is used to determine what the customer currently has access to in Zephr, including new subscriptions, subscription status, any changes that result in access being granted or revoked, and so on.
- Set the communication profile for your site. For information, see Communication profiles.
To ensure that any end-user experience orchestrated by Zephr using CRM ID, subscription ID, or custom fields functions correctly, this configuration must be completed.
- On the Product Configuration tab, complete the following fields:
- You can leave the Product IDs to be managed by Zuora Billing section with an empty array (`[]`). You need to specify the Zephr product IDs that will be mapped to the products in Zuora in the array.
- The Courtesy grant duration field allows you to control the access to the content that users receive. Zephr will add a full product grant for the billing period once a callout notification is received that card details have been successfully charged. This process can take up to 60 mins. If you have an alternative arrangement (e.g. you only run billing and charge cards overnight), please allow enough time in the courtesy grant to ensure users can access content until their details are charged.
- Run billing and collect payment immediately - Enable this setting if you wish to charge end users’ cards as soon as they subscribe.
- Use Zuora Billing Products V2 API - Enable this setting only if you are integrating directly with the Zuora Billing Products V2 API. Do not activate this option if you are using Zephr API forms, as it may lead to compatibility issues.
- Use charge start & end dates to sync grants for canceled subscriptions (standard behaviour is to use processed and invoiced through dates) - Enable this setting to allow Zephr to sync user grants based on the charge start and end dates, instead of the default processed through and invoiced through dates. When enabled, the grants for canceled subscriptions will retain the original start date and correctly reflect the subscription’s end date. Previously, canceled grants displayed a new start date, making it difficult to track the original subscription period in the Zephr console.
- Force all change subscription actions to be effective at end of billing period - Enable this setting to control the timing of subscription changes by forcing all changes, such as upgrades or downgrades, to take effect only at the end of the current billing period. By default, Zephr applies these changes immediately and prorates any price differences on the next invoice. This new option helps maintain consistent billing behavior and can be useful for businesses that prefer changes to align with billing cycles.
- On the Webhook Security tab, add the basic authentication details you chose when setting up the Callout Notifications in the Zuora console.
Note: For the Realm field, you must specify the same value that is specified for the Domain field in Zuora. - Click the Payment Configuration tab and define your custom overrides using a JSON structure. This helps you override the default payment gateway on a per-site basis, providing greater flexibility for multi-site setups. You can specify accepted payment methods for each site by supplying a Gateway ID from your Zuora Billing tenant. If no override is provided, Zephr will default to the billing tenant’s standard gateway configuration. These overrides support a wide range of use cases:
- Assign specific payment gateways to individual sites and payment methods.
- Use dedicated gateways for select payment types, for example, PayPal, Google Pay.
- Customize gateway assignments for only a subset of sites, for example, Site 2, Site 4, and Site 7.
Sample:
{
  "site1": {
    "CreditCard": "gateway_id_1",
    "PayPal": "gateway_id_2"
  },
  "site2": {
    "GooglePay": "gateway_id_3"
  }
}
Where;
- site1, site2: Site identifiers within Zephr
- CreditCard, PayPal, GooglePay: Supported payment methods
- gateway_id_x: Corresponding gateway ID in your Zuora Billing environment. The Gateway ID must come from your Zuora Billing tenant.
- You can configure overrides for any combination of site and payment method. All unspecified combinations fall back to the tenant’s default gateway.
- Only payment methods supported by Zuora Hosted Payment Pages (HPM) or Dynamic Payment Pages (DPM) are supported. For unsupported methods (like ACH), you would need to build a custom integration.
- Click the Subscription Management tab and enable self-service subscription actions. This is done by exposing an authenticated endpoint that integrates with the Zuora Orders API. Based on your configuration, this enables you to perform key subscription actions directly from the front end. The following order actions can be supported (depending on your configuration and implementation):
- Create Subscription
- Terms & Conditions
- Add Product
- Update Product
- Remove Product
- Renew Subscription
- Cancel Subscription
- Owner Transfer
- Suspend / Resume
- Change Plan
- On the Subscription Management tab, complete the following fields:
- Select the Subscription Management checkbox.
- Select the required actions from the list.
- Click Done.
- Build or configure front-end UI components, such as buttons, forms, to call the Zephr API securely, using an authenticated user session.
- If no frontend integration is done, your users won’t see or interact with any of these actions, even though they’re technically enabled.
- Enabling the Subscription Management checkbox in Zephr exposes a secure HTTP endpoint (/subscriptions/{subscriptionId}/manage) that allows your developers to build custom components or integrations for end users to perform these actions from the front-end.
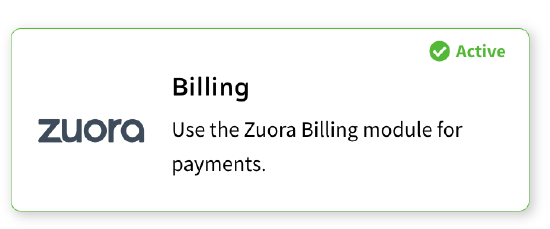
- On the Billing extension main options page, click the Use as Payment Provider button to activate the extension. The extension is successfully activated if you see the Active icon on the Billing extension card.
You can now move on to configure your products in Zephr.
Step 3. Create Zephr products
With Zuora Billing enabled, each payment option in Zephr maps to a product rate plan in Zuora. The following information forms the title of a Zephr payment option:
- Zuora product name
- Zuora product rate plan name
- Zuora product rate plan ID
To create Zephr products, perform the following:
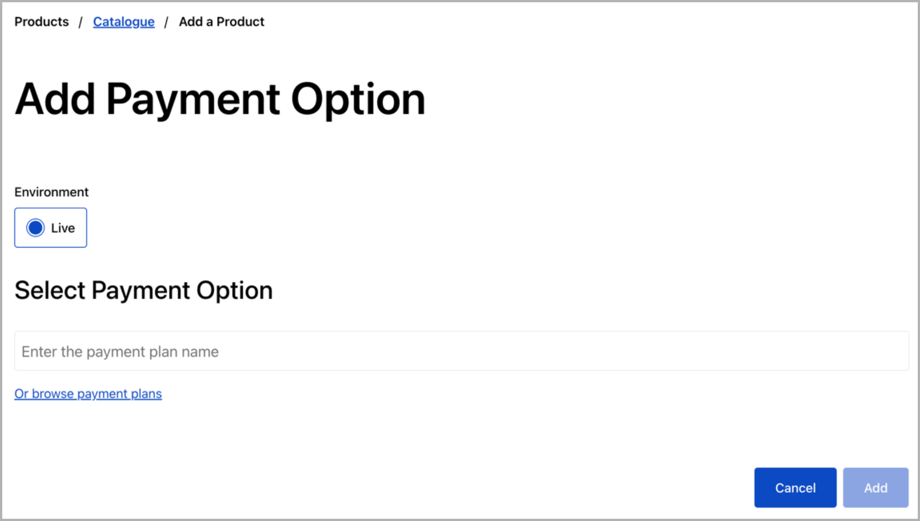
- Navigate to Products > Catalogue.
- Click Add a Product and create the Zephr products you need. The products may well match 1:1 with your Zuora products. In each product, be sure to add the relevant Zephr features. To add rate plans as payment options, click Add a Payment Option; you can either start typing in the search box to find the relevant rate plan or browse an alphabetical list.
- Once you have created your products, you must add the product IDs to the Zuora extension. Product IDs are the slugs of your products. Navigate back to the Zephr Product Grant Configuration setting page in the Zuora extension, and then add the product IDs under Zephr Products IDs as an array of strings. For example, if you have two product IDs – “gold” and “silver”, specify the following as the value:
[“gold”, “silver”].
Step 4. Create payment form pages
After you have mapped your Zephr products with the products created in Zuora, you can start building paywalls for your features. To build the paywall, you need to use the Payment Form, previously known as Frictionless Checkout Form.
Important Note: You can follow the general flow documented in Payment Form to create payment forms (previously known as Frictionless Checkout Form) for your features. However, the payment form is customised for the Zuora Billing integration. Make sure that you go through the following required configurations that are unique to the Zuora Billing integration:
- On the Products & Payment Plans tab, you can specify the currency in which the payment options are available. This allows you to set up payment forms that can be used for different regions.
- Note that after you have selected a currency, you can only choose to add payment options that are available in that currency. You can change the currency to another one after selecting the payment options. However, an error would appear if some of the selected payment options are unavailable in the newly selected currency.
- When adding a payment option, an auto-generated description will be filled into the Description field. The content is retrieved from the corresponding Zuora product rate plan. You can update the description as needed.
- Under the Zuora Hosted Payment Page section on the Payment tab, you must embed a Zuora Hosted Payment Page into the payment form. You need to enter the Payment Page ID and Hosted Page URL to embed the Hosted Payment Page. This information can be retrieved on the Hosted Pages setting page in the Zuora console.
- Navigate to Hosted Pages by clicking your profile icon in the top right corner and then clicking Payments > Setup Payment Page and Payment Link. Scroll down to the Page List section to locate the page you want to use. You can retrieve the page ID by clicking the Show Page ID button. To retrieve the Hosted Page URL, open the page you need and move to the Implementation Details section.
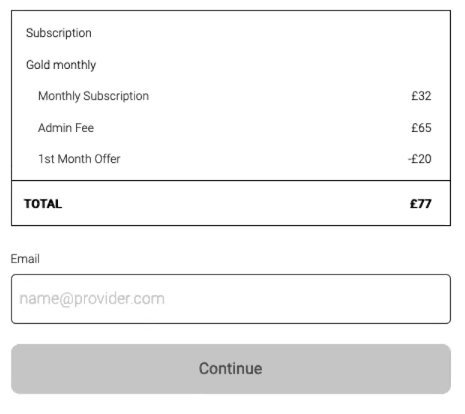
In addition, when your end users use the payment form to checkout, all the charges are listed in the Subscription Details section, as shown in the example below. The amounts are calculated by Zuora.
The Subscription Information section of the end user’s Preference Centre page displays details of the product rate plans purchased by the users.
Communication profiles
Communication Profiles allow you to define the branding, messaging, and notification rules that apply when a customer interacts with your brand. Each brand corresponds to a site, and a Communication Profile ensures that all communications associated with that site are delivered with the correct branding and configuration.
Each Communication Profile is identified by a system-generated unique identifier (UID). This UID, rather than the display name, is used to map the site to its associated Communication Profile. The mapping is maintained in a simple JSON configuration, where the site name is paired with the UID of the Communication Profile. This ensures that the correct configuration is always applied, even if the profile name changes.
When configured, the mapping enables Zephr to automatically route communications for a given site through the correct Communication Profile. This means that customer notifications such as subscription confirmations, renewals, and other system-generated communications are consistently aligned with the branding and messaging defined in the profile.
Setting up communication profiles
- Navigate to Delivery > Sites.
- Copy the site name for which you want to set the communication profile.
- Navigate to Settings > Extension > Zuora Billing > Customer Configuration.
- In the Communication Profile configuration section, enter the JSON mapping in the following format:
{
  "siteName1": "communicationProfileUID1",
  "siteName2": "communicationProfileUID2"}
For example:
{"ABCNews": "764hegdfghjgwfyw6t46",
"ABCMagazine": "a1b2c3d4-e5f6-7890-gh12-ijklmnopqrst"
}
In this example:
siteNamerepresents the configured site.communicationProfileIdis the unique identifier of the Communication Profile created in Zuora Billing.
When a customer interacts with a site, Zuora Billing checks the JSON mapping to find the Communication Profile UID associated with that site. The system then applies the corresponding Communication Profile to all notifications and communications generated for that customer. This ensures that the correct branding and configuration are always applied.
You can retrieve the unique identifier (UID) from Zuora through REST API endpoint. For more information, see Retrieve an account.
Implementation Checklist
To enable a complete billing integration between Zephr and Zuora Billing, ensure the following:
- OAuth credentials (Client ID/Secret) and API URL are set up.
- Payment form settings:
- If you're using the newer hosted payment form (created via Zuora > Payments > Setup Payment Forms and Payment Links), ensure the publishable key is configured.
- If you're using the legacy Hosted Payment Method (HPM 2.0), the Hosted Page URL and Hosted Page ID must be configured in Zuora.
- User attributes for first name and last name are mapped.
- (Optional) CRM Foreign System Key is set, if syncing with an external CRM.
- Zephr products are mapped to Zuora product rate plan IDs.
- Create a Zephr product and map the relevant Zuora rate plan (representing a payment option).
- Courtesy grant logic is configured based on billing timing.
- Webhooks and Realm are set up in Zuora (under the relevant screen) to trigger updates in Zephr. The realm value in Zephr should match the Domain value in Setup Profiles, Notifications, and Email Templates screen in Zuora.

- Ensure the product and rate plan structure in Zuora is compatible with Zephr products and features.