Forms
Zephr offers out-of-the-box form building to create a Registration/Login or Data Capture form in minutes, without the need to write any code.
These forms can be dropped in to any Feature Rule so they display on your site, when and where you want them to.
Click the links below to find out more:
- Creating a Registration Form
- Creating a Data Capture Form
- Using Hidden Fields in a Form
Creating a Data Capture Form
A Data Capture form is an out of the box Zephr form that allows you to gather additional information on your users that you don’t gather within the Registration or Login form. The form can display in two ways, depending on the user state, and the information your User has provided before.
If you have an anonymous user, or your users has not provided information before for the fields in your data capture form, the form will display blank.
If you user has provided information before, this information will be displayed in the form fields, and the user can either confirm it by clicking save, or edit it as needed.
How to Create a Data Capture Form
In this tutorial you will learn the steps required to Create a Data Capture Form within Zephr.
Select UI > Forms, then choose Add Form.

Fill out the details on this page. Give your form a title and click the text to modify the slug if required.
Internal Description is an internal reference for the Administrator, whilst the Public Description is a WYSIWYG to add copy to the form, above the form fields, for the end users.
Leave the Registration/Sign in Form option unchecked. This will mean that the form is for Data Capture, rather than registration and sign in.
Select the Add Fields button and any Available Fields previously created in the User Schema within the Creating a User Schema tutorial, will be shown in rows. Select the fields required by selecting the relevant Add button.

For each field you Add, a modal window will appear and allow you to set whether the field is required, as well as provide default values and placeholder text. Once you’ve added this, click Save Field.

Each field you have selected will now appear in a row within the Fields section where it can be Edited or Removed by clicking the appropriate button. You can also drag these fields to order them as you wish.

If Removed, a field will return to the Available Fields rows within the section below.
Under Form Style you have the option to choose the way your form display on a page. By default the Inline Form style is used. This form will replace the piece of feature content tagged by your Zephr tags.
The next option, Fixed Banner, fixes the form as a banner to the bottom of your page, so it is always in view when scrolling.
The final option, Custom, defaults to the Inline Banner style, but allows you to add custom CSS to the form, to style it how you choose.
Once you’ve chosen your style, click save.
This form will now be available as a Transformation within your Zephr Feature Rule Builder.
Creating a Registration Form
A Registration Form in Blaize works as both a registration form and a login form. Registration forms can be created in minutes by choosing fields from your User Schema to display as form fields, alongside pre-created fields for an email address, password, and social sign in, if relevant.
How to Create a Registration Form
From the main left-hand side navigation menu, select UI > Forms. Then click Add Form.

Fill out the details on this page. Give your form a title and click the text to modify the slug if required.
Internal Description is an internal reference for the Administrator, whilst the Public Description is a WYSIWYG to add copy to the form, above the form fields, for the end-users to read.
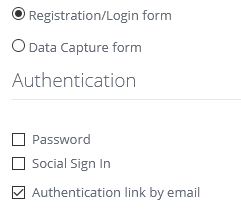
Below this WYSIWYG, check the Registration/Login Form option.
Once checked, a section titled Authentication will display.
This section gives you the option to choose your User Authentication method, with options to authenticate by Password, Social Sign In, or by an Authentication Link sent via email.
To see the Authentication by Link option, you will need to set your instance of Zephr to require email verification. This setting is managed within your Identity Management settings.
The Authentication options for Password, Social Sign In, and Authentication Link by Email can all be used in conjunction with one another and will display in the order shown below.
Enabling Social Sign In will allow you to configure your form to allow Registration and Login via Facebook, Google, LinkedIn, and Microsoft. Read our OAuth2.0 guide to configure each option.
There is also an option to Allow Registration Codes for Account Membership. This will add a field to your Registration form for Users who have been given an access code for a Corporate Account. Find out how to use this in our Corporate Accounts guide.
Following your Authentication setup, it is time to add the fields for your form to display. Select the Add Fields button and any Available Fields previously added to your User Schema will be shown. Select the fields required by selecting the relevant Add button.
For each field you Add, a modal window will appear and allow you to set whether the field is required, as well as provide default values and placeholder text. Once you’ve added this, click Save Field.
Each field you have selected will now appear in a row within the Fields section where it can be Edited or Removed by clicking the appropriate button. You can also drag these fields to order them as you wish.
If Removed, a field will return to the Available Fields rows within the section below.
Under Form Style you have the option to choose the way your form display on a page. By default the Inline Form style is used. This form will replace the piece of feature content tagged by your Zephr tags.
The next option, Fixed Banner, fixes the form as a banner to the bottom of your page, so it is always in view when scrolling.
The final option, Custom, defaults to the Inline Banner style, but allows you to add custom CSS to the form, to style it how you choose.
Once you’ve chosen your style, click save.
This form will now be available as a Transformation within your Zephr Feature Rule Builder.
Note it is possible to use reCAPTCHA on Zephr Registration Forms. Read our reCAPTCHA guide to find out more.
Using Hidden Fields in a Form
Hidden fields allow you to add and set a field not seen by end users within a Zephr form.
If you’re using a single Zephr Identity Store and sharing users across multiple sites, adding a hidden field to a registration form is the perfect place to note which site a user is registering on.
Using Hidden Fields
In this example, we’ll add a Hidden Field to a Registration Form, with the information in the Hidden Field relating to the site that a user had registered on. These instructions can be used for adding any hidden field, with the field available to be added to any out-of-the-box Zephr form.
To begin with, set up a Hidden Field within your Zephr User Schema. To do this, navigate to Settings > Identity Management within your Zephr Admin Console, and scroll down User Schema. Click Add Attribute, and fill in the details for the field you wish to keep hidden. For Type, choose the Hidden option. Once complete, click Add Attribute. This attribute is now part of your user schema, and can have data stored against it for each user.
Once you’ve saved the attribute, navigate to UI > Forms. Locate the form you wish to add the field to from the list, or if you’re starting from scratch, click Add Form.
Add any relevant fields required to your form. When you make it to the Fields section, click Add Fields, and choose your new Hidden user attribute from the list.
A modal called Edit Field will appear. In this modal, set the Default Value for this field. This should be the information you wish to have stored against the attribute. So, if the field is meant to state the site a user has registered on, add the name of the site as this Default Value.

Click Save Field.
Save your Registration Form and add it, as required, into your Feature Rules flow. From now on, when a user fills in this form, the field (unseen by end users) will be filled in with the default value.
Viewing information from Hidden Fields
Information added to a user’s profile via hidden fields can not be viewed on their Zephr User Profile within the Identity section of the site. To view this information, you’ll need to download a copy of your user base.
Do this by navigating to Settings > Identity Management and scrolling down to Export User. Click the download button and you will receive a JSON download of your user base. This will include the Hidden Field details for each user, where applicable. This information can also be shared when connecting to third party integrations, such as a CRM.